If you have questions or comments, contact us. Pour toute question ou tout commentaire, nous contacter. Si tiene dudas o comentarios, contáctenos. 1-800-4-DEWALT • www.dewalt.com INSTRUCTION MANUAL GUIDE D’UTILISATION MANUAL DE INSTRUCCIONES DCGG571 20V Max* Grease Gun Pistolet graisseur 20 v max* Pistola engrasadora de 20V Max* INSTRUCTIVO DE OPERACIÓN, CENTROS DE SERVICIO Y PÓLIZA DE GARANTÍA. ADVERTENCIA: LÉASE ESTE INSTRUCTIVO ANTES DE USAR EL PRODUCTO.
SAVE ALL WARNINGS AND INSTRUCTIONS FOR FUTURE REFERENCE Definitions: Safety Guidelines The term “power tool” in the warnings refers to your mains-operated (corded) power tool or battery-operated (cordless) power tool. 1) WORK AREA SAFETY a) Keep work area clean and well lit. Cluttered or dark areas invite accidents. b) Do not operate power tools in explosive atmospheres, such as in the presence of flammable liquids, gases or dust. Power tools create sparks which may ignite the dust or fumes.
) POWER TOOL USE AND CARE a) Do not force the power tool. Use the correct power tool for your application. The correct power tool will do the job better and safer at the rate for which it was designed. b) Do not use the power tool if the switch does not turn it on and off. Any power tool that cannot be controlled with the switch is dangerous and must be repaired.
6) SERVICE a) Have your power tool serviced by a qualified repair person using only identical replacement parts. This will ensure that the safety of the power tool is maintained. Additional Safety Rules for Grease Guns • Parts of the tool or the hose assembly can break or rupture due to high pressure. Risk of serious injury may occur. Before using, always inspect the tool and hose assembly for damage or wear. Never use if any part of the tool is damaged or worn. • Use only DEWALT-approved flexible hoses.
English • crystalline silica from bricks and cement and other masonry products, and • arsenic and chromium from chemically-treated lumber. Your risk from these exposures varies, depending on how often you do this type of work. To reduce your exposure to these chemicals: work in a well ventilated area, and work with approved safety equipment, such as those dust masks that are specially designed to filter out microscopic particles.
SPECIFIC SAFETY INSTRUCTIONS FOR LITHIUM ION (Li-Ion) • Do not incinerate the battery pack even if it is severely damaged or is completely worn out. The battery pack can explode in a fire. Toxic fumes and materials are created when lithium ion battery packs are burned. • If battery contents come into contact with the skin, immediately wash area with mild soap and water. If battery liquid gets into the eye, rinse water over the open eye for 15 minutes or until irritation ceases.
English to your local retailer for recycling. You may also contact your local recycling center for information on where to drop off the spent battery. RBRC™ is a registered trademark of the Rechargeable Battery Recycling Corporation. • These chargers are not intended for any uses other than charging DEWALT rechargeable batteries. Any other uses may result in risk of fire, electric shock or electrocution. • Do not expose the charger to rain or snow.
• • • • • Chargers Your tool uses a DEWALT charger. Be sure to read all safety instructions before using your charger. Consult the chart at the end of this manual for compatibility of chargers and battery packs. Charging Procedure (Fig. 1) 1. Plug the charger into an appropriate outlet before inserting the battery pack. 2. Insert the battery pack (P) into the charger, as shown in Figure 1, making sure the pack is fully seated in charger.
PACK CHARGING LEAVING THE BATTERY PACK IN THE CHARGER The charger and battery pack can be left connected with the charge indicator showing Pack Charged. PACK CHARGED WEAK BATTERY PACKS: Weak batteries will continue to function but should not be expected to perform as much work. English Indicator Light Operation FAULTY BATTERY PACKS: This charger will not charge a faulty battery pack. The charger will indicate faulty battery pack by refusing to light or by displaying problem pack or charger.
SAVE THESE INSTRUCTIONS FOR FUTURE USE COMPONENTS (Fig. 2, 5) WARNING: Never modify the power tool or any part of it. Damage or personal injury could result. FIGURE 2 A. Variable speed trigger switch O. Retaining slot B. Lock-off button P. Battery C. Handle Q. Battery release button D. LED worklight R. Rubber feet E. LED worklight button S. Hose clip F. Top cap T. Shoulder strap mount G. Flexible hose U. Shoulder strap clip holes H. Flexible hose safety spring guard V. Filter I.
FIG. 2 INTENDED USE This grease gun is designed for professionally dispensing lubricant. DO NOT use under wet conditions or in presence of volatile flammable liquids or gases. This grease gun is a professional power tool. DO NOT let children come into contact with the tool. Supervision is required when inexperienced operators use this tool. English U E D F LED Worklight (Fig. 2, 3) G There is an LED worklight (D) located on the top cap (F).
Variable Speed Trigger Switch (Fig. 2, 4) WARNING: The grease gun may generate high pressure. Do not remove or tamper with the pressure relief valve. Serious injury may occur. Shoulder Strap (Fig. 2) Your grease gun comes with a shoulder strap. Hook the shoulder strap clips into the shoulder strap clip holes (U) found on the shoulder strap mount (T).
English 4. Remove the seal from the other end of the grease cartridge. 5. Thread the grease tube assembly (N) back into the grease gun and screw it in securely. 6. Release the grease tube rod (M) from the retaining slot (O) and slowly press it back into the tube. 7. Use the purge valve (X, Fig. 5) to bleed off any air that may be trapped in the cartridge. Refer to Purging Air Pockets. IMPORTANT: The grease gun will lose its prime if there are air pockets in the lubricant. 3.
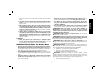
7. Use the purge valve (X, Fig. 5) to bleed off any air that may be trapped in the cartridge. Refer to Purging Air Pockets. FILLER PUMP FILLING FROM A BULK CONTAINER (FIG. 5, 6, 9) FIG. 9 This tool comes with a 1/8" NPT fill port (Z, Fig. 5) for attaching a low pressure fill coupler onto the unit. WARNING: Never thread a highpressure coupler onto the grease gun’s 1/8" NPT fill port. Serious injury may occur due to excessive pressure. Use low-pressure couplers only.
English NOTE: This tool has been tested at the factory, which may result in a small amount of grease left in the grease tube and hose assembly. It is recommended to purge the tool with the brand of grease to be used before first use. FUEL GAUGE BATTERY PACKS (FIG. 11) Some DEWALT battery packs include a FIG. 11 fuel gauge which consists of three green FF LED lights that indicate the level of charge remaining in the battery pack. To actuate the fuel gauge, press and hold the fuel gauge button (FF).
water and mild soap. Never let any liquid get inside the tool; never immerse any part of the tool into a liquid. BATTERY CLEANING INSTRUCTIONS Dirt and grease may be removed from the exterior of the battery using a cloth or soft non-metallic brush. Do not use water or any cleaning solutions. WARNING: Never use solvents or other harsh chemicals for cleaning the battery. These chemicals may weaken the plastic parts.
English Cleaning Contamination from the Filter (Fig. 2, 13) Should the grease gun fail to dispense FIG. 13 grease, clean the filter (V). NOTE: If there is still grease in the tube, open the purge valve prior to pulling the tube handle. 1. Pull the grease tube handle (L) out V as far as it will go, then secure the grease tube rod (M) into the retaining slot (O) by moving the rod to the side. Ensure the rod is placed securely in the slot to prevent it from disengaging. 2.
Three Year Limited Warranty DEWALT will repair, without charge, any defects due to faulty materials or workmanship for three years from the date of purchase. This warranty does not cover part failure due to normal wear or tool abuse. For further detail of warranty coverage and warranty repair information, visit www.dewalt.com or call 1-800-4-DEWALT (1-800-433-9258). This warranty does not apply to accessories or damage caused where repairs have been made or attempted by others.
TROUBLESHOOTING English Problem Unable to pull back rod Unable to push rod forward No grease when trigger is pulled Possible Cause Possible Solution Vacuum build up Unscrew the purge valve to release vacuum. Pressure build up Unscrew the purge valve to release pressure. Rod is still connected to plunger Rotate grease tube handle 90 degrees to disengage it. Grease tube is empty Add grease. Air pockets in the grease tube Refer to Purging Air Pockets.
avertissements et des directives pourrait se solder par un choc électrique, un incendie et/ou une blessure grave. Définitions : lignes directrices en matière de sécurité CONSERVER TOUS LES AVERTISSEMENTS ET TOUTES LES DIRECTIVES POUR UN USAGE ULTÉRIEUR Les définitions ci-dessous décrivent le niveau de danger pour chaque mot-indicateur employé. Lire le mode d’emploi et porter une attention particulière à ces symboles.
Français c) Empêcher les démarrages intempestifs. S’assurer que l’interrupteur se trouve à la position d’arrêt avant de relier l’outil à une source d’alimentation et/ou d’insérer un bloc-piles, de ramasser ou de transporter l’outil. Transporter un outil électrique alors que le doigt repose sur l’interrupteur ou brancher un outil électrique dont l’interrupteur est à la position de marche risque de provoquer un accident. d) Retirer toute clé de réglage ou clé avant de démarrer l’outil.
c) Débrancher la fiche de la source d’alimentation et/ou du bloc-piles de l’outil électrique avant de faire tout réglage ou changement d’accessoire ou avant de ranger l’outil. Ces mesures préventives réduisent les risques de démarrage accidentel de l’outil électrique. d) Ranger les outils électriques hors de la portée des enfants et ne permettre à aucune personne n’étant pas familière avec un outil électrique ou son mode d’emploi d’utiliser cet outil.
Français Changer le tuyau au premier signe d’usure, d’entrave ou de dommage. • Utiliser exclusivement la graisse recommandée dans ce manuel. Se reporter au tableau Informations techniques sous la section Utilisation du pistolet graisseur. • Pour réduire tout risque de dommages corporels graves, ne pas utiliser le pistolet graisseur à proximité ou sur des pièces ou mécanismes mobiles, ou des équipements en marche. • Prendre des précautions à proximité des évents, car ils cachent des pièces mobiles.
sfpm ..............pieds linéaires SPM (FPM) ....... fréquence par par minute (plpm) minute psi.................livres par pouce carré appareil de protection des voies respiratoires homologué par le NIOSH ou l’OSHA. Diriger les particules dans le sens opposé au visage et au corps. AVERTISSEMENT : pendant l’utilisation, porter systématiquement une protection auditive individuelle adéquate homologuée ANSI S12.6 (S3.19).
Français CONSIGNES DE SÉCURITÉ PROPRES AUX PILES AU LITHIUM-ION (Li-Ion) • Ne pas incinérer le bloc-piles même s’il est sévèrement endommagé ou complètement usagé, car il pourrait exploser et causer un incendie. Pendant l’incinération des blocs-piles au lithium-ion, des vapeurs et matières toxiques sont dégagées. • En cas de contact du liquide de la pile avec la peau, rincer immédiatement au savon doux et à l’eau.
Directives de sécurité importantes propres à tous les chargeurs de piles CONSERVER CES INSTRUCTIONS : ce manuel contient des directives de sécurité et d’utilisation importantes propres aux chargeurs de piles. • Avant d’utiliser le chargeur, lire toute consigne et tout avertissement apposés sur le chargeur, le bloc-piles et le produit utilisant le blocpiles. AVERTISSEMENT : risques de chocs électriques. Ne laisser aucun liquide pénétrer dans le chargeur, des chocs électriques pourraient en résulter.
Français • Ne pas démonter le chargeur. Pour tout service ou réparation, le rapporter dans un centre de réparation agréé. Le fait de le réassembler de façon incorrecte comporte des risques de chocs électriques, d’électrocution et d’incendie. • Débrancher le chargeur du secteur avant tout entretien. Cela réduira tout risque de chocs électriques. Le fait de retirer le bloc-piles ne réduira pas ces risques. • NE JAMAIS tenter de connecter 2 chargeurs ensemble.
FIG. 1 Dans cette éventualité, réinsérez le bloc-piles dans le chargeur. Si le problème persiste, essayez un autre bloc-piles pour déterminer si le chargeur fonctionne. Si le nouveau bloc-piles se recharge correctement, le bloc-piles initial est endommagé et doit être retourné dans un centre de réparation ou tout autre site de récupération pour y être recyclé. Si l’on obtient le même résultat avec le nouveau bloc-piles, faites vérifier le chargeur et le bloc-piles chez un centre de réparation agréé.
PROBLÈME AVEC LE SECTEUR Certains chargeurs présentent un voyant pour tout problème avec le secteur. Lorsque le chargeur est utilisé avec des blocs d’alimentation portatifs comme des génératrices ou des alternateurs, il pourrait temporairement s’arrêter de marcher, auquel cas un voyant rouge émet deux clignotements rapides suivis d’une pause. Cela indique que le bloc d’alimentation est hors tolérance. d.
FIG. 2 REMARQUE : les blocs-piles ne devraient pas être entreposés complètement déchargés. Il sera nécessaire de recharger le bloc-piles avant réutilisation. U CONSERVER CES CONSIGNES POUR UTILISATION ULTÉRIEURE E D F DESCRIPTION (Fig. 2, 5) AVERTISSEMENT : ne jamais modifier l’outil électrique ni aucun de ses composants, car il y a risques de dommages corporels ou matériels. T Q. Bouton de libération du bloc-piles R. Patins en caoutchouc S. Collier de serrage T.
USAGE PRÉVU Ce pistolet graisseur est un outil de professionnels conçu pour dispenser des lubrifiants. NE PAS l’utiliser en milieu ambiant humide ou en présence de liquides volatiles ou de gaz inflammables. Ce pistolet graisseur est un outil électrique de professionnels. NE PAS le laisser à la portée des enfants. Une supervision est nécessaire auprès de tout utilisateur non expérimenté. Gâchette à vitesse variable (Fig. 2, 4) BOUTON DE VERROUILLAGE ET GÂCHETTE Votre pistolet graisseur est équipé d’un FIG.
Bandoulière (Fig. 2) Votre pistolet graisseur peut être équipé d’une bandoulière. Accrochez les clips de fixation de la bandoulière aux points de fixation des clips de la bandoulière (U) sur le dispositif de fixation de la bandoulière (T).
FIG. 8 2. Tirez lentement la poignée du tube à graisse (L) pour aspirer le lubrifiant dans le pistolet graisseur. REMARQUE : s’assurer de bien maintenir l’extrémité ouverte du dispositif du tube à graisse suffisamment enfoncé dans le lubrifiant pour prévenir toute formation de poches d’air dans le tube à graisse. 3. Alors que la tige du tube à graisse (M) est complètement étirée, arrimez-la dans la rainure de fixation (O). 4.
Purge des poches d’air (Fig. 2, 5) IMPORTANT : les poches d’air dans le réservoir de graisse désamorcent le pistolet. Éliminez les poches d’air après chaque remplissage ou si le pistolet graisseur n’arrive plus à pomper la graisse. 1. Dévissez la valve de purge (X) sans la retirer, et laissez tout l’air s’échapper. 2. Resserrez la valve de purge (X). 3. Enlevez le capuchon du tuyau flexible (G) puis appuyez sur la gâchette à vitesse variable (A) 10 à 20 secondes. 4.
REMARQUE : cet outil a été testé en usine, et il se pourra qu’il reste un peu de graisse dans le tube à graisse et le dispositif tuyau. Avant tout usage initial, il est recommandé de purger l’outil avec la marque de graisse qui va être utilisée. TÉMOIN DE CHARGE DU BLOC-PILES (FIG. 11) Certains blocs-piles DEWALT possèdent FIG. 11 un témoin de charge qui consiste en trois FF voyants Del verts indiquant le niveau de charge du bloc-piles.
porter une protection oculaire conforme à la norme ANSI Z87.1 lors du nettoyage. AVERTISSEMENT : ne jamais utiliser de solvants ni d’autres produits chimiques puissants pour nettoyer les pièces non métalliques de l’outil. Ces produits chimiques peuvent affaiblir les matériaux de plastique utilisés dans ces pièces. Utiliser un chiffon humecté uniquement d’eau et de savon doux. Ne jamais laisser de liquide pénétrer dans l’outil et n’immerger aucune partie de l’outil dans un liquide.
Français 5. Une fois nettoyé, réinsérez le filtre dans la rainure ronde, en vous assurant qu’il est bien positionné, puis rattachez le dispositif du tube à graisse au pistolet graisseur. FIG. 12 Y 1. Retirez le capuchon de la soupape de retenue (BB), DD CC BB EE puis la rondelle (EE), le ressort (DD) et la bille de la soupape de retenue (CC). 2. Nettoyez la bille (CC) et autour de la soupape de retenue dans le moulage principal. 3. Réinstallez la bille (CC), le ressort (DD) et enfin la rondelle (EE). 4.
4-DEWALT). Cette garantie ne s’applique pas aux accessoires et ne vise pas les dommages causés par des réparations effectuées par un tiers. Cette garantie confère des droits légaux particuliers à l’acheteur, mais celui-ci pourrait aussi bénéficier d’autres droits variant d’un état ou d’une province à l’autre. En plus de la présente garantie, les outils DEWALT sont couverts par notre : Réparations Le chargeur et le bloc-piles ne sont pas réparables.
Français AMÉRIQUE LATINE : cette garantie ne s’applique aux produits vendus en Amérique latine. Pour ceux-ci, veuillez consulter les informations relatives à la garantie spécifique présente dans l’emballage, appeler l’entreprise locale ou consulter le site Web pour les informations relatives à cette garantie.
GUIDE DE DÉPANNAGE Problème Impossible de repousser la tige Cause probable Solution possible Présence de vide Dévisser la valve de purge pour supprimer le vide. Impossible de tirer la tige en avant Accumulation de pression Dévisser la valve de purge pour libérer la pression. Faire tourner la poignée du tube à graisse à 90 degrés pour la libérer. Le tube à graisse est vide Rajouter de la graisse. Poches d’air dans le tube à graisse Se reporter à la section Purge des poches d’air.
CONSERVE TODAS LAS ADVERTENCIAS E INSTRUCCIONES PARA FUTURAS CONSULTAS Definiciones: Normas de seguridad Las siguientes definiciones describen el nivel de gravedad de cada palabra de señal. Lea el manual y preste atención a estos símbolos. PELIGRO: Indica una situación de peligro inminente que, si no se evita, provocará la muerte o lesiones graves. ADVERTENCIA: Indica una situación de peligro potencial que, si no se evita, podría provocar la muerte o lesiones graves.
d) No maltrate el cable. Nunca utilice el cable para transportar, tirar o desenchufar la herramienta eléctrica. Mantenga el cable alejado del calor, el aceite, los bordes filosos y las piezas móviles. Los cables dañados o enredados aumentan el riesgo de descarga eléctrica. e) Al operar una herramienta eléctrica en el exterior, utilice un cable prolongador adecuado para tal uso. Utilice un cable adecuado para uso en exteriores a fin de reducir el riesgo de descarga eléctrica.
d) e) f) Español g) preventivas reducen el riesgo de encender la herramienta eléctrica en forma accidental. Guarde la herramienta eléctrica que no esté en uso fuera del alcance de los niños y no permita que otras personas no familiarizadas con ella o con estas instrucciones operen la herramienta. Las herramientas eléctricas son peligrosas si son operadas por usuarios no capacitados. Realice el mantenimiento de las herramientas eléctricas.
ADVERTENCIA: Use SIEMPRE lentes de seguridad. Los anteojos de diario NO SON lentes de seguridad. Utilice además una cubrebocas o mascarilla antipolvo si la operación de corte genera demasiado polvo. SIEMPRE LLEVE EQUIPO DE SEGURIDAD CERTIFICADO: • protección ocular ANSI Z87.1 (CAN/CSA Z94.3), • protección auditiva ANSI S12.6 (S3.19), • protección respiratoria NIOSH/OSHA/MSHA.
Español no ....................velocidad sin …/min ..........por minuto IPM ..............impactos por ........................carga .....................minuto .....................terminal de sfpm .............pies de superficie ........................conexión a .....................por minuto ........................tierra RPM .............revoluciones .....................símbolo de .....................por minuto ........................advertencia BPM .............golpes por minuto ..................
lesiones corporales graves. Consulte la tabla al final de este manual para ver la compatibilidad entre baterías y cargadores. • Cargue las unidades de batería sólo en los cargadores designados por DEWALT. • NO salpique con ni sumerja en agua u otros líquidos. • No guarde ni use la herramienta y unidad de batería en lugares donde la temperatura pueda alcanzar o superar los 40 °C (105 °F), tales como cobertizos o construcciones de metal durante el verano).
áreas, es ilegal depositar baterías de níquel cadmio, níquel e hidruro metálico o de iones de litio gastadas en la basura o la corriente de residuos sólidos urbanos; el programa RBRC proporciona una alternativa ecológica. RBRC™, en cooperación con DEWALT y otros usuarios de baterías, han establecido programas en los Estados Unidos y Canadá para facilitar la recolección de baterías de níquel cadmio, níquel e hidruro metálico o de iones de litio gastadas.
un hilo calibre 16 tiene mayor capacidad que uno de 18. Un cable de un calibre insuficiente causará una caída en la tensión de la línea dando por resultado una pérdida de energía y sobrecalentamiento. Cuando se utilice más de un alargador para completar el largo total, asegúrese que los hilos de cada alargador tengan el calibre mínimo. La tabla siguiente muestra el tamaño correcto a utilizar, dependiendo de la longitud del cable y del amperaje nominal de la placa de identificación.
FIG. 1 roja intermitente rápida. Si esto ocurre, vuelva a colocar la unidad de batería en el cargador. Si el problema persiste, pruebe con otra unidad de batería para determinar si el cargador está funcionando debidamente. Si la segunda unidad de batería carga correctamente, significa que la primera está fallada y debería ser llevada a un centro de servicio u otro lugar de colección para su reciclaje.
LÍNEA DE ALIMENTACIÓN CON PROBLEMAS Algunos cargadores tienen un indicador de Línea de alimentación con problemas. Cuando el cargador se utiliza con algunas fuentes de alimentación portátiles, como generadores o fuentes que convierten CC a CA, el cargador puede suspender temporalmente el funcionamiento, ocasión en la que la luz roja se encenderá y apagará rápidamente dos veces, seguido de una pausa. Esto indica que la fuente de alimentación está fuera de los límites. Notas importantes sobre la carga 1.
completamente cargada en un lugar fresco y seco fuera del cargador. NOTA: Las unidades de batería no deberían almacenarse completamente descargadas. La unidad de batería deberá recargarse antes de ser usada. FIG. 2 U E GUARDE ESTAS INSTRUCCIONES PARA VOLVER A CONSULTAR EN EL FUTURO COMPONENTES (Fig. 2, 5) D F G Español ADVERTENCIA: Nunca modifique la herramienta eléctrica, ni tampoco ninguna de sus piezas. Podría producir lesiones corporales o daños. T FIGURA 2 A. Interruptor de gatillo de Q.
USO DEBIDO Esta pistola engrasadora está diseñada para dispensar lubricante profesionalmente. NO debe usarse en condiciones húmedas ni en presencia de líquidos o gases inflamables volátiles. Esta pistola engrasadora es una herramienta eléctrica profesional. NO permita que los niños toquen la herramienta. Si el operador no tiene experiencia utilizando esta herramienta, deberá ser supervisado. Interruptor de gatillo de velocidad variable (Fig. 2, 4) Luz de trabajo LED (Fig.
ADVERTENCIA: La pistola engrasadora puede generar alta presión. No saque ni manipule la válvula de descarga de presión. Pueden producirse lesiones graves. Correa para el hombro (Fig. 2) varilla esté colocada fijamente en la ranura para evitar que se salga. 2. Desenrosque la unidad del tubo de grasa (N) de la pistola engrasadora. 3. Saque la tapa de plástico del cartucho de grasa, introduzca el cartucho, el extremo abierto primero, en el tubo de grasa (J). 4.
LLENADO POR SUCCIÓN DE UN RECIPIENTE A GRANEL (FIG. 2, 5, 6, 8) 1. Ponga el extremo abierto de la unidad del tubo FIG. 8 de grasa en el lubricante a granel. 2. Tire hacia atrás lentamente del mango del tubo de grasa (L) para succionar el lubricante en la pistola engrasadora. NOTA: Asegúrese de mantener el extremo abierto de la unidad del tubo de grasa suficientemente dentro del lubricante para evitar que se formen burbujas de aire en el tubo de grasa. 3.
Español LLENADO DE LA HERRAMIENTA CON LA BOMBA DE LLENADO DE BAJA PRESIÓN (FIG. 2, 9) 1. Tire hacia atrás del mango del tubo de grasa lentamente y gire la varilla hasta que esté fija en su sitio. NOTA: No bloquee la varilla en la ranura de retención (O). 2. Conecte el adaptador de baja presión de la pistola engrasadora al adaptador de baja presión adecuado de la bomba de llenado. Estos adaptadores NO se bloquean. Esto evita que el cartucho de la pistola engrasadora se llene demasiado. 3.
Para retirar la unidad de alimentación de la herramienta, presione los botones de liberación (Q) y tire firmemente de la unidad de batería para sacarla del mango de la herramienta. Insértela en el cargador tal como se describe en la sección del cargador de este manual. 4. Si la grasa deja de fluir a través de la manguera, repita el primer paso. NOTA: Esta herramienta ha sido puesta a prueba en la fábrica y quizás se haya quedado una pequeña cantidad de grasa en el tubo de grasa y la unidad de la manguera.
Para poner en funcionamiento la pistola engrasadora, sujétela por el asa (C), o colóquela en vertical sobre una superficie estable en sus tacos de gomas (R) agarrando bien el asa. Sujetando la manguera por el protector de muelle de seguridad (H) de la misma, conecte el acoplador para grasa de la manguera flexible (I) u otro acoplador para grasa adecuado, en el conector para engrasar que vaya a llenarse. Presione con cuidado el interruptor de gatillo de velocidad variable para empezar el proceso de llenado.
(O) moviendo la varilla hacia el lado. Asegúrese de que la varilla esté colocada fijamente en la ranura para evitar que se salga. 2. Desenrosque la unidad del tubo de grasa (N) de la pistola engrasadora y sáquela. 3. Utilizando un pequeño destornillador de hoja plana o una piocha, saque con cuidado el filtro. 4. Limpie el filtro utilizando un paño suave. Si el filtro sigue teniendo residuos después de limpiarlo, puede usarse un cepillo suave o un hisopo de algodón. 5.
MERIDA, YUC Calle 63 #459-A - Col. Centro (999) 928 5038 MONTERREY, N.L. Av. Francisco I. Madero 831 Poniente - Col. Centro (818) 375 23 13 PUEBLA, PUE 17 Norte #205 - Col. Centro (222) 246 3714 QUERETARO, QRO Av. San Roque 274 - Col. San Gregorio (442) 2 17 63 14 SAN LUIS POTOSI, SLP Av. Universidad 1525 - Col. San Luis (444) 814 2383 TORREON, COAH Blvd. Independencia, 96 Pte. - Col. Centro (871) 716 5265 VERACRUZ, VER Prolongación Díaz Mirón #4280 - Col.
• PARA SU SEGURIDAD: Si registra el producto, podremos comunicarnos con usted en el caso improbable que se deba enviar una notificación de seguridad conforme a la Federal Consumer Safety Act (Ley Federal de Seguridad de Productos para el Consumidor). Registro en línea en www.dewalt.com/register. Este producto está garantizado por un año a partir de la fecha de entrega, contra cualquier defecto en su funcionamiento, así como en materiales y mano de obra empleados para su fabricación.
3 AÑOS DE SERVICIO GRATUITO PARA UNIDADES DE ALIMENTACIÓN DEWALT DCB200, DCB204 DCGG571 Español UNIDADES DE BATERÍA DEWALT La garantía del producto quedará nula si la unidad de batería ha sido alterada de cualquier manera. DEWALT no es responsable de ninguna lesión causada por alteraciones y podría iniciar un procedimiento judicial por fraude de garantía hasta el máximo grado permisible por la ley.
RESOLUCIÓN DE PROBLEMAS Problema Causa posible Solución posible No se puede tirar hacia atrás de la varilla Acumulación de vacío Desenrosque la válvula de purga para liberar el vacío. No se puede empujar la varilla hacia adelante Acumulación de presión Desenrosque la válvula de purga para liberar el presión. La varilla sigue conectada al émbolo Gire el mango del tubo de grasa 90 grados para liberarlo. No sale grasa cuando se tira del gatillo Agregue grasa.
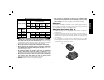
DEWALT Battery and Charger Systems Chargers/Charge Time (Minutes) – Chargeurs/Durée de charge (Minutes) – Cargadores de baterías/Tiempo de carga (Minutos) 120 Volts 12 Volts Battery Cat # Output Voltage DC011 DC022 DC9000 DC9310 DC9320 DCB095 DCB100 DCB101 DCB103 DCB106 DCB107 DW911 DW9106 DW9107 DW9108 DW9116 DW9117 DW9118 DW9216 DW9226 DW0246 DCB119 DW0249 DW9109 DC9319 DC9360 DC9280 DW0242 DCB200 DCB201 DCB203 DCB204 DCB207 DC9096 DC9099 DC9180 DC9181 DW9096 DW9098 DW9099 DC9