If you have questions or comments, contact us. Pour toute question ou tout commentaire, nous contacter. Si tiene dudas o comentarios, contáctenos. 1-800-4-DEWALT • www.dewalt.com INSTRUCTION MANUAL GUIDE D'UTILISATION MANUAL DE INSTRUCCIONES INSTRUCTIVO DE OPERACIÓN, CENTROS DE SERVICIO Y PÓLIZA DE GARANTÍA. ADVERTENCIA: LÉASE ESTE INSTRUCTIVO ANTES DE USAR EL PRODUCTO.
The definitions below describe the level of severity for each signal word. Please read the manual and pay attention to these symbols. DANGER: Indicates an imminently hazardous situation which, if not avoided, will result in death or serious injury. WARNING: Indicates a potentially hazardous situation which, if not avoided, could result in death or serious injury. CAUTION: Indicates a potentially hazardous situation which, if not avoided, may result in minor or moderate injury.
English b) Do not use the power tool if the switch does not turn it on and off. Any power tool that cannot be controlled with the switch is dangerous and must be repaired. c) Disconnect the plug from the power source and/or the battery pack from the power tool before making any adjustments, changing accessories, or storing power tools. Such preventive safety measures reduce the risk of starting the power tool accidentally.
6) SERVICE a) Have your power tool serviced by a qualified repair person using only identical replacement parts. This will ensure that the safety of the power tool is maintained. Additional Safety Instructions for Rotary Hammers • Wear ear protectors. Exposure to noise can cause hearing loss. • Use auxiliary handle(s), if supplied with the tool. Loss of control can cause personal injury.
English WARNING: ALWAYS use safety glasses. Everyday eyeglasses are NOT safety glasses. Also use face or dust mask if cutting operation is dusty. ALWAYS WEAR CERTIFIED SAFETY EQUIPMENT: • ANSI Z87.1 eye protection (CAN/CSA Z94.3), • ANSI S12.6 (S3.19) hearing protection, • NIOSH/OSHA/MSHA respiratory protection.
When ordering replacement battery packs, be sure to include the catalog number and voltage. Consult the chart at the end of this manual for compatibility of chargers and battery packs. The battery pack is not fully charged out of the carton. Before using the battery pack and charger, read the safety instructions below and then follow charging procedures outlined.
NOTICE: Under certain conditions, with the charger plugged into the power supply, the charger can be shorted by foreign material. Foreign materials of a conductive nature, such as, but not limited to, grinding dust, metal chips, steel wool, aluminum foil or any buildup of metallic particles should be kept away from the charger cavities. Always unplug the charger from the power supply when there is no battery pack in the cavity. Unplug the charger before attempting to clean.
Ampere Rating More Not More Than Than 0 6 6 10 10 12 12 16 • The charger is designed to operate on standard 120V household electrical power. Do not attempt to use it on any other voltage. This does not apply to the vehicular charger. Chargers Your tool uses a DEWALT charger. Be sure to read all safety instructions before using your charger. Consult the chart at the end of this manual for compatibility of chargers and battery packs.
English Charge Indicators Important Charging Notes This charger is designed to detect certain problems that can arise. Problems are indicated by the red light flashing at a fast rate. If this occurs, re-insert the battery pack into the charger. If the problem persists, try a different battery pack to determine if the charger is working properly. If the new pack charges correctly, then the original pack is defective and should be returned to a service center or other collection site for recycling.
FIG. 2 6. Foreign materials of a conductive nature such as, but not limited to, grinding dust, metal chips, steel wool, aluminum foil, or any buildup of metallic particles should be kept away from charger cavities. Always unplug the charger from the power supply when there is no battery pack in the cavity. Unplug the charger before attempting to clean. 7. Do not freeze or immerse the charger in water or any other liquid. WARNING: Shock hazard. Don’t allow any liquid to get inside the charger.
The center position of the control button locks the tool in the off position. When changing the position of the control button, be sure the trigger is released. NOTE: The first time the tool is run after changing the direction of rotation, you may hear a click on start up. This is normal and does not indicate a problem. English Trigger Switch (Fig. 2) To turn the tool on, squeeze the trigger switch (B). To turn the tool off, release the trigger switch. Your tool is equipped with a brake.
NOTE: Operating temperature of this tool is 19 ° to 104 °F (-7 ° to +40 °C). Using the tool outside of this temperature range will decrease the life of the tool. OPERATION FUEL GAUGE BATTERY PACKS (FIG. 7) Some DEWALT battery packs include a fuel gauge which consists of three green LED lights that indicate the level of charge remaining in the battery pack. To actuate the fuel gauge, press and hold the fuel gauge button (N).
4. Hold tool firmly with both hands to control the twisting action of the drill. If model is not equipped with side handle, grip drill with one hand on the handle and one hand on the battery pack. WARNING: Drill may stall if overloaded causing a sudden twist. Always expect the stall. Grip the drill firmly to control the twisting action and avoid injury. 5. IF DRILL STALLS, it is usually because it is being overloaded or improperly used.
DRILLING IN WOOD An SDS Plus® to round shank adaptor chuck is required. Ensure that tool is in drill-only mode. Start drilling with slow speed and increase to full power while applying firm pressure on the tool. Holes in wood can be made with the same twist drills used for metal. These bits may overheat unless pulled out frequently to clear chips from the flutes. For larger holes, use spade bits, power auger bits, or hole saws. Work that is apt to splinter should be backed up with a block of wood.
English CHARGER CLEANING INSTRUCTIONS WARNING: Shock hazard. Disconnect the charger from the AC outlet before cleaning. Dirt and grease may be removed from the exterior of the charger using a cloth or soft non-metallic brush. Do not use water or any cleaning solutions. Register Online Thank you for your purchase. Register your product now for: • WARRANTY SERVICE: Registering your product will help you obtain more efficient warranty service in case there is a problem with your product.
FREE WARNING LABEL REPLACEMENT: If your warning labels become illegible or are missing, call 1-800-4-DEWALT (1-800-433-9258) for a free replacement. 2 YEARS FREE SERVICE ON DEWALT BATTERY PACKS DC9071, DC9091, DC9096, DC9280, DC9360, DC9180, DCB120, DCB201 and DCB203 English 3 YEARS FREE SERVICE ON DEWALT BATTERY PACKS DCB200, DCB204 DEWALT BATTERY PACKS Product warranty voided if the battery pack is tampered with in any way.
CONSERVER TOUS LES AVERTISSEMENTS ET TOUTES LES DIRECTIVES POUR UN USAGE ULTÉRIEUR Français Définitions : lignes directrices en matière de sécurité Les définitions ci-dessous décrivent le niveau de danger pour chaque mot-indicateur employé. Lire le mode d’emploi et porter une attention particulière à ces symboles. DANGER : indique une situation dangereuse imminente qui, si elle n’est pas évitée, entraînera la mort ou des blessures graves.
d) e) f) g) 3) SÉCURITÉ PERSONNELLE a) Être vigilant, surveiller le travail effectué et faire preuve de jugement lorsqu’un outil électrique est utilisé. Ne pas utiliser d’outil électrique en cas de fatigue ou sous l’influence de drogues, d’alcool ou de médicaments. Un simple moment d’inattention en utilisant un outil électrique peut entraîner des blessures corporelles graves. b) Utiliser des équipements de protection individuelle. Toujours porter une protection oculaire.
Français d) Ranger les outils électriques hors de la portée des enfants et ne permettre à aucune personne n’étant pas familière avec un outil électrique ou son mode d’emploi d’utiliser cet outil. Les outils électriques deviennent dangereux entre les mains d’utilisateurs inexpérimentés. e) Entretien des outils électriques.
• • • • • • 19 Français • • Les burins légèrement usés peuvent être réaffûtés par le meulage. REMARQUE : ne pas surchauffer la mèche (décoloration) durant le meulage d’un nouveau tranchant. Les burins mal usés demandent à être de nouveau forgés. Ne pas durcir ni ne faire revenir les burins. AVERTISSEMENT : TOUJOURS porter des lunettes de sécurité. Les lunettes de vue ne constituent PAS des lunettes de sécurité.
Français • Éviter le contact prolongé avec la poussière provenant du ponçage, du sciage, du meulage et du forage mécanique ainsi que d’autres activités de construction. Porter des vêtements de protection et laver les parties exposées au savon et à l’eau. La poussière qui pourrait pénétrer dans la bouche et les yeux ou se déposer sur la peau peut favoriser l’absorption de produits chimiques nocifs.
bloc-piles comporte des risques d’incendie, car les bornes des piles pourraient entrer, par inadvertance, en contact avec des objets conducteurs, tels que : clés, pièces de monnaie, outils ou autres.
Français Le sceau SRPRCMC AVERTISSEMENT : risques de chocs électriques. Ne laisser aucun liquide pénétrer dans le chargeur, des chocs électriques pourraient en résulter. ATTENTION : risques de brûlure. Pour réduire tout risque de dommages corporels, ne recharger que des blocs-piles rechargeables DEWALT. Tout autre type de piles pourrait exploser et causer des dommages corporels et matériels.
• Ne pas le faire fonctionner avec un cordon d’alimentation ou une fiche endommagée. • Ne pas utiliser le chargeur s’il a reçu un coup, fait une chute ou a été endommagé de quelque façon que ce soit. Le ramener dans un centre de réparation agréé. • Ne pas démonter le chargeur. Pour tout service ou réparation, le rapporter dans un centre de réparation agréé. Le fait de le réassembler de façon incorrecte comporte des risques de chocs électriques, d’électrocution et d’incendie.
3. En fin de charge, le voyant rouge restera ALLUMÉ de façon continue. Le bloc-piles est alors complètement chargé et peut être utilisé ou laissé dans le chargeur. FONCTION DE SUSPENSION DE CHARGE CONTRE LE CHAUD/FROID Ce chargeur est équipé d’une fonction de suspension de charge contre le chaud/froid. Lorsque le chargeur détecte un bloc-piles chaud, il démarre automatiquement la fonction de suspension de charge contre le chaud, en suspendant le chargement jusqu’au refroidissement de ce dernier.
1. Pour augmenter la durée de vie du bloc-piles et optimiser son rendement, le recharger à une température ambiante de 18 ° à 24 °C (65 °F à 75 °F). NE PAS recharger le bloc-piles à une température inférieure à + 4,5 °C (+ 40 °F) ou supérieure à + 40,5 °C (+ 105 °F). C’est important pour prévenir tout dommage sérieux au bloc-piles. 2. Le chargeur et son bloc-piles peuvent devenir chauds au toucher pendant la charge. C’est normal et ne représente en aucun cas une défaillance du produit.
COMPOSANTS (fig. 2) Poignée latérale (fig. 2) AVERTISSEMENT : ne jamais modifier l’outil électrique ni aucun de ses composants, car il y a risques de dommages corporels ou matériels. A. Poignée latérale E. Poignée principale B. Gâchette F. Lampe de travail C. Bouton de commande marche G. Bloc-piles avant/marche arrière H. Bouton de libération du (Bouton de verrouillage) bloc-piles D.
Sélecteur de mode (fig. 3) FIG. 4 FIG. 3 K ATTENTION : ne jamais changer de mode lorsque l’outil fonctionne. Pour percer droit, régler le sélecteur de D mode (D) de manière à ce que la flèche pointe vers le symbole de mèche pour le perçage (I). Pour le marteau perforateur, J aligner la flèche sur le symbole de marteau I (J). Pour le mode burinage, aligner la flèche sur le symbole de burinage (K).
Pour activer le témoin de charge, maintenez appuyé le bouton du témoin de charge (N). Une combinaison des trois voyants Del verts s’allumera indiquant le niveau de charge. Lorsque le niveau de charge du bloc-pile atteint la limite minimale d’utilisation, le témoin de charge reste éteint et le bloc-piles doit être rechargé. Français Installation et retrait du bloc-piles (fig.
Pour insérer la mèche, insérez la tige de la mâche à environ 19 mm (3/4 po) dans le mandrin (L). Pousser et faire tourner la mèche jusqu’à ce qu’elle s’enclenche. La mèche sera bien maintenue. Pour relâcher la mèche, tirez le manchon vers l’arrière (M) et enlevez la mèche. FIG. 8 L M Perçage (fig. 3) AVERTISSEMENT : pour réduire le risque de blessures corporelles, TOUJOURS utiliser l’outil si la poignée latérale y est bien installée.
Français REMARQUE : les trous larges (de 7,9 mm à 12,7 mm [de 5/16 po à 1/2 po]) dans l’acier peuvent être facilités si l’on perce d’abord un trou pilote (4 mm à 4,8 mm [5/32 po à 3/16 po]). 4. Pendant la perforation de trous profonds, si la vitesse du marteau venait à diminuer, retirez la mèche partiellement du trou alors que l’outil est toujours en marche pour aider l’expulsion des débris. 5. Pour la maçonnerie, utilisez des mèches au carbure ou à maçonnerie.
Réparations AVERTISSEMENT : ne jamais utiliser de solvants ni d’autres produits chimiques puissants pour nettoyer les pièces non métalliques de l’outil. Ces produits chimiques peuvent affaiblir les matériaux de plastique utilisés dans ces pièces. Utiliser un chiffon humecté uniquement d’eau et de savon doux. Ne jamais laisser de liquide pénétrer dans l’outil et n’immerger aucune partie de l’outil dans un liquide. Le bloc-piles et le chargeur ne sont pas réparables.
Français Garantie limitée de trois ans GARANTIE DE REMBOURSEMENT DE 90 JOURS Si l’acheteur n’est pas entièrement satisfait, pour quelque raison que ce soit, du rendement de l’outil électrique, du laser ou de la cloueuse DEWALT, celui-ci peut le retourner, accompagné d’un reçu, dans les 90 jours à compter de la date d’achat pour obtenir un remboursement intégral, sans aucun problème. AMÉRIQUE LATINE : cette garantie ne s’applique aux produits vendus en Amérique latine.
CONSERVE TODAS LAS ADVERTENCIAS E INSTRUCCIONES PARA FUTURAS CONSULTAS Definiciones: Normas de seguridad Las siguientes definiciones describen el nivel de gravedad de cada palabra de señal. Lea el manual y preste atención a estos símbolos. PELIGRO: Indica una situación de peligro inminente que, si no se evita, provocará la muerte o lesiones graves. ADVERTENCIA: Indica una situación de peligro potencial que, si no se evita, podría provocar la muerte o lesiones graves.
d) Retire la clavija de ajuste o la llave de tuercas antes de encender la herramienta eléctrica. Una llave de tuercas o una clavija de ajuste que quede conectada a una pieza giratoria de la herramienta eléctrica puede provocar lesiones personales. e) No se estire. Conserve el equilibrio y párese adecuadamente en todo momento. Esto permite un mejor control de la herramienta eléctrica en situaciones inesperadas. f) Use la vestimenta adecuada. No use ropas holgadas ni joyas.
c) Cuando no utilice el paquete de baterías, manténgalo lejos de otros objetos metálicos como sujetapapeles, monedas, llaves, clavos, tornillos u otros objetos metálicos pequeños que puedan realizar una conexión desde un terminal al otro. Los cortocircuitos en los terminales de la batería pueden provocar quemaduras o incendio. d) En condiciones abusivas, el líquido puede ser expulsado de la batería. Evite su contacto. Si entra en contacto accidentalmente, enjuague con agua.
Español • No golpee las brocas atascadas con un martillo para desatascarlas. Los fragmentos de metal o astillas del material podrían desprenderse y provocar lesiones. • Los cinceles levemente gastados pueden afilarse con una esmeriladora. NOTA: No sobrecaliente la broca (decoloración) mientras esmerila un borde nuevo. Los cinceles muy gastados deben ser reforjados. No temple ni endurezca nuevamente el cincel. ADVERTENCIA: Use SIEMPRE lentes de seguridad.
• Evite el contacto prolongado con el polvo procedente del lijado, serrado, esmerilado y taladrado eléctricos, así como de otras actividades del sector de la construcción. Lleve ropa protectora y lave con agua y jabón las zonas expuestas. Si permite que el polvo se introduzca en la boca u ojos o quede sobre la piel, puede favorecer la absorción de productos químicos peligrosos. ADVERTENCIA: Toda persona que entre al área de trabajo deberá usar una máscara antipolvo o protección respiratoria.
Español • NUNCA fuerce la unidad de batería para que entre en el cargador. NO modifique la unidad de batería en ninguna forma para que entre en un cargador no compatible, pues puede producir una ruptura en la unidad de batería y causar lesiones corporales graves. Consulte la tabla al final de este manual para ver la compatibilidad entre baterías y cargadores. • Cargue las unidades de batería sólo en los cargadores designados por DEWALT. • NO salpique con ni sumerja en agua u otros líquidos.
El sello RBRC™ Instrucciones importantes de seguridad para todos los cargadores de baterías GUARDE ESTAS INSTRUCCIONES: Este manual contiene instrucciones de seguridad y operación importantes para los cargadores de baterías. • Antes de usar el cargador, lea todas las instrucciones y advertencias que se encuentren en el cargador, la unidad de batería y el producto que usa la unidad de batería. 39 Español ADVERTENCIA: Peligro de descarga eléctrica.
• No coloque ningún objeto encima del cargador ni coloque a este sobre una superficie blanda que pudiera bloquear las ranuras de ventilación y resultar en un calor interno excesivo. Coloque el cargador en un lugar alejado de cualquier fuente de calor. El cargador se ventila a través de las ranuras que se encuentran en la parte superior e inferior de la caja protectora. • No opere el cargador si su cable o enchufe están dañados.
Procedimiento de carga (Fig. 1) Indicadores de carga Este cargador ha sido diseñado para detectar ciertos problemas que pudieran surgir. Estos problemas se indican mediante una luz roja intermitente rápida. Si esto ocurre, vuelva a colocar la unidad de batería en el cargador. Si el problema persiste, pruebe con otra unidad de batería para determinar si el cargador está funcionando debidamente.
b. Revise que la toma de corriente no esté conectada a un interruptor de luz que corte la corriente cuando se corte la luz; c. Mueva el cargador y la unidad de batería a un lugar donde la temperatura ambiental sea aproximadamente 18 – 24 °C (65 – 75 °F); d. Si el problema de carga continúa, lleve la herramienta, unidad de batería y el cargador a su centro de servicio local. 5.
FIG. 2 Recomendaciones de almacenamiento A K 1. El mejor lugar de almacenamiento es uno que sea fresco y seco, lejos de la luz solar directa y del exceso de calor o frío. 2. Para resultados óptimos durante tiempos prolongados de almacenamiento, se recomienda almacenar la unidad de batería completamente cargada en un lugar fresco y seco fuera del cargador. NOTA: Las unidades de batería no deberían almacenarse completamente descargadas. La unidad de batería deberá recargarse antes de ser usada.
El mango lateral (A) se fija al frente del cilindro (anillo) y puede girarse 360° para utilizarlo tanto con la mano derecha como con la izquierda. Ajuste el mango lateral girando la parte plástica de color negro del mango lateral en sentido de las agujas del reloj. El mango lateral debe estar lo suficientemente ajustado como para resistir la acción de torsión de la herramienta si el accesorio se atasca o pierde sustentación.
FIG. 4 Cómo instalar y retirar la unidad de batería (Fig. 6) ADVERTENCIA: Para reducir el riesgo de lesiones, nunca presione el botón de liberación de la batería si no pretende quitar la unidad de batería. Si presiona el botón de liberación de la batería sin retirar la unidad de batería, ésta podría caerse inesperadamente de su lugar. NOTA: Para mejores resultados, verifique que su unidad de batería esté completamente cargada.
NOTA: La temperatura de operación de esta herramienta es -7 a +40 °C (19° a 104 °F). Esta herramienta tendrá una vida útil más corta si se usa fuera del rango de temperatura indicado. Descargas eléctricas – Control activo de vibración (Fig. 2) Para un mejor control de la vibración, sostenga la herramienta con una mano en el mango principal (E) y la otra en el mango lateral (A). Aplique sólo la presión necesaria para que el martillo esté a media carrera aproximadamente.
TALADRADO EN METAL Se requiere de un mandril adaptador de SDS Plus® a caña redonda. Compruebe que la herramienta esté en modo de sólo taladrado. Inicie la perforación a baja velocidad y vaya aumentándola hasta la máxima potencia mientras aplica presión firme en la herramienta. El flujo uniforme y suave de virutas indica que se taladra a la velocidad adecuada. Emplee un lubricante para corte cuando taladre en metales. Las excepciones son el hierro colado y el latón, que se deben taladrar en seco.
2. Cuando taladree, use la fuerza necesaria en el martillo para evitar que rebote excesivamente o que “sobrepase” la broca. Si usa demasiada fuerza, la velocidad de taladrado será menor, se sobrecalentará la herramienta y el índice de taladrado será menor también. 3. Taladree en forma recta, manteniendo la broca en un ángulo recto en relación con la pieza. No ejerza presión lateral en la broca mientras taladree pues la broca podría atorarse y disminuir la velocidad de taladrado. 4.
• PARA SU SEGURIDAD: Si registra el producto, podremos comunicarnos con usted en el caso improbable que se deba enviar una notificación de seguridad conforme a la Federal Consumer Safety Act (Ley Federal de Seguridad de Productos para el Consumidor). Registro en línea en www.dewalt.com/register. Los accesorios que se recomiendan para utilizar con la herramienta están disponibles a un costo adicional en su distribuidor local o en un centro de mantenimiento autorizado.
Anexo encontrará una relación de sucursales de servicio de fábrica, centros de servicio autorizados y franquiciados en la República Mexicana, donde podrá hacer efectiva su garantía y adquirir partes, refacciones y accesorios originales. Si se encuentra en México, por favor llame al (55) 5326 7100 Si se encuentra en U.S., por favor llame al 1-800-433-9258 (1-800 4-DEWALT) Póliza de Garantía Garantía limitada por tres años Español IDENTIFICACIÓN DEL PRODUCTO: Sello o firma del Distribuidor.
UNIDADES DE ALIMENTACIÓN DEWALT La garantía del producto quedará nula si la unidad de alimentación ha sido alterada de cualquier manera. DEWALT no es responsable de ninguna lesión causada por alteraciones y podría iniciar un procedimiento judicial por fraude de garantía hasta el máximo grado permisible por la ley.
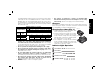
DEWALT Battery and Charger Systems Battery Output Chargers/Charge Time (Minutes) – Chargeurs/Durée de charge (Minutes) – Cargadores de baterías/Tiempo de carga (Minutos) Cat # Voltage DW9106 DW9118 DW9107 DW9108 DW9116 DW9216 DW9117 DW911 DC011 DC022 DC9000 DC9310 DC9320 DCB095 DCB100 DCB101 DCB103 DW0246 DCB119 DW0249 DW9109 DC9319 DC9360 36 X X X X X X X X X X 60 X X X X X X X X X X X DC9280 DW0242 DC9096 DC9099 DC9180 DC9181 DCB080 DCB200 DCB201 DCB203 D