INSTRUCTIVO DE OPERACIÓN, CENTROS DE SERVICIO Y PÓLIZA DE GARANTÍA. ADVERTENCIA: LÉASE ESTE INSTRUCTIVO ANTES DE USAR EL PRODUCTO. Taladro/destornillador inalámbrico de 1/2 pulg. (13 mm) para trabajos pesados de 20 V Máx* DCD980 Taladro percusor/taladro/destornillador inalámbrico de 1/2 pulg.
The term “power tool” in the warnings refers to your mains-operated (corded) power tool or battery-operated (cordless) power tool. SAVE ALL WARNINGS AND INSTRUCTIONS FOR FUTURE REFERENCE WARNING! Read all safety warnings and all instructions. Failure to follow the warnings and instructions may result in electric shock, fire and/or serious injury. General Power Tool Safety Warnings WARNING: To reduce the risk of injury, read the instruction manual.
English 4) POWER TOOL USE AND CARE a) Do not force the power tool. Use the correct power tool for your application. The correct power tool will do the job better and safer at the rate for which it was designed. 3) PERSONAL SAFETY a) Stay alert, watch what you are doing and use common sense when operating a power tool. Do not use a power tool while you are tired or under the influence of drugs, alcohol or medication. A moment of inattention while operating power tools may result in serious personal injury.
• Wear ear protectors when impact drilling. Exposure to noise can cause hearing loss. • Use auxiliary handle(s), if supplied with the tool. Loss of control can cause personal injury. • Hold power tool by insulated gripping surfaces, when performing an operation where the cutting accessory may contact hidden wiring. Cutting accessory contacting a “live” wire may make exposed metal parts of the power tool “live” and could give the operator an electric shock.
English Your risk from these exposures varies, depending on how often you do this type of work. To reduce your exposure to these chemicals: work in a well ventilated area, and work with approved safety equipment, such as those dust masks that are specially designed to filter out microscopic particles. • Avoid prolonged contact with dust from power sanding, sawing, grinding, drilling, and other construction activities. Wear protective clothing and wash exposed areas with soap and water.
SPECIFIC SAFETY INSTRUCTIONS FOR LITHIUM ION (Li-Ion) • Do not incinerate the battery pack even if it is severely damaged or is completely worn out. The battery pack can explode in a fire. Toxic fumes and materials are created when lithium ion battery packs are burned. • If battery contents come into contact with the skin, immediately wash area with mild soap and water. If battery liquid gets into the eye, rinse water over the open eye for 15 minutes or until irritation ceases.
English • Before using the charger, read all instructions and cautionary markings on the charger, battery pack and product using the battery pack. WARNING: Shock hazard. Do not allow any liquid to get inside the charger. Electric shock may result. CAUTION: Burn hazard. To reduce the risk of injury, charge only DEWALT rechargeable battery packs. Other types of batteries may overheat and burst resulting in personal injury and property damage.
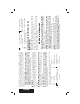
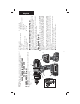
1. Plug the charger into an appropriate FIG. 1 I outlet before inserting the battery pack. 2. Insert the battery pack (I) into the charger, as shown in Figure 1, making sure the pack is fully seated in charger. The red (charging) light will blink continuously, indicating that the charging process has started. 3. The completion of charge will be indicated by the red light remaining ON continuously. The pack is fully charged and may be used at this time or left in the charger. Charging Procedure (Fig.
English 1. Longest life and best performance can be obtained if the battery pack is charged when the air temperature is between 65 °F and 75 °F (18 ° – 24 °C). DO NOT charge the battery pack in an air temperature below +40 °F (+4.5 °C), or above +105 °F (+40.5 °C). This is important and will prevent serious damage to the battery pack. 2. The charger and battery pack may become warm to the touch while charging. This is a normal condition, and does not indicate a problem.
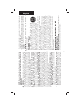
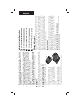
H FIG. 2 C D B I J A E F G M L K M WARNING: Never modify the power tool or any part of it. Damage or personal injury could result. COMPONENTS (Fig. 2) SAVE THESE INSTRUCTIONS FOR FUTURE USE NOTE: Battery packs should not be stored completely depleted of charge. The battery pack will need to be recharged before use. 9 Trigger switch Forward/reverse control button Worklight Chuck Torque adjustment collar Mode control collar Gear shifter H. I. J. K. L. M.
English DRILLING (FIG. 3) CAUTION: When the mode collar is in the drill/hammerdrill mode, the drill will not clutch out regardless of the position of the torque adjustment collar (E). Rotate the mode control collar (F) so the drill symbol is aligned with the arrow. NOTE: The torque adjustment collar (E) may be set on any number. Your drill is equipped with a separate mode control collar (F) to switch between drilling, screwdriving and hammerdrilling mode. Mode Control Collar (Fig.
WARNING: Do not attempt to tighten drill bits (or any other accessory) by gripping the front part of the chuck and turning the tool on. Damage to the chuck and personal injury may result. Always lock off trigger switch and disconnect tool from power source when changing accessories. WARNING: Always ensure the bit is secure before starting the tool. A loose bit may eject from tool causing possible personal injury.
English NOTE: For best results, make sure your battery pack is fully charged. To install the battery pack (I) into the tool handle, align the battery pack with the rails inside the tool’s handle and slide it into the handle until the battery pack is firmly seated in the tool and ensure that it does not disengage. To remove the battery pack from the tool, press the release button (J) and firmly pull the battery pack out of the tool handle.
NOTICE: If drilling thin material, use a wood “back-up” block to prevent damage to the material. 1. Select the desired speed/torque range using the gear shifter to match the speed and torque to the planned operation. Set the mode control collar to the drill symbol. 2. Use sharp drill bits only. For MASONRY, such as brick, cement, cinder block, etc., use carbide-tipped bits rated for percussion drilling. 3. Always apply pressure in a straight line with the bit.
English CHARGER CLEANING INSTRUCTIONS WARNING: Shock hazard. Disconnect the charger from the AC outlet before cleaning. Dirt and grease may be removed from the exterior of the charger using a cloth or soft non-metallic brush. Do not use water or any cleaning solutions. WARNING: Blow dirt and dust out of all air vents with clean, dry air at least once a week. To minimize the risk of eye injury, always wear ANSI Z87.1 approved eye protection when performing this.
3 YEARS FREE SERVICE ON DEWALT BATTERY PACKS DCB200 2 YEARS FREE SERVICE ON DEWALT BATTERY PACKS DC9071, DC9091, DC9096, DC9280, DC9360, DC9180, DCB120 and DCB201 1 YEAR FREE SERVICE DEWALT will maintain the tool and replace worn parts caused by normal use, for free, any time during the first year after purchase. In addition to the warranty, DEWALT tools are covered by our: DEWALT will repair, without charge, any defects due to faulty materials or workmanship for three years from the date of purchase.