
Use and Care Manual


ENGLISH
12
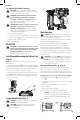
Unloading The Tool (Fig. A, I)
WARNING: The trigger lock-off should always be
locked off whenever any adjustments are made or
when tool is not inuse.
1. Release pusher assembly
16
so it is no longer applying
force to the nail sticks.
2. Slide nail sticks down and out through the slot in the
rear of the magazine.
3. Open the jam clear latch
5
on the nosepiece to verify
there are no nailsremaining.
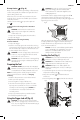
Adjusting Depth (Fig. J)
The depth that the fastener is driven can be adjusted using
the depth adjustment wheel
3
on the side of thetool.
WARNING: To reduce risk of serious injury from
accidental actuation when attempting to adjust
depth, ALWAYS:
• Remove batterypack.
• Engage trigger lock-off.
• Avoid contact with trigger duringadjustments.
1. To drive the nail shallower
, rotate the depth
adjustment wheel
3
away from the nose of thenailer.
2. To sink a nail deeper
, rotate the depth adjustment
wheel
3
toward the nose of thenailer.
Fig. J
3
13
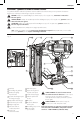
Headlights (Fig. K)
There is a headlight
4
located on each side of the nailer.
Headlights turn on upon battery insertion, activation of
the trigger, or depressing the contact trip. The lights will
automatically shut off after 20 seconds unless tool remains
inuse.
Fig. K
4
NOTE: These headlights are for lighting the immediate work
surface and are not intended to be used asflashlights.
LOW BATTERY INDICATOR: The left-side headlight will
flash four consecutive times and then shut down to indicate
lowbattery.
JAMMED NAIL INDICATOR: The right-side headlight will
flash continually if a nail becomes jammed in the nosepiece
(see Clearing a Jammed Nail).
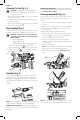
Clearing a Jammed Nail (Fig. A, L)
If a nail becomes jammed in the nosepiece, keep the tool
pointed away from you and follow these instructions
toclear:
1. Remove battery pack from tool and engage the trigger
lock-off.
2. Release pusher assembly and remove any loaded nails
3. Lift the jam clear latch
5
then pull up to open the
nosepiecedoor.
4. Remove bent nail, using pliers ifnecessary.
5. If driver blade is in the down position, cycle the stall
release lever
12
using enough force to fully slide it to
the other end of the slot in thehousings.
6. Close the nosepiece door and engage the latch pin
under the two arms on the nosepiece. Push latch until
it locks inplace.
7. Reinsert batterypack.
NOTE: The tool will disable itself and not reset until the
battery pack has been removed andreinserted.
8. Reinsert nails into magazine (see Loading the Tool).
Fig. L
5
12
NOTE: Should nails continue to jam frequently in nosepiece,
have tool serviced by an authorized
De
WALT servicecenter.