
Use and Care Manual


ENGLISH
11
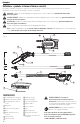
Fig.H
Fig.I
1
21
22
3
Fig.J
9
Fig.K
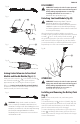
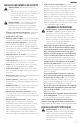
Joining Center Extension to Saw Head
Module and Handle Module (Fig. A, L)
Adding the center extension
2
to the handle assembly
1
and saw head assembly
3
creates a pole saw that is
approximately 10' (3 m) in length as shown in FigureL.
Refer to to Joining Saw Head Module to HandleModule
for directions on how to attach the middle assembly to the
handle assembly and saw head assembly.
Fig.L
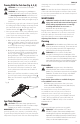
WARNING: Always check to make sure that the
sleeve is completely threaded on and that the red
threads are no longer visible. Not threading the sleeve
completely on could result in the assemblys becoming
disconnected creating a hazardous condition.
Periodically check the connections to insure that no
red threads are visible.
DISASSEMBLY
WARNING: To reduce the risk of serious personal
injury, turn unit off and remove the battery pack
before making any adjustments or removing/
installing attachments or accessories. An
accidental start-up can causeinjury.
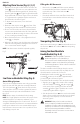
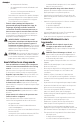
Detaching Saw Head Module (Fig. M)
WARNING: Sharp moving blade. To prevent
accidental operation, insure that battery is
disconnected from the handle and that the protective
scabbard is in place on the chain before performing
the following operations. Failure to do this could result
in serious personal injury.
When detaching the assemblies, whether it is in the two
assembly or three assembly mode, always detach the saw head
assembly
1
first. To do this, rest the handle assembly
2
on
the ground and grasp the center of the saw head assembly
with one hand as shown in FigureM. Use your other hand to
loosen the threaded sleeve and then pull the two halves apart.
Repeat this process if the center extension wasattached.
Fig.M
1
2
OPERATION
WARNING: To reduce the risk of serious personal
injury, turn unit off and remove the battery pack
before making any adjustments or removing/
installing attachments or accessories. An
accidental start-up can causeinjury.
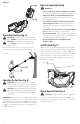
Installing and Removing the Battery Pack
(Fig. N)
NOTE: For best results, make sure your battery pack is
fullycharged.
To install the battery pack
6
into the tool handle, align the
battery pack with the rails inside the tool’s handle and slide
it into the handle until the battery pack is firmly seated in
the tool and ensure that it does notdisengage.
To remove the battery pack from the tool, press the release
button
23
and firmly pull the battery pack out of the tool
handle. Insert it into the charger as described in the charger
section of thismanual.