If you have questions or comments, contact us. Pour toute question ou tout commentaire, nous contacter. Si tiene dudas o comentarios, contáctenos. 1-800-4-DEWALT • www.dewalt.com INSTRUCTION MANUAL GUIDE D’UTILISATION MANUAL DE INSTRUCCIONES INSTRUCTIVO DE OPERACIÓN, CENTROS DE SERVICIO Y PÓLIZA DE GARANTÍA. ADVERTENCIA: LÉASE ESTE INSTRUCTIVO ANTES DE USAR EL PRODUCTO.
The definitions below describe the level of severity for each signal word. Please read the manual and pay attention to these symbols. DANGER: Indicates an imminently hazardous situation which, if not avoided, will result in death or serious injury. WARNING: Indicates a potentially hazardous situation which, if not avoided, could result in death or serious injury. CAUTION: Indicates a potentially hazardous situation which, if not avoided, may result in minor or moderate injury.
English 4) POWER TOOL USE AND CARE a) Do not force the power tool. Use the correct power tool for your application. The correct power tool will do the job better and safer at the rate for which it was designed. b) Do not use the power tool if the switch does not turn it on and off. Any power tool that cannot be controlled with the switch is dangerous and must be repaired.
6) SERVICE a) Have your power tool serviced by a qualified repair person using only identical replacement parts. This will ensure that the safety of the power tool is maintained. Additional Safety Rules for Oscillating Multi-Tool • Hold power tool by insulated gripping surfaces, when performing an operation where the cutting accessory may contact hidden wiring or its own cord.
English Important Safety Instructions for All Battery Packs WARNING: Use of this tool can generate and/or disperse dust, which may cause serious and permanent respiratory or other injury. Always use NIOSH/OSHA approved respiratory protection appropriate for the dust exposure. Direct particles away from face and body. WARNING: Always wear proper personal hearing protection that conforms to ANSI S12.6 (S3.19) during use.
blow, been dropped, run over or damaged in any way (e.g., pierced with a nail, hit with a hammer, stepped on). Damaged battery packs should be returned to the service center for recycling. WARNING: Fire hazard. Do not store or carry the battery pack so that metal objects can contact exposed battery terminals. For example, do not place the battery pack in aprons, pockets, tool boxes, product kit boxes, drawers, etc., with loose nails, screws, keys, etc.
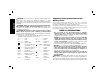
English of the wire, the greater the capacity of the cable, that is, 16 gauge has more capacity than 18 gauge. An undersized cord will cause a drop in line voltage resulting in loss of power and overheating. When using more than one extension to make up the total length, be sure each individual extension contains at least the minimum wire size. The following table shows the correct size to use depending on cord length and nameplate ampere rating. If in doubt, use the next heavier gauge.
• Do not disassemble the charger; take it to an authorized service center when service or repair is required. Incorrect reassembly may result in a risk of electric shock, electrocution or fire. • Disconnect the charger from the outlet before attempting any cleaning. This will reduce the risk of electric shock. Removing the battery pack will not reduce this risk. • NEVER attempt to connect 2 chargers together. • The charger is designed to operate on standard 120V household electrical power.
English HOT/COLD DELAY or sources that convert DC to AC, the charger may temporarily suspend operation, flashing the red light with two fast blinks followed by a pause. This indicates the power source is out of limits. DCB101 This charger has a hot/cold delay feature: when the charger detects a battery that is hot, it automatically starts a delay, suspending charging until the battery has cooled. After the battery has cooled, the charger automatically switches to the pack charging mode.
b. Check to see if receptacle is connected to a light switch which turns power off when you turn out the lights; c. Move the charger and battery pack to a location where the surrounding air temperature is approximately 65 °F – 75 °F (18° – 24 °C); d. If charging problems persist, take the tool, battery pack and charger to your local service center. 5. The battery pack should be recharged when it fails to produce sufficient power on jobs which were easily done previously.
English FIG. 3 1. Grasp the tool and squeeze the accessory clamping lever (C) as shown in Figure 3. 2. Clean any residual debris from the tool shaft and the accessory holder. 3. Slide the accessory between the J shaft (J) and the accessory holder C making sure the accessory engages all eight pins on the holder and is flush with the shaft. 4. Release the accessory clamp lever. NOTE: Some accessories, such as scrapers and blades, can be mounted at an angle if required as shown in Figure 5.
CAUTION: To avoid injury, do not use any accessory for an application where the adaptor may fail to hold the accessory. CAUTION: Read and follow all manufacturers' safety warnings for any accessories used with this tool. CAUTION: To avoid injury, ensure adaptor and accessory are securely tightened. Attaching the Cut Guide (Fig. 8–12) The depth/cut guide allows you to precisely cut material at a specified depth or height and more accurately track a marked cut line. 1.
English OPERATION FIG. 10 FIG. 9 WARNING: To reduce the risk of serious personal injury, turn tool off and remove the battery pack before making any adjustments or removing/installing attachments or accessories. An accidental start-up can cause injury. F P G Installing and Removing the Battery Pack (Fig. 14) CUT GUIDE This feature allows you to more accurately track a marked cut line. 1. Insert the guide arm (G) as shown in Figure 11 into the slots on the left and right sides of the guide block (F).
T To actuate the fuel gauge, press and hold FIG. 15 the fuel gauge button (T). A combination of the three green LED lights will illuminate designating the level of charge left. When the level of charge in the battery is below the usable limit, the fuel gauge will not illuminate and the battery will need to be recharged. NOTE: The fuel gauge is only an indication of the charge left on the battery pack.
English CHARGER CLEANING INSTRUCTIONS WARNING: Shock hazard. Disconnect the charger from the AC outlet before cleaning. Dirt and grease may be removed from the exterior of the charger using a cloth or soft non-metallic brush. Do not use water or any cleaning solutions. • Use coarse grit paper to sand rough surfaces, medium grit for smooth surfaces and fine grit for the finishing surfaces. If necessary, first make a test run on scrap material.
Titanium Oscillating Flush Cut Blade Oscillating Multi-Material Blade Oscillating Rigid Scraper Blade Oscillating Flexible Scraper Blade Oscillating Carbide Grout Removal Blade Oscillating Fastcut Carbide Grout Removal Blade Oscillating Carbide Rasp Three Year Limited Warranty Repairs The charger and battery pack are not serviceable.
English 90 DAY MONEY BACK GUARANTEE If you are not completely satisfied with the performance of your DEWALT Power Tool, Laser, or Nailer for any reason, you can return it within 90 days from the date of purchase with a receipt for a full refund – no questions asked. LATIN AMERICA: This warranty does not apply to products sold in Latin America.
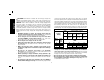
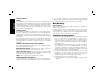
DEWALT Battery and Charger Systems Chargers/Charge Time (Minutes) – Chargeurs/Durée de charge (Minutes) – Cargadores de baterías/Tiempo de carga (Minutos) 120 Volts 12 Volts Battery Cat # Output Voltage DC011 DC022 DC9000 DC9310 DC9320 DCB095 DCB100 DCB101 DCB102 DCB103 DCB106 DCB107 DCB112 DW911 DW9106 DW9107 DW9108 DW9116 DW9117 DW9118 DW9216 DW9226 DW0246 DCB119 DW0249 DW9109 DC9319 DC9360 DCB361 DC9280 DW0242 DCB200 DCB201 DCB203 DCB204 DCB205 DCB207 DC9096 DC9099 DC9180 D