INSTRUCTIVO DE OPERACIÓN, CENTROS DE SERVICIO Y PÓLIZA DE GARANTÍA. ADVERTENCIA: LÉASE ESTE INSTRUCTIVO ANTES DE USAR EL PRODUCTO. DCS373 20 V Max* 5-1/2" (140 mm) Cordless Metal-Cutting Circular Saw Scie circulaire à métaux sans fil, 140 mm (5-1/2 po) 20 V max* Sierra circular inalámbrica de 20 V Max* 140 mm (5-1/2 pulg.) para corte de metal INSTRUCTION MANUAL GUIDE D’UTILISATION MANUAL DE INSTRUCCIONES 1-800-4-DEWALT • www.dewalt.com If you have questions or comments, contact us.
The term “power tool” in the warnings refers to your mains-operated (corded) power tool or battery-operated (cordless) power tool. SAVE ALL WARNINGS AND INSTRUCTIONS FOR FUTURE REFERENCE WARNING! Read all safety warnings and all instructions. Failure to follow the warnings and instructions may result in electric shock, fire and/or serious injury. General Power Tool Safety Warnings WARNING: To reduce the risk of injury, read the instruction manual.
English 4) POWER TOOL USE AND CARE a) Do not force the power tool. Use the correct power tool for your application. The correct power tool will do the job better and safer at the rate for which it was designed. 3) PERSONAL SAFETY a) Stay alert, watch what you are doing and use common sense when operating a power tool. Do not use a power tool while you are tired or under the influence of drugs, alcohol or medication. A moment of inattention while operating power tools may result in serious personal injury.
e) d) c) b) a) DANGER: Keep hands away from cutting area and the blade. Keep your second hand on auxiliary handle, or motor housing. If both hands are holding the saw, they cannot be cut by the blade. Do not reach underneath the workpiece. The guard cannot protect you from the blade below the workpiece. Adjust the cutting depth to the thickness of the workpiece. Less than a full tooth of the blade teeth should be visible below the workpiece. Never hold piece being cut in your hands or across your leg.
English LOWER GUARD SAFETY INSTRUCTIONS a) Check lower guard for proper closing before each use. Do not operate the saw if lower guard does not move freely and close instantly. Never clamp or tie the lower guard into the open position. If saw is accidentally dropped, lower guard may be bent. Raise the lower guard with the retracting g) f) e) d) c) b) but kickback forces can be controlled by the operator, if proper precautions are taken.
• Keep your body positioned to either side of the blade, but not in line with the saw blade. KICKBACK could cause the saw to jump backwards (see Causes and Operator Prevention of Kickback and KICKBACK). • Air vents often cover moving parts and should be avoided. Loose clothes, jewelry or long hair can be caught in moving parts. WARNING: ALWAYS use safety glasses. Everyday eyeglasses are NOT safety glasses. Also use face or dust mask if cutting operation is dusty.
English • Do not charge or use the battery pack in explosive atmospheres, such as in the presence of flammable liquids, gases or dust. Inserting or removing the battery pack from the charger may ignite the dust or fumes. • NEVER force the battery pack into the charger. DO NOT modify the battery pack in any way to fit into a noncompatible charger as battery pack may rupture causing serious personal injury. Consult the chart at the end of this manual for compatibility of batteries and chargers.
SAVE THESE INSTRUCTIONS: This manual contains important safety and operating instructions for battery chargers. • Before using the charger, read all instructions and cautionary markings on the charger, battery pack and product using the battery pack. WARNING: Shock hazard. Do not allow any liquid to get inside the charger. Electric shock may result. CAUTION: Burn hazard. To reduce the risk of injury, charge only DEWALT rechargeable battery packs.
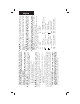
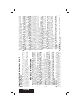
English Not More Than 6 10 12 16 18 18 16 14 16 16 16 12 AWG 16 14 14 12 14 12 Not Recommended • Do not place any object on top of the charger or place the charger on a soft surface that might block the ventilation slots and result in excessive internal heat. Place the charger in a position away from any heat source. The charger is ventilated through slots in the top and the bottom of the housing. • Do not operate the charger with a damaged cord or plug.
PROBLEM POWERLINE PROBLEM PACK OR CHARGER HOT/COLD DELAY This charger has a hot/cold delay feature: when the charger detects a battery that is hot, it automatically starts a delay, suspending charging until the battery has cooled. After the battery has cooled, the charger automatically switches to the pack charging mode. This feature ensures maximum battery life. The red light flashes long, then short while in the hot/cold delay mode. This charger is designed to detect certain problems that can arise.
English 1. The best storage place is one that is cool and dry, away from direct sunlight and excess heat or cold. Storage Recommendations 4. If the battery pack does not charge properly: a. Check operation of receptacle by plugging in a lamp or other appliance; b. Check to see if receptacle is connected to a light switch which turns power off when you turn out the lights; c.
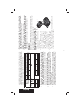
E FIG. 2 D L M C K J G B N A F H D I E 11 The saw is equipped with a worklight that is activated when the trigger switch is depressed. The light will automatically turn off 20 seconds after the trigger switch is released. If the trigger switch remains depressed, the worklight will remain on. NOTE: The worklight is for lighting the immediate work surface and is not intended to be used as a flashlight.
English FIG. 3 I N Q FIG. 3A NOTE: For best results, make sure your battery pack is fully charged. To install the battery pack (I) into the tool handle, align the battery pack with the rails inside the tool’s handle and slide it into the handle until the battery pack is firmly seated in the tool and ensure that it does not disengage. To remove the battery pack from the tool, press the release button (N) and firmly pull the battery pack out of the tool handle.
TO INSTALL THE BLADE 1. Place inner clamp FIG. 4 washer (O) on saw spindle with the large flat surface facing out P toward the blade F (Fig. 4, 5). 2. Retract the lower blade guard (G) and place blade on saw spindle O against the inner clamp washer (O), making sure that the blade will rotate in the proper direction (the direction of the rotation arrow on the saw blade and the teeth must point in the same direction as the direction of rotation arrow on the saw).
English TO REPLACE THE BLADE 1. To loosen the blade clamping screw (F), depress the blade lock button (D) and turn the saw spindle with the blade wrench until the blade lock engages and the blade stops rotating. With the blade lock engaged, turn the blade clamping screw clockwise with the blade wrench (screw has left-hand threads and must be turned clockwise to loosen). 2. Remove the blade clamping screw (F) and outer clamp washer (P) only. Remove old blade. 3.
KICKBACK Kickback is a sudden reaction to a pinched, bound or misaligned saw blade, causing an uncontrolled saw to lift up and out of the workpiece toward the operator. When the blade is pinched or bound tightly by the kerf closing down, the blade stalls and the motor reaction drives the unit rapidly back toward the operator.
English FIG. 8 CUTTING SHEETS OF METAL Figure 9 shows the correct and incorrect way to support a large sheet. To avoid kickback, support material near the cut. Do not support it away from the cut. If material is supported away from the cut, it will bind the blade and cause kickback. When cutting thin strips, keep Workpiece Support (Fig. 9) TO SET THE DEPTH OF CUT 1. Lay the piece of material you plan to cut along the blade as shown. 2. Note how much tooth projects beyond the material. 3.
To extend blade life, follow these practices: • Do not force the blade through the metal. The saw must cut at its own pace and at a constant rate. Maximizing Blade Life CORRECTING A CUT Should your cut begin to leave the cutting line, don’t try to force it back on. Forcing a correction can stall the saw and cause kickback. Instead, release the switch and allow the blade to come to a complete stop. Then, back the saw out of the cut. Restart the saw and re-enter the cut, following the desired cutting line.
English The charger and battery pack are not serviceable. To assure product SAFETY and RELIABILITY, repairs, maintenance and adjustment (including brush inspection and replacement) should be performed by a DEWALT factory service center, a DEWALT authorized Repairs WARNING: Since accessories, other than those offered by DEWALT, have not been tested with this product, use of such accessories with this tool could be hazardous.
within 90 days from the date of purchase with a receipt for a full refund – no questions asked. LATIN AMERICA: This warranty does not apply to products sold in Latin America. For products sold in Latin America, see country specific warranty information contained in the packaging, call the local company or see website for warranty information. FREE WARNING LABEL REPLACEMENT: If your warning labels become illegible or are missing, call 1-800-4-DEWALT (1-800-4339258) for a free replacement.