If you have questions or comments, contact us. Pour toute question ou tout commentaire, nous contacter. Si tiene dudas o comentarios, contáctenos. 1-800-4-DEWALT • www.dewalt.com INSTRUCTION MANUAL GUIDE D’UTILISATION MANUAL DE INSTRUCCIONES INSTRUCTIVO DE OPERACIÓN, CENTROS DE SERVICIO Y PÓLIZA DE GARANTÍA. ADVERTENCIA: LÉASE ESTE INSTRUCTIVO ANTES DE USAR EL PRODUCTO.
The definitions below describe the level of severity for each signal word. Please read the manual and pay attention to these symbols. DANGER: Indicates an imminently hazardous situation which, if not avoided, will result in death or serious injury. WARNING: Indicates a potentially hazardous situation which, if not avoided, could result in death or serious injury. CAUTION: Indicates a potentially hazardous situation which, if not avoided, may result in minor or moderate injury.
English b) c) d) e) f) g) tool while you are tired or under the influence of drugs, alcohol or medication. A moment of inattention while operating power tools may result in serious personal injury. Use personal protective equipment. Always wear eye protection. Protective equipment such as dust mask, nonskid safety shoes, hard hat, or hearing protection used for appropriate conditions will reduce personal injuries. Prevent unintentional starting.
6) SERVICE a) Have your power tool serviced by a qualified repair person using only identical replacement parts. This will ensure that the safety of the power tool is maintained. Additional Safety Rules – Portable Band Saws • Hold power tool by insulated gripping surfaces when performing an operation where the cutting accessory may contact hidden wiring. Cutting accessories contacting a “live” wire may make exposed metal parts of the power tool “live” and could give the operator an electric shock.
English sfpm ............. surface feet per minute SPM ............. strokes per minute Wear protective clothing and wash exposed areas with soap and water. Allowing dust to get into your mouth, eyes, or lay on the skin may promote absorption of harmful chemicals. WARNING: Use of this tool can generate and/or disperse dust, which may cause serious and permanent respiratory or other injury. Always use NIOSH/OSHA approved respiratory protection appropriate for the dust exposure.
The RBRC™ Seal The RBRC™ (Rechargeable Battery Recycling Corporation) Seal on the nickel cadmium, nickel metal hydride or lithium ion batteries (or battery packs) indicate that the costs to recycle these batteries (or battery packs) at the end of their useful life have already been paid by DEWALT.
English • An extension cord must have adequate wire size (AWG or American Wire Gauge) for safety. The smaller the gauge number of the wire, the greater the capacity of the cable, that is, 16 gauge has more capacity than 18 gauge. An undersized cord will cause a drop in line voltage resulting in loss of power and overheating. When using more than one extension to make up the total length, be sure each individual extension contains at least the minimum wire size.
Indicator Light Operation • Do not operate the charger if it has received a sharp blow, been dropped or otherwise damaged in any way. Take it to an authorized service center. • Do not disassemble the charger; take it to an authorized service center when service or repair is required. Incorrect reassembly may result in a risk of electric shock, electrocution or fire. • Disconnect the charger from the outlet before attempting any cleaning. This will reduce the risk of electric shock.
English LEAVING THE BATTERY PACK IN THE CHARGER The charger and battery pack can be left connected with the charge indicator showing Pack Charged. 4. If the battery pack does not charge properly: a. Check operation of receptacle by plugging in a lamp or other appliance; b. Check to see if receptacle is connected to a light switch which turns power off when you turn out the lights; c.
2. For long storage, it is recommended to store a fully charged battery pack in a cool dry place out of the charger for optimal results. NOTE: Battery packs should not be stored completely depleted of charge. The battery pack will need to be recharged before use. Trigger Switch (Fig. 2) SAVE THESE INSTRUCTIONS FOR FUTURE USE COMPONENTS (Fig. 2, 3) LED Worklight (Fig. 2) WARNING: Never modify the power tool or any part of it. Damage or personal injury could result. A. Auxiliary handle K. Hang hook B.
FIG. 2 English A P C B coarse tooth blades, while hard materials require fine tooth blades. Where a smoother finish is important, select one of the finer tooth blades. Select the appropriate band saw blade according to the material type, dimensions, and number of teeth. See Blade Description chart. The following table is intended as a general guide only. Determine the type of material and dimension of the workpiece and select the most appropriate band saw blade.
FIG. 3 A D K P Q M J J L L N F N G FIG. 4 ASSEMBLY AND ADJUSTMENTS WARNING: To reduce the risk of serious personal injury, turn tool off and remove the battery pack before making any adjustments or removing/installing attachments or accessories. An accidental start-up can cause injury. Installing and Removing the Battery Pack (Fig. 1, 2, 4) NOTE: For best results, make sure your battery pack is fully charged.
English To remove the battery pack from the tool, press the release button (Q) and firmly pull the battery pack out of the tool handle. Insert it into the charger as described in the charger section of this manual. 3. Begin removing the blade at the upper portion of the blade guard (M) and continue around the pulleys (L). When removing the blade, tension may be released and the blade may spring free. SAW BLADES ARE SHARP. USE CARE IN HANDLING THEM. 4.
4. Make sure that the blade is fully inserted into the guide rollers and positioned squarely against the rubber tires. 5. Rotate the blade tension lever (I) counterclockwise until it stops and then gently turn the saw over so that the pulleys rest on your work bench or table. Make sure the teeth face away from the bandsaw (Fig. 2, 5). 6. Turn the saw on and off a few times to ensure that the blade is seated properly.
English 6. End pieces, which would be heavy enough to cause injury when they drop, after cut-off, should be supported. Safety shoes are strongly recommended. End pieces may be hot and sharp. 7. Whenever possible, hold the saw firmly in both hands. If an application requires only one hand to be placed on the saw, be sure to keep the second hand clear of the blade area and do not allow the saw to fall against the clamped or supported material when the cut is complete.
FIG. 9 MAINTENANCE RECOMMENDED CUTTING POSITIONS YES NO YES Lubrication Self-lubricating bearings are used in the tool and periodic relubrication is not required. In the unlikely event that service is ever needed, take your tool to an authorized service location. YES NO YES NO YES NO YES NO Cleaning WARNING: Blow dirt and dust out of all air vents with clean, dry air at least once a week. To minimize the risk of eye injury, always wear ANSI Z87.1 approved eye protection when performing this.
English Recommended accessories for use with your tool are available at extra cost from your local dealer or authorized service center. If you need assistance in locating any accessory, please contact DEWALT Industrial Tool Co., 701 East Joppa Road, Baltimore, MD 21286, call 1-800-4-DEWALT (1-800-433-9258) or visit our website: www.dewalt. com. detail of warranty coverage and warranty repair information, visit www. dewalt.com or call 1-800-4-DEWALT (1-800-433-9258).
FREE WARNING LABEL REPLACEMENT: If your warning labels become illegible or are missing, call 1-800-4-DEWALT (1-800-4339258) for a free replacement.
avertissements et des directives pourrait se solder par un choc électrique, un incendie et/ou une blessure grave. Français Définitions : lignes directrices en matière de sécurité CONSERVER TOUS LES AVERTISSEMENTS ET TOUTES LES DIRECTIVES POUR UN USAGE ULTÉRIEUR Les définitions ci-dessous décrivent le niveau de danger pour chaque mot-indicateur employé. Lire le mode d’emploi et porter une attention particulière à ces symboles.
d) e) f) g) 3) SÉCURITÉ PERSONNELLE a) Être vigilant, surveiller le travail effectué et faire preuve de jugement lorsqu’un outil électrique est utilisé. Ne pas utiliser d’outil électrique en cas de fatigue ou sous l’influence de drogues, d’alcool ou de médicaments. Un simple moment d’inattention en utilisant un outil électrique peut entraîner des blessures corporelles graves. b) Utiliser des équipements de protection individuelle. Toujours porter une protection oculaire.
d) Français e) f) g) Ces mesures préventives réduisent les risques de démarrage accidentel de l’outil électrique. Ranger les outils électriques hors de la portée des enfants et ne permettre à aucune personne n’étant pas familière avec un outil électrique ou son mode d’emploi d’utiliser cet outil. Les outils électriques deviennent dangereux entre les mains d’utilisateurs inexpérimentés. Entretien des outils électriques.
• L’arsenic et le chrome dans le bois ayant subi un traitement chimique. Le risque associé à de telles expositions varie selon la fréquence à laquelle on effectue ces travaux. Pour réduire toute exposition à ces produits : travailler dans un endroit bien aéré, en utilisant du matériel de sécurité homologué, tel un masque antipoussières spécialement conçu pour filtrer les particules microscopiques.
Français V ....................volts A....................... ampères Hz ..................hertz W...................... watts min ................minutes ou AC ......... courant ou DC ....courant continu ......................... alternatif ..................classe I ou AC/DC ... courant ......................fabrication ......................... alternatif (mis à la terre) ou continu no ..................... vitesse à vide ..................fabrication classe II n .......................
• Le contenu des cellules d’une pile ouverte peut causer une irritation respiratoire. En cas d’inhalation, exposer l’individu à l’air libre. Si les symptômes persistent, consulter un médecin. AVERTISSEMENT : risques de brûlure. Le liquide de la pile peut s’enflammer s’il est exposé à des étincelles ou à une flamme. que ce soit (p. ex. percé par un clou, frappé d’un coup de marteau, piétiné). Les blocs-piles endommagés doivent être renvoyés à un centre de réparation pour y être recyclés.
• Protéger le chargeur de la pluie ou de la neige. • Tirer sur la fiche plutôt que sur le cordon pour débrancher le chargeur. Cela permet de réduire les risques d’endommager la fiche ou le cordon d’alimentation. • S’assurer que le cordon est protégé de manière à ce que personne ne marche ni ne trébuche dessus, ou à ce qu’il ne soit ni endommagé ni soumis à aucune tension. • N’utiliser une rallonge qu’en cas de nécessité absolue.
• • • • Chargeurs L’outil utilise un chargeur DEWALT. S’assurer de bien lire toutes les directives de sécurité avant d’utiliser le chargeur. Consulter le tableau figurant à la fin du présent mode d’emploi pour connaître la compatibilité des chargeurs et des blocs-piles. FIG.1 P Procédure de charge (Fig. 1) 1. Branchez le chargeur dans la prise appropriée avant d’y insérer le bloc-piles. 2.
assure aux blocs-piles une durée de vie maximale. Le voyant rouge clignote longuement, puis rapidement en mode de suspension de charge contre le chaud/froid. Fonctionnement du voyant LAISSER LE BLOC-PILES DANS LE CHARGEUR Le chargeur et son bloc-piles peuvent rester connectés, le voyant du chargeur affichant alors Bloc-piles chargé. BLOCS-PILES FAIBLES : les blocs-piles faibles continueront de fonctionner, mais il faudra s’attendre à un rendement moindre.
7. Ne pas congeler ou immerger le chargeur dans l’eau ou tout autre liquide. AVERTISSEMENT : risques de chocs électriques. Ne laisser aucun liquide pénétrer dans le chargeur, des chocs électriques pourraient en résulter. AVERTISSEMENT : risqu esde brûlure. Ne submerger le bloc-piles dans aucun liquide et le protéger de toute infiltration de liquide. Ne jamais tenter d’ouvrir le bloc-piles pour quelque raison que ce soit.
Français A. Poignée auxiliaire K. Crochet B. Bouton de verrouillage L. Poulie C. Gâchette M. Protège-lame D. Poignée principale N. Pneus en caoutchouc E. Clé hexagonale O. Vis de réglage d’alignement F. Butée de coupe P. Bloc-piles G. Galets de guidage Q. Boutons de libération du H. Écrou de verrouillage de réglage bloc-piles I. Levier de réglage de tension R. Témoin de charge de lame S. Lampe DEL J. Lame Lampe de travail (Fig. 2) Une lampe de travail (S) est située au-dessus de la lame.
FIG. 2 A P C B D E Q Français Choisissez la lame de scie à ruban appropriée selon le type de matériau et ses dimensions, et le nombre de dents. Se reporter au tableau Description des lames. Le tableau suivant ne se veut être qu’un guide général. Déterminer le type de matériau, les dimensions de la pièce à travailler puis choisir la lame de scie à ruban la plus appropriée. AVIS : Ne jamais utiliser la scie à ruban pour couper des matériaux en résine, car ceux-ci pourraient fondre.
Français que les dents de la lame (J) se trouveront à 0,38 mm (3/16 po) du bord du galet de guidage. RÉGLAGE D’ALIGNEMENT DE LAME 1. Tournez et ouvrez le levier de réglage de tension de lame (I) pour avoir accès aux vis de réglage d’alignement (O). 2. Utilisez une clé de 10 mm pour desserrer les écrous de verrouillage de réglage (H). 3. Utilisez une clé hexagonale de 3 mm (E) pour tourner la vis de réglage d’alignement (O) d’un quart de tour vers la droite.
le dans son chargeur comme décrit dans la section appropriée de ce manuel. Retrait et installation des lames AVERTISSEMENT : pour réduire tout risque de dommages corporels graves, arrêter et retirer le bloc-piles avant tout réglage ou avant de retirer ou installer toute pièce ou tout accessoire. Tout démarrage accidentel comporte des risques de dommages corporels. ATTENTION : risques de coupure. Le levier de réglage de tension de lame est maintenu sous tension grâce à un ressort.
4. Assurez-vous que la lame est FIG. 7 pleinement insérée dans les galets de guidage et parfaitement positionnée contre les pneus en caoutchouc. 5. Faites tourner à fond le levier F de réglage de tension de lame (I) vers la gauche, puis inversez délicatement la scie de façon à ce que les poulies soient appuyées sur l’établi ou la table. Assurezvous que les dents soient en sens inverse par rapport à la scie ruban (Fig. 2, 5). 6.
FIG. 8 1. Arrimez solidement le matériau à couper à l’aide d’un étau ou tout autre dispositif de serrage. 2. Mettez la butée de coupe (F) en contact avec la pièce à travailler sans toucher la pièce avec la lame. Mettez la scie en marche. 3. Lorsque la scie atteint la vitesse de rotation désirée, inclinez lentement et fermement le corps de l’outil pour mettre la lame de la scie à ruban en contact avec la pièce.
FIG. 9 • Ne déformez jamais la lame de la scie à ruban pendant l’opération de coupe. • N’utilisez jamais de réfrigérants fluides avec les scies à ruban portables. L’utilisation de ces derniers pourrait laisser un dépôt sur les pneus et affecter les performances de l’outil. • En cas de vibrations excessives pendant la coupe, assurez-vous que le matériau à découper est fermement arrimé. Si le problème persiste, changez la lame de la scie à ruban.
• CONFIRMATION DE PROPRIÉTÉ: en cas de perte provoquée par un incendie, une inondation ou un vol, cette preuve de propriété vous servira de preuve auprès de votre compagnie d’assurances. • SÉCURITÉ: l’enregistrement de votre produit nous permettra de communiquer avec vous dans l’éventualité peu probable de l’envoi d’un avis de sécurité régi par la loi fédérale américaine de la protection des consommateurs. Registre en ligne à www.dewalt.com/register.
CONTRAT D’ENTRETIEN GRATUIT DE DEUX ANS SUR LES BLOC-PILES DEWALT DC9071, DC9091, DC9096, DC9280, DC9360, DC9180, DCB120, DCB201 et DCB203 REMPLACEMENT GRATUIT DES ÉTIQUETTES D’AVERTISSEMENT : si les étiquettes d’avertissement deviennent illisibles ou sont manquantes, composer le 1 800 433-9258 (1 800 4-DEWALT) pour en obtenir le remplacement gratuit.
El término “herramienta eléctrica” incluido en las advertencias hace referencia a las herramientas eléctricas operadas con corriente (con cable eléctrico) o a las herramientas eléctricas operadas con baterías (inalámbricas). Definiciones: Normas de seguridad Las siguientes definiciones describen el nivel de gravedad de cada palabra de señal. Lea el manual y preste atención a estos símbolos. PELIGRO: indica una situación de peligro inminente que, si no se evita, provocará la muerte o lesiones graves.
o una clavija de ajuste que quede conectada a una pieza giratoria de la herramienta eléctrica puede provocar lesiones personales. e) No se estire. Conserve el equilibrio y párese adecuadamente en todo momento. Esto permite un mejor control de la herramienta eléctrica en situaciones inesperadas. f) Use la vestimenta adecuada. No use ropas holgadas ni joyas. Mantenga el cabello, la ropa y los guantes alejados de las piezas en movimiento.
otro paquete de baterías puede producir riesgo de incendio y lesiones. c) Cuando no utilice el paquete de baterías, manténgalo lejos de otros objetos metálicos como sujetapapeles, monedas, llaves, clavos, tornillos u otros objetos metálicos pequeños que puedan realizar una conexión desde un terminal al otro. Los cortocircuitos en los terminales de la batería pueden provocar quemaduras o incendio. d) En condiciones abusivas, el líquido puede ser expulsado de la batería. Evite su contacto.
Español • Detenga siempre la operación de inmediato si nota cualquier anormalidad. • Asegúrese siempre que todas las piezas estén debida y firmemente montadas antes de utilizar la herramienta. • Maneje siempre la hoja de la sierra de banda con cuidado cuando la monte o retire de la sierra. • Mantenga siempre las manos alejadas de la trayectoria de la hoja de la sierra de banda. • Espere siempre a que el motor haya alcanzado su velocidad completa antes de iniciar el corte.
de esta herramienta. Bajo algunas condiciones y duraciones de uso, el ruido producido por este producto puede contribuir a la pérdida auditiva. ATENCIÓN: Cuando no esté en uso, guarde la herramienta apoyada en un costado sobre una superficie estable, donde no interrumpa el paso o provoque una caída. Algunas herramientas con paquetes de baterías de gran tamaño pueden colocarse paradas sobre el paquete de baterías, pero pueden caerse fácilmente.
líquido de la batería entra en contacto con sus ojos, enjuáguelos con agua y los ojos abiertos por 15 minutos o hasta que cese la irritación. Si se requiere de asistencia médica, el electrolito de la batería está compuesto por una mezcla de carbonatos orgánicos líquidos y sales de litio. • El contenido de los elementos abiertos de la batería puede causar irritación en el tracto respiratorio. Salga al aire fresco. Si los síntomas persisten, busque asistencia médica. ADVERTENCIA: Peligro de quemaduras.
GUARDE ESTAS INSTRUCCIONES: Este manual contiene instrucciones de seguridad y operación importantes para los cargadores de baterías. • Antes de usar el cargador, lea todas las instrucciones y advertencias que se encuentren en el cargador, la unidad de batería y el producto que usa la unidad de batería. ADVERTENCIA: Peligro de descarga eléctrica. No permita que ningún líquido se introduzca en el cargador. Puede producir descargas eléctricas. ATENCIÓN: Peligro de quemaduras.
• Desenchufe el cargador antes de intentar limpiarlo. Esto reducirá el riesgo de descargas eléctricas. El retirar el paquete de baterías no reducirá este riesgo. • NUNCA intente conectar 2 cargadores entre sí. • El cargador está diseñado para operar con una corriente eléctrica estándar residencial de 120 V. No intente usarlo con ningún otro voltaje. Esto no aplica al cargador vehicular.
unidad. Esta función asegura la máxima duración de su batería. La luz roja parpadeará a intervalos largos, luego cortos cuando esté en modalidad de retardo por unidad caliente/fría. Operación de la luz indicadora PERMANENCIA DE LA UNIDAD DE BATERÍA EN EL CARGADOR El cargador y la unidad de batería pueden dejarse conectados con la luz del cargador indicando que la unidad está cargada.
Español 2. Puede que el cargador y la unidad de batería se calienten ligeramente durante el proceso de carga. Esto es normal y no representa ningún problema. Para facilitar el enfriamiento de la unidad de batería después del uso, evite colocar el cargador o la unidad de batería en un lugar cálido, como un cobertizo metálico o un remolque sin aislamiento térmico. 3. Una unidad de batería fría se demora el doble del tiempo en cargarse que una unidad de batería caliente.
A. Mango de auxilio B. Interruptor de desbloqueo C. Gatillo D. Mango principal E. Llave hexagonal F. Tope G. Rodillos de guía H. Contratuerca de ajuste I. Palanca de tensión de la hoja J. Hoja K. L. M. N. O. P. Q. Gancho para colgar Polea Protector de la hoja Llantas de goma Tornillos de ajuste Paquete de baterías Botones de desbloqueo de baterías R. Indicador de carga S. Luz de trabajo LED Luz de trabajo (Fig. 2) Hay una luz de trabajo (S) ubicada encima de la hoja.
FIG. 2 A P C B Seleccione la hoja para su sierra de banda de acuerdo al tipo de material, las dimensiones y el número de dientes. Vea el cuadro Descripción de la hoja. La siguiente tabla es para ser utilizada sólo como una guía general. Determine el tipo de material y la dimensión de la pieza de trabajo y seleccione la hoja para sierras de banda más apropiada. AVISO: Jamás utilice la sierra de banda para cortar materiales de resina que pudieran derretirse.
FIG. 3 A D K P Q M J J L L N F N G Gire el otro tornillo de ajuste 1/4 de vuelta en el sentido de las manillas del reloj. NOTA: Girar el tornillo de ajuste en el sentido de las manillas del reloj acerca la hoja al rodillo de guía, girar el tornillo en el sentido contrario a las manillas del reloj aleja la hoja del rodillo de guía. 4. Apriete las dos contratuercas de ajuste y cierre la palanca del cierre rápido. (Será necesario encender la sierra para observar el ajuste.) 5.
Para activar el indicador de carga, presione y sostenga el botón del indicador (R). Se iluminará una combinación de las tres luces LED verdes, que indicará el nivel de carga que queda. Cuando el nivel de carga está por debajo del nivel útil, el indicador no se iluminará, y la batería deberá recargarse. NOTA: El indicador de carga es sólo eso: un indicador de la carga de la unidad de batería.
4. Revise los rodillos de guía (G) y retire cualquier pieza grande que pudiera encontrarse atrapada en ellos. Las piezas atrapadas pueden prevenir la rotación de los rodillos guía y causar áreas planas en los rodillos de guía. 5. Las llantas de goma (N) están montadas en las poleas (L). Las llantas de goma deberían ser revisadas para confirmar que no están sueltas ni dañadas cuando se cambie la hoja. Limpie cualquier astilla que encuentre en las llantas de goma de las poleas.
Nunca debe de fiarse al gancho para colgar para apoyarse o para ayudarle a mantenerse equilibrado. ADVERTENCIA: Nunca intente usar estar herramienta colocándola sobre una superficie y trayendo el material hacia la herramienta. Sujete siempre bien la pieza de trabajo y lleve la herramienta a la pieza de trabajo, sujetando bien la herramienta con ambas manos en la medida de lo posible como se muestra en la Figura 8. 1. Monte el material a ser cortado en un torno u otro dispositivo de sujeción. 2.
FIG. 9 6. Los extremos, que podrían ser lo suficientemente pesados como para causar lesiones cuando se caigan luego del corte, deberían ser debidamente apoyadas. Se recomienda utilizar calzado de seguridad. Los extremos pueden estar calientes y afilados. 7. Siempre que sea posible, sujete la sierra firmemente con ambas manos.
Para reducir el riesgo de lesiones, con este producto deben usarse sólo los accesorios recomendados por DEWALT. Los accesorios que se recomiendan para utilizar con la herramienta están disponibles a un costo adicional en su distribuidor local o en un centro de mantenimiento autorizado. Si necesita ayuda para localizar algún accesorio, póngase en contacto con DEWALT Industrial Tool Co., 701 East Joppa Road, Baltimore, MD 21286, llame al 1-800-4-DEWALT (1-800-433-9258) o visite nuestro sitio web: www.dewalt.
MONTERREY, N.L. Av. Francisco I. Madero 831 Poniente - Col. Centro (818) 375 23 13 PUEBLA, PUE 17 Norte #205 - Col. Centro (222) 246 3714 QUERETARO, QRO Av. San Roque 274 - Col. San Gregorio (442) 2 17 63 14 SAN LUIS POTOSI, SLP Av. Universidad 1525 - Col. San Luis (444) 814 2383 TORREON, COAH Blvd. Independencia, 96 Pte. - Col. Centro (871) 716 5265 VERACRUZ, VER Prolongación Díaz Mirón #4280 - Col. Remes (229) 921 7016 VILLAHERMOSA, TAB Constitución 516-A - Col.
UNIDADES DE BATERÍA DEWALT La garantía del producto quedará nula si la unidad de batería ha sido alterada de cualquier manera. DEWALT no es responsable de ninguna lesión causada por alteraciones y podría iniciar un procedimiento judicial por fraude de garantía hasta el máximo grado permisible por la ley. enviar una notificación de seguridad conforme a la Federal Consumer Safety Act (Ley Federal de Seguridad de Productos para el Consumidor). Registro en línea en www.dewalt.com/register.
ESPECIFICACIONES DCS371 20 V Max* 570 PSPM SOLAMENTE PARA PROPÓSITO DE MÉXICO: IMPORTADO POR: DEWALT INDUSTRIAL TOOL CO. S.A. DE C.V. AVENIDA ANTONIO DOVALI JAIME, # 70 TORRE B PISO 9 COLONIA LA FE, SANTA FÉ CÓDIGO POSTAL : 01210 DELEGACIÓN ALVARO OBREGÓN MÉXICO D.F. TEL. (52) 555-326-7100 R.F.C.: BDE810626-1W7 Para servicio y ventas consulte “HERRAMIENTAS ELECTRICAS” en la sección amarilla.
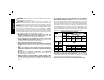
DEWALT Battery and Charger Systems Chargers/Charge Time (Minutes) – Chargeurs/Durée de charge (Minutes) – Cargadores de baterías/Tiempo de carga (Minutos) 120 Volts 12 Volts Battery Cat # Output Voltage DC011 DC022 DC9000 DC9310 DC9320 DCB095 DCB100 DCB101 DCB103 DCB106 DCB107 DW911 DW9106 DW9107 DW9108 DW9116 DW9117 DW9118 DW9216 DW9226 DW0246 DCB119 DW0249 DW9109 DC9319 DC9360 DC9280 DW0242 DCB200 DCB201 DCB203 DCB204 DCB207 DC9096 DC9099 DC9180 DC9181 DW9096 DW9098 DW9099 DC9