If you have questions or comments, contact us. Pour toute question ou tout commentaire, nous contacter. Si tiene dudas o comentarios, contáctenos. 1-800-4-DEWALT • www.dewalt.com INSTRUCTION MANUAL GUIDE D’UTILISATION MANUAL DE INSTRUCCIONES INSTRUCTIVO DE OPERACIÓN, CENTROS DE SERVICIO Y PÓLIZA DE GARANTÍA. ADVERTENCIA: LÉASE ESTE INSTRUCTIVO ANTES DE USAR EL PRODUCTO.
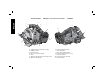
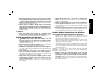
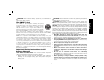
English DCS391, DCS393 20V Max* 6-1/2" Cordless Circular Saw 5250 RPM A L B K A M M J I C H F G A. B. C. D. E. F. G. N E TRIGGER SWITCH LOCK-OFF BUTTON TRIGGER SWITCH BATTERY PACK DEPTH ADJUSTMENT KNOB SHOE LOWER BLADE GUARD RETRACTING LEVER LOWER BLADE GUARD 2 H. I. J. K. L. M. N.
The definitions below describe the level of severity for each signal word. Please read the manual and pay attention to these symbols. DANGER: Indicates an imminently hazardous situation which, if not avoided, will result in death or serious injury. WARNING: Indicates a potentially hazardous situation which, if not avoided, could result in death or serious injury. CAUTION: Indicates a potentially hazardous situation which, if not avoided, may result in minor or moderate injury.
English 3) PERSONAL SAFETY a) Stay alert, watch what you are doing and use common sense when operating a power tool. Do not use a power tool while you are tired or under the influence of drugs, alcohol or medication. A moment of inattention while operating power tools may result in serious personal injury. b) Use personal protective equipment. Always wear eye protection.
f) When ripping always use a rip fence or straight edge guide. This improves the accuracy of cut and reduces the chance of blade binding. g) Always use blades with correct size and shape (diamond versus round) of arbor holes. Blades that do not match the mounting hardware of the saw will run eccentrically, causing loss of control. h) Never use damaged or incorrect blade washers or bolt. The blade washers and bolt were specially designed for your saw, for optimum performance and safety of operation.
English b) When blade is binding, or when interrupting a cut for any reason, release the trigger and hold the saw motionless in the material until the blade comes to a complete stop. Never attempt to remove the saw from the work or pull the saw backward while the blade is in motion or kickback may occur. Investigate and take corrective actions to eliminate the cause of blade binding.
and body. Always operate tool in well-ventilated area and provide for proper dust removal. Use dust collection system wherever possible. WARNING: ALWAYS wear proper personal hearing protection that conforms to ANSI S12.6 (S3.19) during use. Under some conditions and duration of use, noise from this product may contribute to hearing loss. WARNING: ALWAYS use eye protection. All users and bystanders must wear eye protection that conforms to ANSI Z87.1.
pack. Do not use a battery pack or charger that has received a sharp blow, been dropped, run over or damaged in any way (e.g., pierced with a nail, hit with a hammer, stepped on). Damaged battery packs should be returned to the service center for recycling. WARNING: Fire hazard. Do not store or carry the battery pack so that metal objects can contact exposed battery terminals. For example, do not place the battery pack in aprons, pockets, tool boxes, product kit boxes, drawers, etc.
WARNING: Burn hazard. Battery liquid may be flammable if exposed to spark or flame. The RBRC™ Seal The RBRC™ (Rechargeable Battery Recycling Corporation) Seal on the nickel cadmium, nickel metal hydride or lithium ion batteries (or battery packs) indicate that the costs to recycle these batteries (or battery packs) at the end of their useful life have already been paid by DEWALT.
English • Do not disassemble the charger; take it to an authorized service center when service or repair is required. Incorrect reassembly may result in a risk of electric shock, electrocution or fire. • Disconnect the charger from the outlet before attempting any cleaning. This will reduce the risk of electric shock. Removing the battery pack will not reduce this risk. • NEVER attempt to connect 2 chargers together. • The charger is designed to operate on standard 120V household electrical power.
PACK CHARGED WEAK BATTERY PACKS: Weak batteries will continue to function but should not be expected to perform as much work. FAULTY BATTERY PACKS: This charger will not charge a faulty battery pack. The charger will indicate faulty battery pack by refusing to light or by displaying problem pack or charger. NOTE: This could also mean a problem with a charger. HOT/COLD DELAY x PROBLEM PACK OR CHARGER PROBLEM POWER LINE Some chargers have a problem powerline indicator.
English 3. A cold battery pack will charge at about half the rate of a warm battery pack. The battery pack will charge at that slower rate throughout the entire charging cycle and will not return to maximum charge rate even if the battery pack warms. 4. If the battery pack does not charge properly: a. Check operation of receptacle by plugging in a lamp or other appliance; b. Check to see if receptacle is connected to a light switch which turns power off when you turn out the lights; c.
NOTE: For best results, make sure your battery pack is fully charged. To install the battery pack (C) into the tool handle, align the battery pack with the rails inside the tool’s handle and slide it into the handle until the battery pack is firmly seated in the tool and ensure that it does not disengage. To remove the battery pack from the tool, press the release button (M) and firmly pull the battery pack out of the tool handle.
English direction as the direction of rotation arrow on the lower blade guard). Do not assume that the printing on the blade will always be facing you when properly installed. When retracting the lower blade guard to install the blade, check the condition and operation of the lower blade guard to assure that it is working properly. Make sure it moves freely and does not touch the blade or any other part, in all angles and depths of cut. FIG.
FIG. 5 LOWER BLADE GUARD WARNING: The lower blade guard is a safety feature which reduces the risk of serious personal injury. Never use the saw if the lower blade guard is missing, damaged, misassembled or not working properly. Do not rely on the lower blade guard to protect you under all circumstances. Your safety depends on following all warnings and precautions as well as proper operation of the saw.
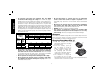
English Blade Diameter Teeth DW9155 DW9154 DW9153 6-1/2" (165 mm) 6-1/2" (165 mm) 6-1/2" (165 mm) 18 24 90 Application E. Snagging the lower guard on a surface below the material being cut momentarily reduces operator control. The saw can lift partially out of the cut increasing the chance of blade twist. 2. IMPROPER DEPTH OF CUT SETTING ON SAW To make the most efficient cut, the blade should protrude only far enough to expose one-half of a tooth as shown in Figure 7.
For the most efficient cutting action, set the depth adjustment so that one-half tooth of the blade will project below the material to be cut. This distance is from the tip of the tooth to the bottom of the gullet in front of it. This keeps blade friction at a minimum, removes sawdust from the cut, results in cooler, faster sawing and reduces the chance of kickback. A method for checking for correct cutting depth is shown in Figure 7.
English 5. Confirm the accuracy of the setting by checking the squareness of an actual cut on a scrap piece of material. Figure 10 shows proper sawing position. Note that hands are kept away from cutting area. To avoid kickback, DO support board or panel NEAR the cut (Fig. 11). DON’T support board or panel away from the cut (Fig. 12). Place the work with its “good” side – the one on which appearance is most important – down.
pieces by hand! Remember to support cantilevered and overhanging material. Use caution when sawing material from below. Be sure saw is up to full speed before blade contacts material to be cut. Starting saw with blade against material to be cut or pushed forward into kerf can result in kickback. Push the saw forward at a speed which allows the blade to cut without laboring. Hardness and toughness can vary even in the same piece of material, and knotty or damp sections can put a heavy load on the saw.
English 5. Make sure blade is not in contact with cutting surface before starting saw. 6. Start the motor and gradually lower the saw until its shoe rests flat on the material to be cut. Advance saw along the cutting line until cut is completed. 7. Release the trigger switch and allow the blade to stop completely before withdrawing the blade from the material. 8. When starting each new cut, repeat the above steps.
Three Year Limited Warranty DEWALT will repair, without charge, any defects due to faulty materials or workmanship for three years from the date of purchase. This warranty does not cover part failure due to normal wear or tool abuse. For further detail of warranty coverage and warranty repair information, visit www.dewalt.com or call 1-800-4-DEWALT (1-800-433-9258). This warranty does not apply to accessories or damage caused where repairs have been made or attempted by others.
DEWALT Battery and Charger Systems Chargers/Charge Time (Minutes) – Chargeurs/Durée de charge (Minutes) – Cargadores de baterías/Tiempo de carga (Minutos) 120 Volts 12 Volts Battery Cat # Output Voltage DC011 DC022 DC9000 DC9310 DC9320 DCB095 DCB100 DCB101 DCB102 DCB103 DCB106 DCB107 DCB112 DW911 DW9106 DW9107 DW9108 DW9116 DW9117 DW9118 DW9216 DW9226 DW0246 DCB119 DW0249 DW9109 DC9319 DC9360 DCB361 DC9280 DW0242 DCB200 DCB201 DCB203 DCB204 DCB205 DCB207 DC9096 DC9099 DC9180 D