
Use and Care Manual


ENGLISH
11
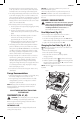
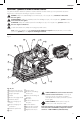
Proper Hand Position (Fig. G)
WARNING: To reduce the risk of serious personal injury,
ALWAYS use proper hand position as shown.
WARNING: To reduce the risk of serious personal
injury, ALWAYS hold securely in anticipation of a
suddenreaction.
Proper hand position requires one hand on the front handle
11
, with the other hand on the main handle
3
.
11
3
Fig. G
Instructions for Use
WARNING: Always observe the safety instructions
and applicableregulations.
WARNING: To reduce the risk of serious personal
injury, turn tool off and disconnect battery pack
before making any adjustments or removing/
installing attachments or accessories. An
accidental start-up can causeinjury.
Switching On and Off (Fig. A1)
Press the on/off switch
2
to turn the track sawon.
Guiding the Tool (Fig. A1, G, H)
WARNING:
• ALWAYS secure the workpiece in such a manner
that it cannot move whilesawing.
• ALWAYS push the machine forward. NEVER pull
the machine backward towardsyou.
• ALWAYS use the track saw with both hands.
Put one hand on the main handle
3
and the
second hand on the front handle
11
as shown
in FigureG.
• ALWAYS use the clamp to hold the rail to
theworkpiece.
• Use proper hand position to guide the sawproperly.
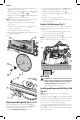
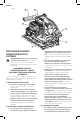
• The cutting indicator
27
displays the cutting line for 0°
and 47° cuts (without guide rail).
• The blade position indicator
29
shows the blade
position for fullplunge.
• For optimum results, clamp the workpiece bottomup.
29
28
27
27
Fig. H
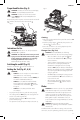
Cutting
1. Place the machine with the front part of the saw shoe
4
on theworkpiece.
2. Push the plunge trigger
1
forward, then press the on/
off switch
2
to turn the sawon.
3. Press the saw down to set cutting depth and push it
forward in the cuttingdirection.
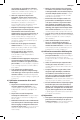
Plunge Cuts (Fig. A2)
WARNING: To avoid kickbacks, the following
instructions MUST be observed when plunge cutting:
• Place the machine onto the guide rail
28
and
release the anti-kickback knob
18
by turning it
counter-clockwise.
• Turn the machine on and slowly press the saw
down onto the set cutting depth and push
forward in the cutting direction. The cutting
indicators
27
display the absolute front and the
absolute rear cutting points of the saw blade (dia.
6.5" [165 mm]) at maximum cutting depth and
using the guiderail.
• If kickback happened during the plunge cut, turn
the anti-kickback knob
18
counter-clockwise to
release it from therail.
• When you have finished the plunge cut, turn
the anti-kickback knob
18
clockwise into the
lockposition.
Blades
WARNING: To minimize the risk of eye injury, always
wear ANSI Z87.1 approved eye protection. Carbide
is a hard but brittle material. Foreign objects in the
work piece such as wire or nails can cause tips to
crack or break. Only operate saw when proper saw
blade guard is in place. Mount blade securely in
proper rotation before using, and always use a clean,
sharpblade.
WARNING: Do not cut metal, masonry, glass,
masonry-type planking, cement board, tile or plastic
with thissaw.
A dull blade will cause inefficient cutting, overload on the
saw motor, excessive splintering and increase the possibility