
Use and Care Manual


ENGLISH
8
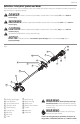
Fig.B
7
6
8
20
Fig.C
24
24
4
23
Attaching the Auxiliary Handle (Fig. A, C)
1. Place the auxiliary handle
4
on top of the handle base
23
so the upper trimmer pole
15
is between them.
2. Hold the auxiliary handle in place and slide the handle
bolts
24
into the handle from the top, threading them
into the handlebase.
3. Tighten the handle bolts with the supplied hex wrench .
Ensure the handle is securelyattached.
OPERATION
WARNING: To reduce the risk of
serious personal injury, turn unit off and remove
the battery pack before making any adjustments
or removing/installing attachments or
accessories. An accidental start-up can causeinjury.
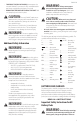
Attaching Guard (Fig. D, E)
WARNING: Never remove the guard.
Damage or personal injury couldresult.
WARNING: NEVER OPERATE
APPLIANCE WITHOUT GUARD FIRMLY IN PLACE.
The guard must always be properly attached on the
appliance to protect theuser.
1. Assemble the guard
9
to the motor housing
5
.
2. Using a crosshead screwdriver, insert the 2 guard screws
21
and tighten securely.
NOTE: An extended coverage guard is available (sold
separately) for extra coverage if desired. Use replacement
guard Part Number N776035.
Fig.D
5
Fig.E
21
9
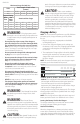
Installing and Removing the Battery Pack
(Fig. F)
NOTE: For best results, make sure your battery pack is
fullycharged.
To install the battery pack
12
into the tool handle, align the
battery pack with the rails inside the tool’s handle and slide
it into the handle until the battery pack is firmly seated in
the tool and ensure that it does notdisengage.
To remove the battery pack from the tool, press the release
button
13
and firmly pull the battery pack out of the tool
handle. Insert it into the charger as described in the charger
section of thismanual
the pole completely until the guard
9
securely
locks
into place over the rear of the battery housing
11
.