
Use and Care Manual


ENGLISH
7
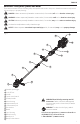
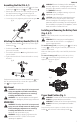
Assembling the Pole (FIG. A, C)
1. To assemble the pole, line up the hole
15
in the lower
trimmer pole
8
with the pin
16
on the pole bracket
9
.
2. Pull the pin out and slide the lower trimmer pole into
the upper trimmer pole
7
as shown in figureC.
3. Release the pin and ensure it fully engages the hole.
4. Secure the poles by tightening the bracket wingnut
17
.
fig. C
17
16
15
Attaching the Auxiliary Handle (FIG. A, D)
1. Place the auxiliary handle
5
onto the top of the upper
trimmer pole
7
.
2. Slide the bracket
18
of the auxiliary handle into the
bottom of the handle.
3. Thread the handle bolts
19
through the bracket and
into the handle.
4. Tighten the handle bolts. Ensure the handle is securely
attached.
fig. D
18
1919
If adjustment is necessary, loosen the handle bolts
19
and
slide the auxiliary handle up or down the upper trimmer
pole
7
. Then, retighten the bolts.
Adjustment
WARNING: To reduce the risk of serious personal
injury, turn appliance off and remove battery
before making any adjustments or removing/
installing attachments or accessories.
WARNING: Never operate appliance without guard
firmly in place. Damage or personal injury could result.
OPERATION
WARNING: To reduce the risk of serious personal
injury, turn unit off and remove the battery pack
before making any adjustments or removing/
installing attachments or accessories. An
accidental start-up can causeinjury.
WARNING: Always use proper eye protection that
conforms to ANSI Z87.1 (CAN/CSA Z94.3) while
operating this appliance.
WARNING: Remove the battery before making any
assembly, adjustments, or changing accessories. Such
preventive safety measures reduce the risk of starting
the TRIMMER accidentally.
CAUTION: Before you begin trimming, only use the
appropriate type of cutting line.
CAUTION: Inspect area to be trimmed and remove
any wire, cord, or string-like objects which could
become entangled in the rotating line or spool. Be
particularly careful to avoid any wire which might be
bent outwardly into the path of the appliance, such as
barbs at the base of a chain link fence.
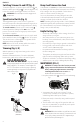
Installing and Removing the Battery Pack
(Fig. A, E, F)
NOTE: For best results, make sure your battery pack is
fullycharged.
WARNING: Before removing or installing battery,
make certain the lock-off lever is not engaged to
prevent trigger actuation.
To install battery pack: Insert battery pack
13
into battery
housing
12
as shown in figureE until fully seated and an
audible click is heard.
Make sure battery pack is fully seated and fully latched into
position.
To remove battery pack: Depress the battery release
button
14
on the battery and pull battery pack out of
appliance as shown in figureF.
fig. E
fig. F
Proper Hand Position (Fig. G
WARNING: To reduce the risk of serious personal injury,
ALWAYS use proper hand position as shown.
WARNING: To reduce the risk of serious personal injury,
ALWAYS hold securely in anticipation of a sudden
reaction.
Proper hand position requires one hand on the main
handle
3
and one hand on the auxiliary handle
5
.