If you have questions or comments, contact us. Pour toute question ou tout commentaire, nous contacter. Si tiene dudas o comentarios, contáctenos. 1-800-4-DEWALT • www.dewalt.com INSTRUCTION MANUAL GUIDE D'UTILISATION MANUAL DE INSTRUCCIONES INSTRUCTIVO DE OPERACIÓN, CENTROS DE SERVICIO Y PÓLIZA DE GARANTÍA. ADVERTENCIA: LÉASE ESTE INSTRUCTIVO ANTES DE USAR EL PRODUCTO.
SAVE ALL WARNINGS AND INSTRUCTIONS FOR FUTURE REFERENCE Definitions: Safety Guidelines Work Area Safety a) Keep work area clean and well lit. Cluttered or dark areas invite accidents. b) Keep children and bystanders away while operating an inspection camera. Distractions can cause you to lose control. Personal Safety a) Stay alert, watch what you are doing and use common sense when operating an inspection camera.
English • The inspection camera should only be used with specifically designated DEWALT batteries. Use of any other batteries may create a risk of fire. • Store the inspection camera out of reach of children and other untrained persons. Tools are dangerous in the hands of untrained users. • Do not disassemble the inspection camera. There are no user serviceable parts inside. • Do not use anywhere the unit may come into exposure with moving parts, hazardous chemicals, or electrical charges.
– Connect the equipment into an outlet on a circuit different from that to which the receiver is connected. – Consult the dealer or an experienced radio/TV technician for help. Important Safety Instructions for All Battery Packs When ordering replacement battery packs, be sure to include catalog number and voltage. Consult the chart at the end of this manual for compatibility of chargers and battery packs. The battery pack is not fully charged out of the carton.
English been dropped, run over or damaged in any way (i.e., pierced with a nail, hit with a hammer, stepped on). Damaged battery packs should be returned to service center for recycling. WARNING: Fire hazard. Do not store or carry battery so that metal objects can contact exposed battery terminals. For example, do not place battery in aprons, pockets, tool boxes, product kit boxes, drawers, etc., with loose nails, screws, keys, etc.
Minimum Gauge for Cord Sets Volts Total Length of Cord in Feet (meters) Ampere Rating 120V 25 (7.6) 50 (15.2) 100 (30.5) 150 (45.7) 240V 50 (15.2) 100 (30.5) 200 (61.0) 300 (91.4) More Not More AWG Than Than 0 6 18 16 16 14 6 10 18 16 14 12 10 12 16 16 14 12 12 16 14 12 Not Recommended • Do not place any object on top of charger or place the charger on a soft surface that might block the ventilation slots and result in excessive internal heat. Place the charger in a position away from any heat source.
English 3. The completion of charge will be indicated by the red light remaining ON continuously. The pack is fully charged and may be used at this time or left in the charger. • Do not disassemble charger; take it to an authorized service center when service or repair is required. Incorrect reassembly may result in a risk of electric shock, electrocution or fire. • Disconnect the charger from the outlet before attempting any cleaning. This will reduce the risk of electric shock.
1. Longest life and best performance can be obtained if the battery pack is charged when the air temperature is between 65 °F and 75 °F (18–24 °C). DO NOT charge the battery pack in an air temperature below +40 °F (+4.5 °C), or above +105 °F (+40.5 °C). This is important and will prevent serious damage to the battery pack. 2. The charger and battery pack may become warm to touch while charging. This is a normal condition, and does not indicate a problem.
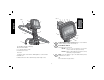
FIG. 2 FIG. 3 H D R J K M L E English S I F G C H Q P N B A A. 12V Max* Lithium Ion Battery B. Camera with LED’s C. 3' (.91 m) Camera cable D. Camera connector E. Screen F. Camera cable on/off switch / LED brightness control switch G. Handle set H. Micro SD slot for micro SD memory cards 16 gb or less 8 O I. Power button for the screen: Both the screen and the camera cable (F) need to be turned on. J.
Camera: Press this button for taking a photo. M. Record: Press this button to start and stop recording a video. N. Main Menu: Press this button to show a list of options for operating the inspection camera or to exit a screen. O. Back Arrow: Press this button to navigate backward. P. OK: Press this button to save changes. Q. Forward Arrow: Press this button to navigate forward. R. Power indicator for the handle set: When the green light is on it indicates that the handle set is on.
Hook, Magnet and Mirror DCT411 (Fig. 7, 8) English FIG. 5 Follow the process below to assemble the hook, magnet or mirror onto the DCT411 9mm camera. 1. With the sleeve (W) on the accessory, insert the bottom of accessory (bent wire) into the hole (X) in the 9mm camera cable. D To remove the camera cable, turn the connector clockwise (direction of arrow). Additional camera cable and extensions are available at additional cost. Please contact DEWALT Industrial Tool Co.
To remove the battery pack from the tool, press the release button (BB) and firmly pull the battery pack out of the tool handle. Insert it into the charger as described in the charger section of this manual. Belt Hook (Fig. 9) (Optional Accessory) Getting Started INITIAL SETUP Language Setup 1. Press the forward or back arrow to select English, French or Spanish. 2. Press the OK button to confirm and exit. OPERATION Installing and Removing the Battery Pack (Fig. 10) Date and Time Setup 1.
2. Press the forward or back arrow to select the Folder option. English 4. Press the OK button to save changes (field turns yellow). 5. Repeat above steps to change remaining fields. 6. Press the main menu button to exit. BASIC OPERATION NOTE: At any time during the camera operation, pressing the main menu button will return to the previous menu. To Record Photos or Videos Be sure a micro SD card (sold separately) is loaded in the card slot (H). 1. Turn both the camera (B) and the handle set (G) on. 2.
4. Press the forward or back arrow to select a dated folder. 8. Press the forward or back arrow to advance to the next photo or video. 9. When finished, press the main menu button to exit. 5. Press the OK button to navigate to the next screen. 6. Press the forward or back arrow to select a photo or video. English 7. Press the OK button to view the photo or video. To Delete Individual Photos or Videos: 1. Press the main menu button to show the Main Menu. 2.
8. Press the delete button. Select YES to delete the individual photo or video. English To Delete a Photo or Video While Viewing 1. Press the main menu button to show the Main Menu. 2. Press the forward or back arrow to select the Folder option. To Change Languages 1. Press the main menu button to show the Main Menu. 2. Press the forward or back arrow to select the Language option. 3. Press the OK button to navigate to the next screen. 4. Press the forward or back arrow to select a dated folder. 5.
To Activate the Time Stamp 1. Press the main menu button to show the Main Menu. 2. Press the forward or back arrow to select the Time Stamp option. 5. Press the OK button to save changes. 6. Press the main menu button to exit. English To Change Date/Time 1. Press the main menu button to show the Main Menu. 2. Press the forward or back arrow to select Date/Time option. 3. Press the OK button to navigate to the next screen. 4. Press the forward or back arrow to select OFF or ON. 3.
English 2. Press the forward or back arrow to select the Default Setup option. To Format Micro SD Card NOTICE: Formatting the micro SD card will erase all data. 1. Press the main menu button to show the Main Menu. 2. Press the forward or back arrow to select the Format Disk option. 3. Press the OK button to navigate to the next screen. 4. Press the forward or back arrow to select NO or YES. 3. Press the OK button to navigate to the next screen. 4. Press the forward or back arrow to select NO or YES. 5.
• If the picture is dim, roll the brightness control switch to brighten the LED light. MAINTENANCE Cleaning WARNING: Since accessories, other than those offered by DEWALT, have not been tested with this product, use of such accessories with this tool could be hazardous. To reduce the risk of injury, only DEWALT recommended accessories should be used with this product. Recommended accessories for use with your tool are available at extra cost from your local dealer or authorized service center.
English LATIN AMERICA: This warranty does not apply to products sold in Latin America. For products sold in Latin America, see country specific warranty information contained in the packaging, call the local company or see website for warranty information. FREE WARNING LABEL REPLACEMENT: If your warning labels become illegible or are missing, call 1-800-4-DEWALT (1-800-4339258) for a free replacement.
• • Définitions : lignes directrices en matière de sécurité • Les définitions ci-dessous décrivent le niveau de danger pour chaque mot-indicateur employé. Lire le mode d’emploi et porter une attention particulière à ces symboles. DANGER : indique une situation dangereuse imminente qui, si elle n’est pas évitée, entraînera la mort ou des blessures graves. AVERTISSEMENT : indique une situation potentiellement dangereuse qui, si elle n’est pas évitée, pourrait entraîner la mort ou des blessures graves.
b) Après utilisation, ranger le bloc-piles à l’écart de tout objet métallique comme trombones, pièces de monnaie, clés, clous, vis ou autres petits objets susceptibles de conduire l’électricité entre les bornes. Court-circuiter les bornes comporte des risques de brûlures ou d’incendie. c) Se prémunir de tout contact avec le liquide que le blocpiles pourrait perdre lorsque sujet à des conditions extrêmes. En cas de contact accidentel, rincer abondamment à l’eau claire.
• Ne pas démonter la caméra de surveillance. Elle ne comporte à l’intérieur aucune pièce réparable par l’utilisateur. • Ne jamais utiliser la caméra à proximité de pièces mobiles ou de produits chimiques dangereux et la protéger de toute décharge électrique. Les éléments suivants posent des risques de dommages corporels ou mortels : murs, tuyaux, automobiles et machines. • Ne pas utiliser la caméra de surveillance à proximité d’une machine en mouvement.
nuisibles à toute réception radio ou télévision, ce qui peut être déterminé en allumant et éteignant l’équipement, l’utilisateur est encouragé à tenter de corriger ces interférences en prenant l’une ou plusieurs des mesures suivantes : – Réorienter l’antenne de réception ou en changer l’emplacement; – Augmenter la distance entre l’équipement et le récepteur; – Brancher l’équipement à une prise située sur un circuit différent de celui sur lequel le récepteur est connecté; – Contacter le détaillant ou consult
La SRPRCMC, en collaboration avec DEWALT et d’autres utilisateurs de piles, a mis sur pied des programmes aux États-Unis et au Canada pour faciliter la collecte des piles au nickel-cadmium, à l’hydrure métallique de nickel ou au lithium-ion usagées.
Français utilisée pour obtenir une certaine longueur, s’assurer que chaque rallonge présente au moins le calibre de fil minimum. Le tableau ci-dessous illustre les calibres à utiliser selon la longueur de rallonge et l’intensité nominale indiquée sur la plaque signalétique. En cas de doute, utiliser le calibre suivant. Plus le calibre est petit, plus la rallonge peut supporter de courant.
3. En fin de charge, le voyant rouge restera ALLUMÉ de façon continue. Le bloc-piles est alors complètement chargé et peut être utilisé ou laissé dans le chargeur. • Débrancher le chargeur du secteur avant tout entretien. Cela réduira tout risque de chocs électriques. Le fait de retirer le bloc-piles ne réduira pas ces risques. • NE JAMAIS tenter de connecter 2 chargeurs ensemble. • Le chargeur a été conçu pour être alimenté en courant électrique domestique standard de 120 volts.
BLOCS-PILES FAIBLES : les blocs-piles faibles continueront de fonctionner, mais il faudra s’attendre à un rendement moindre. d. Si le problème persiste, amener l’outil, le bloc-piles et son chargeur dans un centre de réparation local. 4. Recharger le bloc-piles lorsqu’il ne produit plus assez de puissance pour effectuer un travail qu’il faisait facilement auparavant. NE PAS CONTINUER à l’utiliser dans ces conditions. Suivre la procédure de charge.
E. Écran F. Interrupteur marche/arrêt du câble de caméra / bouton de réglage de la luminosité DEL G. Poignée H. Fente micro SD pour carte mémoire micro SD de 16 Go maximum CONSERVER CES CONSIGNES POUR UTILISATION ULTÉRIEURE DESCRIPTION (Fig. 2, 3) AVERTISSEMENT : ne jamais modifier la caméra de surveillance ni aucun de ses composants, car il y a risques de dommages corporels ou matériels. FIG. 2 FIG.
Français K. Marche : Appuyer sur ce bouton pour aller dans le dossier où les photos et les vidéos sont enregistrées. OU Appuyer sur ce bouton pour démarrer les vidéos. L. Caméra : Appuyer sur ce bouton pour prendre une photo. M. Enregistrer : Appuyer sur ce bouton pour démarrer ou arrêter d’enregistrer une vidéo. N. Menu principal : Appuyer sur ce bouton pour afficher une liste d’options pour utiliser la caméra de surveillance ou quitter un écran. O.
Pour retirer l’écran de la poignée, tirez-le fermement hors de la poignée. L’écran peut être allumé et visionné lorsqu’il n’est pas rattaché à la poignée pour faciliter l’utilisation de la caméra. Alignez le crochet ou l’aimant sur la rainure grise (T) puis poussez vers le bas jusqu’à ce que les languettes (U) à l’extrémité du crochet/aimant soient arrimées dans les encoches (V) sur la lentille de la caméra. Tournez la partie saillante vers la droite pour verrouiller la base du crochet ou de l’aimant.
côté de l’outil à l’aide seulement de la vis (Z) fournie, pour accommoder un gaucher ou un droitier. Si vous ne désirez pas utiliser le crochet, il peut être complètement retiré de l’outil. Pour déplacer le crochet de ceinture, retirez la vis (Z) le maintenant en place puis réassemblez-le sur le côté opposé. 2. Veillez à ce que l’accessoire soit bien dans la rainure (Y) du manchon puis glissez le manchon sur la caméra jusqu’à ce qu’il recouvre le trou (X). FIG.
5. Répétez le processus ci-dessus pour modifier les champs restants. 6. Appuyez sur le bouton du menu principal pour quitter. Instruction de démarrage CONFIGURATION INITIALE Configuration du langage 1. Appuyez sur les flèches avant ou retour pour choisir Anglais, Français ou Espagnol. OPÉRATIONS FONDAMENTALES REMARQUE : en appuyant sur le bouton du menu principal, on peut à tout moment au cours de l’utilisation de la caméra retourner au menu précédent.
La caméra créera un dossier sur la carte micro SD pour la journée en question. Toutes les photos ou vidéos prisent ce jour-là seront enregistrées dans ce dossier. Visionner photos ou vidéos 1. Appuyez sur le bouton du menu principal pour afficher celui-ci. 2. Appuyez sur les flèches avant ou retour pour choisir l’option Dossier. 6. Appuyez sur les flèches avant ou retour pour choisir une photo ou une vidéo. Français 7. Appuyer sur le bouton OK pour visionner la photo ou la vidéo. 3.
Effacer une photo ou une vidéo individuelle : 1. Appuyez sur le bouton du menu principal pour afficher celui-ci. 2. Appuyez sur les flèches avant ou retour pour choisir l’option Dossier. 6. Appuyez sur les flèches avant ou retour pour choisir une photo ou une vidéo. 7. Appuyez sur le bouton Supprimer. Sélectionner OUI pour effacer une photo ou une vidéo individuelle. Français 3. Appuyez sur le bouton OK pour passer à l’écran suivant. 4.
7. Appuyez sur le bouton OK pour visionner. Effacer une photo ou une vidéo pendant la projection 1. Appuyez sur le bouton du menu principal pour afficher celui-ci. 2. Appuyez sur les flèches avant ou retour pour choisir l’option Dossier. Français 8. Appuyez sur le bouton Supprimer. Sélectionner OUI pour effacer une photo ou une vidéo individuelle. 3. Appuyez sur le bouton OK pour passer à l’écran suivant. 4. Appuyez sur les flèches avant ou retour pour choisir un dossier daté. 5.
Changer la date/l’heure 1. Appuyez sur le bouton du menu principal pour afficher celui-ci. 2. Appuyez sur les flèches avant ou retour pour choisir l’option Date/ Heure. 3. Appuyez sur le bouton OK pour la sélectionner. 4. Appuyez sur les flèches avant ou retour pour choisir Anglais, Français ou Espagnol. 3. Appuyez sur le bouton OK pour passer à l’écran suivant. 4. Appuyez sur les flèches avant ou retour pour mettre en surbrillance le champ à modifier. 5.
Français Activer l’horodatage 1. Appuyez sur le bouton du menu principal pour afficher celui-ci. 2. Appuyez sur les flèches avant ou retour pour choisir l’option Horodatage. Formater la carte micro SD AVIS : le formatage de la carte micro SD en supprimera toutes les données. 1. Appuyez sur le bouton du menu principal pour afficher celui-ci. 2. Appuyez sur les flèches avant ou retour pour choisir l’option Formater disque. 3. Appuyez sur le bouton OK pour passer à l’écran suivant. 4.
Changer la configuration de base AVIS : tout changement apporté à la Configuration de base supprimera la configuration présente et restaurera les paramètres d’usine. 1. Appuyez sur le bouton du menu principal pour afficher celui-ci. 2. Appuyez sur les flèches avant ou retour pour choisir l’option Config. de base. • Assurez-vous que la pile DEWALT fonctionne correctement. Si le voyant de charge basse clignote sur l’écran, la pile doit être rechargée.
Français • Veillez à ce que l’écran soit bien rattaché à la poignée. La photo pourra se figer si vous tentez de retirer l’(écran) de la poignée alors que vous prenez une photo ou une vidéo. • Veillez à ce que la pile soit bien installée dans la poignée pendant l’utilisation. • Assurez-vous que le câble de caméra est rattaché correctement à la poignée. • Veillez à ce que la poignée et l’écran soient allumés.
REMPLACEMENT GRATUIT DES ÉTIQUETTES D’AVERTISSEMENT : Si les étiquettes d’avertissement deviennent illisibles ou sont manquantes, composer le 1 800 4-DEWALT pour en obtenir le remplacement gratuit. par un tiers. Cette garantie confère des droits légaux particuliers à l’acheteur, mais celui-ci pourrait aussi bénéficier d’autres droits variant d’un état ou d’une province à l’autre.
• Realice el mantenimiento con personal calificado. Se requiere servicio cuando el aparato haya sido dañado de alguna manera, el aparato haya estado expuesto a la lluvia o la humedad, no funcione normalmente o se haya caído. Definiciones: Normas de seguridad Las siguientes definiciones describen el nivel de gravedad de cada palabra de señal. Lea el manual y preste atención a estos símbolos. PELIGRO: indica una situación de peligro inminente que, si no se evita, provocará la muerte o lesiones graves.
c) En condiciones de abuso, la batería puede expulsar líquido; evite el contacto con el mismo. Si se presenta un contacto accidental enjuague con agua. Si el líquido entra en contacto con los ojos, en forma adicional busque atención médica. El líquido expulsado de la batería puede causar irritación o quemaduras. d) Vístase debidamente. No utilice ropa suelta ni joyas. Mantenga su pelo, ropa y guantes alejados de piezas móviles.
Español • No opere la cámara de inspección cerca de maquinaria en movimiento. Pueden tener como resultado lesiones si el cable de la cámara se ve atrapado en las piezas móviles y hala al usuario hacia ellas. • No utilice la cámara de inspección en las vecindades de sustancias químicas corrosivas. La exposición a ambientes corrosivos y aceitosos puede arruinar el plástico que cubre la cabeza de la cámara y deteriorar la calidad de la imagen.
– Consulte con el concesionario o con un técnico de radio y televisión con experiencia que pueda ayudarle. Instrucciones de seguridad importantes para todas las unidades de batería Cuando solicite unidades de batería de repuesto, no olvide indicar el número de catálogo y el voltaje. Consulte la tabla al final de este manual para ver la compatibilidad entre cargadores y unidades de batería. La unidad de batería no viene completamente cargada de fábrica.
RBRC™ es una marca comercial registrada de Rechargeable Battery Recycling Corporation. • Si el contenido de la batería entra en contacto con la piel, lave el área de inmediato con agua y un jabón suave. Si el líquido de la batería entra en contacto con sus ojos, enjuáguelos con agua y los ojos abiertos por 15 minutos o hasta que cese la irritación. Si se requiere de asistencia médica, el electrolito de la batería está compuesto por una mezcla de carbonatos orgánicos líquidos y sales de litio.
• Estos cargadores no fueron diseñados para ser utilizados para más que cargar las baterías recargables DEWALT. Cualquier otro uso puede producir riesgo de incendios, descargas eléctricas o electrocución. • No exponga el cargador a la lluvia o a la nieve. • Tire del enchufe y no del cable cuando desconecte el cargador. De esta forma se reduce el riesgo de daño al enchufe y cable.
pruebe con otra unidad de batería para determinar si el cargador está en buen estado. Si la segunda unidad de batería carga correctamente, significa que la primera está fallada y debería ser llevada a un centro de servicio u otro lugar de colección para su reciclaje. Si la segunda unidad de batería hace que el cargador indique el mismo problema que la primera, lleve el cargador a un centro de servicio autorizado para su examinación. Cargadores Su herramienta utiliza un cargador DEWALT.
la lana de acero, el papel de aluminio o cualquier acumulación de partículas metálicas deberían mantenerse alejados de las cavidades del cargador. Desenchufe siempre el cargador de la toma de corriente cuando no haya una unidad de batería en su cavidad. Desenchufe el cargador antes de intentar limpiarlo. 6. No congele ni sumerja el cargador en agua o cualquier otro líquido. ADVERTENCIA: Peligro de descarga eléctrica. No permita que ningún líquido se introduzca en el cargador.
FIG. 3 FIG. 2 H D R J K M L E S I F G C H Q P N O B Español A A. Batería de iones de litio de 12V Max* B. Cámara con LEDs C. Cable de la cámara de 0,91 m (3 pies) D. Conector de la cámara E. Pantalla F. Conmutador de encendido y apagado del cable de la cámara/ interruptor de control del brillo del LED G. Conjunto de la agarradera H. Ranura MicroSD para tarjetas de memoria MicroSD de 16 GB o menos 48 I.
K. Reproducir: Oprima el botón para acceder a la carpeta donde se guardan las fotos y videos. Ú Oprima el botón para reproducir videos. L. Cámara: Oprima este botón para tomar una foto. M. Grabar: Oprima este botón para iniciar y detener la grabación de un video. N. Menú principal: Oprima este botón para mostrar una lista de opciones para operar la cámara de inspección o para salir de una pantalla. O. Flecha hacia atrás: Oprima este botón para navegar hacia atrás. P.
Para instalar la pantalla (E) en el conjunto de la agarradera (G), alinee la pantalla con los rieles dentro del conjunto de la agarradera y deslícela firmemente en la agarradera hasta que oiga el chasquido de cierre. Para retirar la pantalla del conjunto de la agarradera, deslice firmemente la pantalla hacia arriba de la agarradera de la herramienta. La pantalla se puede activar y visualizar cuando no está adosada al conjunto de la agarradera, lo que facilita la maniobrabilidad de la cámara.
gancho para cinturón. SÓLO cuelgue el gancho para cinturón de la herramienta de un cinturón de herramientas. ADVERTENCIA: Para reducir el riesgo de lesión corporal grave, verifique que el tornillo (Z) que sujeta el gancho para cinturón esté ajustado. FIG. 9 IMPORTANTE: Para adosar o retirar el gancho para cinturón, AA utilice solamente el tornillo (Z) que se suministra.
Ajuste de fecha y hora 1. Oprima la flecha hacia adelante o hacia atrás para destacar el campo a modificar. FIG. 10 A BB Para retirar la unidad de baterías de la herramienta, apriete el botón de destrabado (BB) y tire firmemente de la unidad de baterías mediante la agarradera de la herramienta. Insértela en el cargador tal como se describe en la sección del cargador de este manual. 2. Oprima el botón OK para activar el campo (el campo se pone verde). 3.
2. Apunte la cámara al objetivo. 2. Oprima la flecha hacia adelante o hacia atrás para seleccionar la opción de Carpeta. A. Pulse el botón de la cámara (L) para tomar una fotografía. Un icono de confirmación aparecerá en la parte superior derecha de la pantalla. O B. Pulse el botón de grabación (M) para iniciar la grabación. Un punto rojo aparecerá en la parte superior derecha de la pantalla. Para detener la grabación, pulse de nuevo el botón de grabar. 3.
7. Oprima el botón OK para visualizar la foto o el video. 4. Oprima la flecha hacia adelante o hacia atrás para seleccionar una carpeta fechada. 8. Oprima la flecha hacia adelante o hacia atrás para desplazarse a la foto o el video siguientes. 9. Al terminar, para salir oprima el botón de Menú principal. 5. Oprima el botón OK para navegar a la siguiente pantalla. 6. Oprima la flecha hacia adelante o hacia atrás para seleccionar una foto o un video. Para borrar fotos o videos en forma individual: 1.
8. Para salir oprima el botón de Menú principal. Para borrar una foto o video mientras se visualiza 1. Oprima el botón de Menú principal para mostrar el Menú principal. 2. Oprima la flecha hacia adelante o hacia atrás para seleccionar la opción de Carpeta. 7. Oprima el botón OK para visualizar. 8. Oprima el botón de borrar. Seleccione SÍ para borrar la foto o video en particular. 3. Oprima el botón OK para navegar a la siguiente pantalla. 4.
3. Oprima el botón OK para seleccionar. 4. Oprima la flecha hacia adelante o hacia atrás para seleccionar inglés, francés o español. 4. Oprima la flecha hacia adelante o hacia atrás para destacar un campo a modificar. 5. Oprima el botón OK para activar el campo (el campo se pone verde). 6. Oprima la flecha hacia adelante o hacia atrás para cambiar el campo activado. 7. Oprima el botón OK para guardar los cambios. 8. Repita los pasos anteriores para cambiar los campos restantes. 9.
4. Oprima la flecha hacia adelante o hacia atrás para seleccionar OFF ú ON. 4. Oprima la flecha hacia adelante o hacia atrás para seleccionar NO ó SÍ. 5. Oprima el botón OK para guardar los cambios. 6. Para salir oprima el botón de Menú principal. 5. Oprima el botón OK para guardar los cambios y salir. Para cambiar el Ajuste predeterminado AVISO: El cambiar al ajuste predeterminado borrará los ajustes actuales y restaurará los ajustes de fábrica. 1.
4. Oprima la flecha hacia adelante o hacia atrás para seleccionar NO ó SÍ. Estas sustancias químicas pueden debilitar los materiales plásticos utilizados en estas piezas. Use un paño humedecido con agua y jabón suave. No permita que ningún líquido se introduzca en la herramienta; no sumerja ninguna parte de la herramienta en un líquido. INSTRUCCIONES DE LIMPIEZA DEL CARGADOR ADVERTENCIA: Peligro de descarga eléctrica. Desconecte el cargador de la toma de corriente alterna antes de limpiarlo.
PARA REPARACIÓN Y SERVICIO DE SUS HERRAMIENTAS ELÉCTRICAS, FAVOR DE DIRIGIRSE AL CENTRO DE SERVICIO MÁS CERCANO Accesorios ADVERTENCIA: Ya que otros accesorios aparte de los ofrecidos por DEWALT no han sido probados con este producto, el uso de tales accesorios con esta herramienta podría ser peligroso. Para reducir el riesgo de lesiones, sólo se deberían usar los accesorios recomendados por DEWALT con este producto.
Español Póliza de Garantía Garantía limitada por tres años IDENTIFICACIÓN DEL PRODUCTO: Sello o firma del Distribuidor. Nombre del producto: ___________ Mod./Cat.: _________________ Marca: ______________________ Núm.
recibo y obtener el reembolso completo de su dinero – sin necesidad de responder a ninguna pregunta. AMÉRICA LATINA: Esta garantía no se aplica a los productos que se venden en América Latina. Para los productos que se venden en América Latina, debe consultar la información de la garantía específica del país que viene en el empaque, llamar a la compañía local o visitar el sitio Web a fin de obtener esa información.
DEWALT Battery and Charger Systems Battery Output Chargers/Charge Time (Minutes) – Chargeurs/Durée de charge (Minutes) – Cargadores de baterías/Tiempo de carga (Minutos) 120 Volts Cat Number 12 Volts Voltage DW9106 DW9118 DW9107 DW9108 DW9116 DW9216 DW9117 DW911 DC011 DC022 DC9000 DC9310 DC9320 DCB100 DCB101 DW0246 DCB119 DW0249 DW9109 DC9319 DC9360 36 X X X X X X X X X X 60 X X X X X X X X X DC9280 DW0242 DC9096 DC9099 DC9180 DC9181 DCB200 DCB201 DW9096 DW909