INSTRUCTIVO DE OPERACIÓN, CENTROS DE SERVICIO Y PÓLIZA DE GARANTÍA. ADVERTENCIA: LÉASE ESTE INSTRUCTIVO ANTES DE USAR EL PRODUCTO. DCT410, DCT411, DCT412 12V Max* Cordless Inspection Camera Caméra de surveillance sans fil 12 v max* Cámara inalámbrica de inspección 12V Max* INSTRUCTION MANUAL GUIDE D'UTILISATION MANUAL DE INSTRUCCIONES 1-800-4-DEWALT • www.dewalt.com If you have questions or comments, contact us. Pour toute question ou tout commentaire, nous contacter.
• • • • • • Read these instructions. Keep these instructions. Heed all warnings. Follow all instructions. Only use attachments/accessories specified by the manufacturer. Refer all servicing to qualified service personnel. Servicing is required when the apparatus has been damaged in any way, the apparatus has been exposed to rain or moisture, does not operate normally, or has been dropped. Important Safety Instructions WARNING: To reduce the risk of injury, read the instruction manual.
English WARNING: Do not disassemble or modify the inspection camera. There are no serviceable parts inside. If you need assistance contact DEWALT at 1-800-4-DEWALT (1-800-433-9258) or go to http://www.dewalt.com on the Internet. • Do not operate the inspection camera in explosive atmospheres, such as in the presence of flammable liquids, gases, or dust. Inspection cameras create sparks which may ignite the dust or fumes.
• This Class B digital apparatus complies with Canadian ICES-003. • This device complies with Part 15 of the FCC Rules. Operation is subject to the following two conditions: 1. This device may not cause harmful interference, and 2. This device must accept any interference received, including interference that may cause undesired operation. NOTE: This equipment has been tested and found to comply with the limits for a Class B digital device, pursuant to Part 15 of the FCC Rules.
English SPECIFIC SAFETY INSTRUCTIONS FOR LITHIUM ION (Li-Ion) • Do not incinerate the battery pack even if it is severely damaged or is completely worn out. The battery pack can explode in a fire. Toxic fumes and materials are created when lithium ion battery packs are burned. • If battery contents come into contact with the skin, immediately wash area with mild soap and water. If battery liquid gets into the eye, rinse water over the open eye for 15 minutes or until irritation ceases.
WARNING: Shock hazard. Do not allow any liquid to get inside charger. Electric shock may result. CAUTION: Burn hazard. To reduce the risk of injury, charge only DEWALT rechargeable batteries. Other types of batteries may burst causing personal injury and damage. NOTICE: Under certain conditions, with the charger plugged in to the power supply, the charger can be shorted by foreign material.
English A 1. Plug the charger into an appropriate outlet before inserting battery pack. Charging Procedure (Fig. 1) FIG. 1 Your tool uses a DEWALT charger. Be sure to read all safety instructions before using your charger. Consult the chart on the back cover of this manual for compatibility of chargers and battery packs. Chargers • Do not operate charger with damaged cord or plug. • Do not operate charger if it has received a sharp blow, been dropped, or otherwise damaged in any way.
1. Longest life and best performance can be obtained if the battery pack is charged when the air temperature is between 65°F and 75°F (18°–24°C). DO NOT charge the battery pack in an air temperature below +40°F (+4.5°C), or above +105°F (+40.5°C). This is important and will prevent serious damage to the battery pack. 2. The charger and battery pack may become warm to touch while charging. This is a normal condition, and does not indicate a problem.
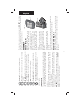
English H F G E A A. 12V Max* Lithium Ion Battery B. Camera with LED’s C. 3' (.91 m) Camera cable D. Camera connector E. Screen F. Camera cable on/off switch / LED brightness control switch G. Handle set H. Micro SD slot for micro SD memory cards 16 gb or less B C D FIG. 2 8 N O P Q S Play: Press the button to go to the folder where photos and videos are saved. OR Press the button to play videos. L K.
Record: Press this button to start and stop recording a video. Main Menu: Press this button to show a list of options for operating the inspection camera or to exit a screen. Back Arrow: Press this button to navigate backward. OK: Press this button to save changes. Forward Arrow: Press this button to navigate forward. Power indicator for the handle set: When the green light is on it indicates that the handle set is on. M. N. O. P. Q. R.
English D The hook is beneficial for retrieving cable or wire located in tight spaces. The magnet is beneficial for retrieving metal objects in tight spaces. To attach the hook or magnet, turn the knurled part of the camera counterclockwise until it stops. Align the hook or magnet with the gray groove (T) then slide it down until the tabs (U) at the top of the hook/magnet are securely in the notches (V) located in the camera lens. Turn the knurled part clockwise to lock the base of the hook and magnet.
A FIG. 10 BB NOTE: Make sure your battery pack is fully charged. To install the battery pack (A) into the tool handle, align the battery with the rails inside the tool’s handle and slide it firmly into the handle until you hear the lock snap into place. OPERATION Installing and Removing the Battery Pack (Fig. 10) WARNING: To reduce the risk of serious personal injury, DO NOT suspend tool overhead or suspend objects from the belt hook. ONLY hang tool’s belt hook from a work belt.
English To View Photos or Videos 1. Press the main menu button to show the Main Menu. A. Press the camera button (L) to take a photo. A confirmation icon will appear in the top right side of screen. OR B. Press the record button (M) to start recording. A red dot will appear in the top right side of the screen.To stop recording, press the record button again. The camera will create a folder on the micro SD card for that day. All photos or videos taken that day will be stored in this folder.
3. Press the OK button to navigate to the next screen. 13 8. Press the main menu button to exit. 7. Press the delete button. Select YES to delete the individual photo or video. 5. Press the OK button to navigate to the next screen. 6. Press the forward or back arrow to select a photo or video. 8. Press the forward or back arrow to advance to the next photo or video. 9. When finished, press the main menu button to exit. To Delete Individual Photos or Videos: 1.
English 5. Press the OK button to navigate to the next screen. 6. Press the forward or back arrow to select a photo or video. 7. Press the OK button to view. 3. Press the OK button to navigate to the next screen. 4. Press the forward or back arrow to select a dated folder. To Delete a Photo or Video While Viewing 1. Press the main menu button to show the Main Menu. 2. Press the forward or back arrow to select the Folder option. 14 3. Press the OK button to select. 4.
5. Press the OK button to activate the field (field turns green). 6. Press the forward or back arrow to change the activated field. 7. Press the OK button to save changes. 8. Repeat above steps to change remaining fields. 9. Press the main menu button to exit. 3. Press the OK button to navigate to the next screen. 4. Press the forward or back arrow to highlight a field to change. To Change Date/Time 1. Press the main menu button to show the Main Menu. 2.
English To Change Default Setup NOTICE: Changing to default setup will erase current settings and restore factory settings. 1. Press the main menu button to show the Main Menu. 5. Press the OK button to save changes and exit. 3. Press the OK button to navigate to the next screen. 4. Press the forward or back arrow to select NO or YES. To Format Micro SD Card NOTICE: Formatting the micro SD card will erase all data. 1. Press the main menu button to show the Main Menu. 2.
• Make sure the 12V Max* battery is charged. • Make sure the screen is fully charged. • Make sure the screen is always attached to the handle set. The picture may freeze if you attempt to remove the (screen) from the handle set while taking a photo or video. • Make sure the battery is installed on the handle set when in use. • Make sure the camera cable is attached to the handle set properly. • Make sure the handle set is turned on as well as the screen.
English 90 DAY MONEY BACK GUARANTEE If you are not completely satisfied with the performance of your DEWALT Power Tool, Laser, or Nailer for any reason, you can return it within 90 days from the date of purchase with a receipt for a full refund – no questions asked. LATIN AMERICA: This warranty does not apply to products sold in Latin America.