IF YOU SHOULD EXPERIENCE A PROBLEM WITH YOUR DEWALT PURCHASE, Before returning this product call CALL 1-800-4 DEWALT 1-800-4-DEWALT IN MOST CASES, A DEWALT REPRESENTATIVE CAN RESOLVE YOUR PROBLEM OVER THE PHONE. IF YOU HAVE A SUGGESTION OR COMMENT, GIVE US A CALL. YOUR FEEDBACK IS VITAL TO THE SUCCESS OF DEWALT’S QUALITY IMPROVEMENT PROGRAM. Questions? See us on the World Wide Web at www.dewalt.
IF YOU HAVE ANY QUESTIONS OR COMMENTS ABOUT THIS OR ANY DEWALT TOOL, CALL US TOLL FREE AT: 1-800-4-DEWALT (1-800-433-9258) FIG.
English Table of Contents Introduction......................................................................................................iii Features & Options ......................................................................................10 Safety and Precautionary Information ....................................................iii System Settings ....................................................................................10 Limitations of the System .................................
CAUTION: POTENTIAL EQUIPMENT MALFUNCTION OR FAILURE. Use only the DEWALT power supplies marked for use with this equipment. If the cord is missing or damaged, replace only with the DEWALT power supply specified for this equipment to avoid product damage CAUTION: POTENTIAL EQUIPMENT MALFUNCTION OR FAILURE. This equipment is supplied with a wall mount power supply designed specifically to operate on 120V 60Hz. Replace only with the DEWALT power supply specified for this unit.
English • Signals sent by wireless devices may be blocked or reflected by metal before they reach the receiver. Even if the signal path has been recently checked during a routine test, blockage can occur if a metal object is moved into the path. • A telephone line, either cellular or landline, is needed to transmit alarm signals to the monitoring system.
Industry Canada Warnings For your convenience and safety, the following warning labels are on the Base Unit and Key Chain Remote: DS100 BASE UNIT • To reduce the risk of injury, user must read and understand Instruction Manual. • Use only with DEWALT authorized power sources designated for this product. • Not for personal protection. • Contains Lead-Acid battery. Must be recycled or disposed of properly. See Instruction Manual.
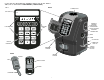
ELECTRONIC CHIME TONE When typing on the keypad, there will be a chime that indicates the key was pressed. PRODUCT OVERVIEW English Unique Features KEY PAD INTERFACE Refer to Figure 1 at the beginning of this manual. This system offers several features unique to most security systems. CELLEMETRY® Cellemetry® is a patented two-way wireless data network that uses standard cellular infrastructure to transport small packets of communication messages throughout North America.
Jobsite Security Cable Lock: A unique sensor that enables securing of assets by wrapping a cable through mobile equipment, containers, materials, gates or other remote assets for protection. Also provides a location for a standard padlock (not included) providing added security. Prevention of False Alarms The majority of alarms that occur are false. These situations happen every day due to user error, incorrect installation or improper maintenance of the system.
English If the system is armed and it receives either an Instant alarm signal from a sensor or the entry delay time on a sensor has expired, the system shall enter the Alarm State for 8 minutes. Vibration The Base Unit contains a vibration sensor. Mount the Base Unit in a location that is not subject to vibration during the armed state. If the system is armed and both the motion sensor and vibration sensor are activated, an alarm is sent instantly.
Telephone Connection NOTE: The connection to the telephone line is designed to be a back-up source of communication. When the cellular radio does not have a connection (the Cell LED is not lit), the telephone connection will be used. CAUTION: To prevent damage to the system, use a telephone communications surge protector (not included). move back a character, use the down arrow. To move forward a character, use the up arrow. Select SET. 2. Choose AM or PM.
NOTE: Each device has a reset button that must be pressed and released. To locate the reset button, refer to the instructions for each particular device. 3. Reset the device. English 4. If the master codes match, the screen will indicate that the master code has been saved. Select NEXT. RESET BUTTON NOTE: If the codes do not match, the screen will display Code Incorrect. CAUTION: Do not touch the electronic components inside the devices as they are static sensitive.
To change from numbers to letters, reference the Alpha/Numeric chart below: ALPHA/NUMERIC CHART 1 1 2 3 4 5 6 7 8 9 0 # of presses 2 3 1 1 A B D E G H J K M N P Q T U W X space . 4 1 C F I L O R V Y space 5 1 2 3 4 5 6 S 8 Z . 3. During the test function, the system will cycle through the list of registered devices. Each device is displayed for one second. 4. Walk through the site and trigger each sensor using the list below. As that sensor is tripped, the entry should disappear.
2. Starting with User 1, enter a four digit access code. To move back a character, use the down arrow. To move forward a character, use the up arrow. BASIC OPERATIONS English Arming the System Activating the alarm to protect assets and notify if an intrusion has occurred. • Delays • Using the Keypad • Using the Key Chain Remote • Arming Automatically IMPORTANT: After arming the system, exit before the end of the delay period or an alarm will sound! 3. After entering the user code, select SAVE. 4.
CAUTION: LOUD NOISE. Enabling the auto arm feature will cause a brief loud noise while arming that may startle any persons near the Base Unit. To enable the automatic arming feature, be sure that the system is disarmed. 1. Start at the main screen. 4. There are two indications that the system is armed. First, the ARMED light on the upper right of the keypad will be on. Second, the Armed screen will be displayed. 2. Select MENU or press MAIN MENU on the keypad. 3. Using the keypad, enter the master code.
English 10. Select SET. 1. To disarm the system, use the keypad to enter either the master code or a valid user code. 2. The main screen will be displayed. The ARMED light on the unit will be off. 11. Choose AM or PM. The up and down arrows are used to toggle between AM and PM. 12. Select SET. USING THE KEY CHAIN REMOTE Use the Key Chain Remote for one-touch disarming from up to 2000' away from the Base Unit.
2. The fault code will be displayed. Use the up and down arrows to scroll through the faults. Resolve the issue with the action listed in Description of Fault Codes chart and the Fault screen will disappear. To remove a tamper fault, select CLEAR. DESCRIPTION OF FAULT CODES cont.
able, the screen will display ALL DEVICES IN USE. To edit the description of the device, select EDIT. To add another device, select EXIT. 5. Use the up and down arrows to scroll through the menu until the Wireless Device Maintenance screen is displayed. Select OK. 6. To edit the description, use the keypad to type a description (up to 8 characters). The character that is being changed will be underlined. To move back a character, use the down arrow. To move forward a character, use the up arrow.
To Remove a Device: 1. Use the up and down arrows to scroll through the menu until the Remove Device screen is displayed. Select OK. 8. Re-enter the new master code to confirm. Again, using the numbers on the keypad, enter the new four digit master code. The character that is being changed will be underlined. To move back a character, use the down arrow. To move forward a character, use the up arrow. Then, select OK. 9. If the codes match, the system will confirm that the master code has been changed.
English To Add a User NOTE: Up to 6 users including the master user can be programmed. 1. Use the up and down arrows to scroll through the menu until the Add User screen is displayed. Select OK. 3. To change the user code, enter a new four digit access code. To move back a character, use the down arrow. To move forward a character, use the up arrow. Select SAVE. 4. Next, edit the name for the user. Use the keypad to type a name (up to 8 characters). The character that is being changed will be underlined.
4. Use the up and down arrows to scroll through the menu until the System Settings screen is displayed. Select OK. 5. Use the up and down arrows to scroll through the menu until the Set Delay/Instant screen is displayed. Select OK. 5. Use the up and down arrows to scroll through the menu until the Set Console Devices On/Off screen is displayed. Select OK. 6. Using the up and down arrows, scroll through the list of programmed devices.
English 7. The system will request one final check before clearing the settings. All registered sensors, sirens, Key Chain Remotes, and users will be deleted from the system. To simply change sensor descriptions, user names or user codes use the System Settings menu instead. To confirm a clearing of the settings, select YES. AUTO ARM TIME SET The system can be set to arm at a particular time each day. To set or change the time of automatic arming, follow these steps. 1. Start at the main screen. 2.
5. Use the up and down arrows to scroll through the menu until the Review Account screen is displayed. Select OK. 6. To continue in English, select OK. 7. To choose another language, use the arrow keys to find the correct language. When the desired language is displayed, select OK. Customer Service information NOTE: To activate the monitoring of this system, contact customer service. To View Account Number Use the up and down arrows to scroll through the menu until the Account Number screen is displayed.
RUNNING A TEST Run a test on all devices and telecommunication connections. There are two ways to begin the test: the Main Menu and the TEST button on the keypad. Using the TEST Button on Keypad: 1. Press TEST on the keypad. English 7. Using the numbers on the keypad, set the date. The character that is being changed will be underlined. To move back a character, use the down arrow. To move forward a character, use the up arrow. Select SET.
2. Perform such activities in the off peak hours, such as early morning or late evenings. If the Base Unit is placed in standby mode, wait 90 seconds after the power has been restored to perform the cellular radio test. The system uses cellular radio to send a signal. The signal should be tested regularly. The CELL light on the keypad will indicate the presence of a signal. If the CELL LED is flashing, it indicates that the cellular radio signal is weak. 2.
English A. When the siren screen is displayed, select TEST. D. Select BACK. B. While the siren is testing, a message will be displayed indicating that the siren is on. If the siren does not sound, see the Troubleshooting Guide for more detailed information. C. Once the function is verified, end the test by selecting BACK. E. Use the up and down arrows to scroll through the menu until the next console device to be tested is reached.
CAUTION: LOUD NOISE. Running this test will cause a loud noise that may startle any persons near the Siren. 1. Select TEST. 5. The screen will provide a reminder that the power must be unplugged before standby state can be entered. Unplug the power supply and select OK. 6. Verify that the system is to be placed in standby. Select YES. 2. Using the up and down arrows, scroll through the list of external sirens and choose the one to be tested. Select TEST. 7. Using the keypad, enter the master code. 8.
English Contact DESCRIPTION OF FAULT CODES If you have any questions or comments about this product, call us toll free at 1-800-4DEWALT (1-800-433-9258); or visit www.dewalt.com. To answer any specific monitoring questions call DEWALT customer service or refer to the monitoring service contract for additional contact phone numbers.
Coverage Map Appendix 22
English ALARM CODES Display Unsecured device x txt Tampered device x txt Unsecured base motion Unsecured base vibration System alarm CELL PHONE TEXT MESSAGE CODES Event Unsecured Tamper Internal PIR trip Internal vibration trip Start of alarm cycle (8 min.) ALPHA/NUMERIC CHART KEY PAD 1 2 3 4 5 6 7 8 9 0 1 1 2 3 4 5 6 7 8 9 0 # of presses 2 3 1 1 A B D E G H J K M N P Q T U W X space . 4 1 C F I L O R V Y space 5 1 2 3 4 5 6 S 8 Z .
DESCRIPTION OF EVENT CODES DESCRIPTION OF EVENT CODES Event Code Description Action Base: NO AC Base: POWER RESTORED DEV x txt: NO AC DEV x txt: POWER RESTORED DEV x txt: LOW BATT No power to Base Unit Base Unit power restored No power to device Device power restored Device battery low DEV x txt: LOW BATT CLR BASE LOW BATT Device battery restored Battery has dropped below the voltage limit Base Unit battery has been restored Transmission signal from device is weak Check power supply NA Check power
English Troubleshooting Guide PROBLEM The LCD screen is blank while the Base Unit is plugged in. The LCD screen is blank while the Base Unit is unplugged. A different device number appears on the LCD screen. A device fails a walk test. A device fails to register when you press the reset button. The CELL LED is blinking. The cellular radio has been shut down. Cell Radio: SHUTDOWN The POWER LED is blinking at two flashes per 10 seconds.
Glossary of Terms Strobe A device providing a light to notify user and intruder of an alarm. System The Base Unit, all devices and the monitoring service. AC power Alternating Current power from electrical outlet. Tamper An indication that the cover of a device has been removed or someone has altered the physical state of a device. Arm To turn on security protection.
SI VOUS AVEZ DES QUESTIONS OU VOUS VOULEZ NOUS FAIRE PART DE VOS COMMENTAIRES CONCERNANT CET OUTIL OU TOUT AUTRE OUTIL DEWALT, COMPOSEZ SANS FRAIS LE : 1 800 433-9258. (1-800-4-DEWALT). DS100 FIG.
Table des matières Mise à l’heure de l’armement automatique ...................................47 Revue du compte...........................................................................47 Choisir le langage ..........................................................................48 Réglage heure/date ...............................................................................48 Revue du rapport d’activité....................................................................
CONSERVER CES DIRECTIVES Règles de sécurité – Généralités • Éviter de les exposer à des températures extrêmes. Après utilisation, entreposer les piles dans un lieu frais, sombre et sec. • Conserver les piles hors de la portée des enfants. • Une pile représente une unité autonome. Ne pas chercher à l’ouvrir. • Ne jamais mettre une pile au feu. S’en défaire conformément aux régulations locales. Recycler les piles. Ne pas chercher à les recharger.
Limites du système NORMES Communiqué de la Federal Communications Commission (FCC), paragraphe 15 • Cet équipement (Base et télécommande porte-clés) a été testé et se conforme au paragraphe 15 du règlement de la FCC. Son utilisation est sujette aux deux conditions suivantes : (1) Ce dispositif ne doit pas causer d’interférences nuisibles, et (2) ce dispositif doit accepter toute interférence reçue, y compris toute interférence pouvant causer un fonctionnement indésirable.
Français • Cet équipement (DS100) utilise un jack RJ-11 pour se connecter sur le réseau téléphonique. Si tout autre dispositif, tel téléphone, télécopie ou modem, utilise la même connexion, l’équipement ne coupera pas le dispositif en fonctionnement. • Si cet équipement (DS100) provoque des dommages au réseau téléphonique, la compagnie téléphonique vous avertira à l’avance qu’un arrêt temporaire de service peut être nécessaire. Si un préavis n’est pas possible, vous serez averti aussitôt que possible.
VUE D'ENSEMBLE DU PRODUIT Caractéristiques uniques Ce système présente des caractéristiques uniques par rapport à la plupart des systèmes de sécurité. CELLEMETRY® La Cellemetry® est un réseau de données sans fil bidirectionnel breveté qui utilise une infrastructure cellulaire standard pour transporter de petits paquets de messages de communication en Amérique du Nord.
Dispositif de fixation du système d’alarme : Ce dispositif est utilisé pour accrocher la base et comprend un verrou et une clé pour verrouiller la base une fois installée. Les cavités intégrées de fixation permettent une installation facile dans les coins ou à plat contre un mur. Détecteur de mouvements intérieur (PIR) : Ce détecteur offre une portée de protection de 152 m (50 pi) avec un balayage numérique de pointe pour reconnaître tout mouvement humain et taille pour prévenir toute fausse alerte.
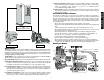
Pendant une alerte REMARQUE : Se reporter à la section Codes des messages textuels du téléphone cellulaire de l’Appendice. CONFIGURATION INITIALE Connexion de l’équipement • Installation de la base • Configuration physique Si le système est armé et reçoit un signal d’alarme instantané d’un détecteur ou parce que le délai d’entrée d’un détecteur a expiré, il entrera en État d’alerte pendant 8 minutes. SURVEILLANCE Un appel sera placé immédiatement auprès du service de surveillance.
pile est conçue pour servir d'alimentation de secours pendant jusqu'à 8 heures. Si le service de surveillance a été activé, la base enverra un message « pile faible » au service de surveillance 1 heure environ avant le déchargement complet de la pile. Si le courant n'est pas restauré dans l'heure qui suit, la base se désarmera et se mettra horsservice. IMPORTANT : Lorsque le courant sera restauré, la base ne sera pas automatiquement armée.
3. Si les codes maître cadrent, l’écran indiquera que le code maître a été sauvegardé. Choisir SUIV. ÉTAPE TROIS : CONFIGURATION DU CODE MAÎTRE Un code maître DOIT être choisi. Ce code peut être changé. Ce code cependant est le SEUL qui peut être utilisé pour changer la programmation et annuler une erreur. L’écran Code maître s’affichera une fois la date configurée. Code maître sauv. SUIV Code maître : #### RET.
a. À l’aide d’un tournevis ordinaire, ouvrir le boîtier. Insérer le tournevis d’environ 6 mm (25 po) dans l’encoche sur le dessus de l’appareil. Pousser sur le manche du tournevis jusqu’à ce que le système de fermeture du couvercle se relâche. IMPORTANT : Inscrire la description du dispositif et le numéro correspondant du dispositif sur la Liste d’emplacements des détecteurs. Conserver cette liste à titre de référence.
3. Une fois le code utilisateur entré, choisir ENREG. 4. Entrer ensuite un nom d’utilisateur. À l’aide du clavier, taper le texte (jusqu’à 8 caractères). Le caractère qui sera changé sera souligné. Pour reculer d’un caractère, utiliser la flèche vers le bas. Pour avancer d’un caractère, utiliser la flèche vers le haut. Pour choisir des lettres, se reporter au Diagramme alpha-numérique dans l’Appendice.
DÉLAIS Tous les détecteurs sans fils et celui de la base sont programmés à un délai par défaut. Cela donnera à l’utilisateur 60 secondes pour sortir après l’armement et 30 secondes pour entrer avant le désarmement sans déclencher une alerte. Chaque détecteur, hormis celui de la base, peut être réglé sur Instant pour que lorsque le système est armé, il y ait alerte instantanée si le détecteur est déclenché.
8. Pour régler l’heure, choisir OK. ARMEMENT AUTOMATIQUE Cette fonction peut être utilisée pour assurer que le système peut être correctement armé lorsque l’armement ne peut être fait par l’utilisateur maître ou tout autre utilisateur du système. Une fois l’heure configurée, le système s’activera à la même heure chaque jour. MISE EN GARDE : SON STRIDENT. L’utilisation de la fonction d’auto-armement causera un son bref et strident pendant l’armement qui peut faire sursauter toute personne près de la base.
Erreurs tout dommage ou destruction. Si le détecteur de vibrations est déclenché accidentellement, le système contactera immédiatement le service de surveillance.Une fois le système armé, l’écran d’armement sera affiché : Les erreurs indiquent qu’un problème sérieux doit être adressé. Cela peut représenter plusieurs choses y compris un dispositif suspect, une pile faible, un dispositif altéré ou un signal faible.
DESCRIPTION DES CODES D’ERREURS REMARQUE : Se reporter à la section Guide de dépannage pour plus de détails. CARACTÉRISTIQUES ET OPTIONS Options du système DESCRIPTION DES CODES D'ERREURS Affichage Description Action Aliment Perte ali. princ./base Base privée d’alimentation Vérifier la source d’alimentation Ali/Disp Perte d’ali.
Pour remplacer un dispositif : utiliser les flèches vers le haut ou le bas pour choisir le dispositif à remplacer. Si un dispositif déjà programmé est choisi, l’ancien dispositif sera effacé lorsque le bouton de réinitialisation du nouveau dispositif sera poussé puis relâché. Pour modifier un dispositif : 1. Utiliser les flèches vers le haut ou le bas pour faire défiler le menu jusqu’à ce que l’écran Edit disp. soit affiché. Choisir OK. Edit disp. Disp 1? QUIT QUIT Disp 01: CÂBLE OK QUIT OK OK 2.
Si les codes maître ne cadrent pas 1. Choisir OK. 2. L’écran Changer code maître s’affichera (Étape 5, Changer de code maître). Le code maître original est le code par défaut est le reste tant qu’il n’est pas modifié et vérifié. CHANGER LE CODE MAÎTRE Le code maître permet SEULEMENT à l’utilisateur maître de changer la programmation du système et des options d’armement et désarmement. Le code maître peut être changé à tout moment lorsque le système est désarmé. 1. Commencer sur l’écran principal. 2.
utiliser la flèche vers le bas. Pour avancer d’un caractère, utiliser la flèche vers le haut. Pour choisir des lettres, se reporter au Diagramme alpha-numérique dans l’Appendice. 5. Choisir ENREG. Nom : SMITH QUIT < > ENREG Nom : UTIL. O2 QUIT < > ENREG 6. Continuer de modifier des utilisateurs ou choisir QUIT. Pour supprimer un utilisateur 1. Utiliser les flèches vers le haut ou le bas pour faire défiler le menu jusqu’à ce que l’écran Sup. util. soit affiché. Choisir OK.
8. Une fois chaque dispositif modifié, choisir QUIT pour retourner au menu principal. 6. À l’aide des flèches vers le haut ou le bas, choisir entre stroboscope ou sirène. L’écran indiquera si le stroboscope et la sirène sont activés ou désactivés. Pour changer leur statut, choisir CHANGE. Disp. 14: Instant QUIT CHANGE Strobe : ON RET. CHANGE RÉINITIALISATION DES OPTIONS REMARQUE : Cette option permettra à la base d’être complètement reprogrammée. Ce système a été conçu pour être mobile.
MISE EN GARDE : SON STRIDENT. L’utilisation de la fonction d’auto-armement causera un son bref et strident pendant l’armement qui peut faire sursauter toute personne près de la base. 1. Commencer sur l’écran principal. 2. Choisir MENU ou appuyer sur MENU PRINCIPAL sur le clavier. 3. À l’aide du clavier, entrer le code maître. 4. Utiliser les flèches vers le haut ou le bas pour faire défiler le menu jusqu’à ce que l’écran Options sys. soit affiché. Choisir OK. 5.
7. Pour choisir une autre langue, utiliser les flèches pour trouver la langue voulue. Lorsque la langue voulue est affichée, choisir OK. Pour afficher le numéro de compte Utiliser les flèches vers le haut ou le bas pour faire défiler le menu jusqu’à ce que l’écran Num. de compte soit affiché. Cet écran affichera le numéro de compte. Ce numéro est important car nécessaire au service clientèle. Pour quitter cet écran, choisir QUIT. Num.
Revue du rapport d'activités À l’aide du bouton TEST sur le clavier : 1. Appuyer sur TEST sur le clavier, La base enregistrera automatiquement toute modification du système. Le rapport enregistrera le type de modification, l’utilisateur ou le dispositif qui aura effectué la modification, et la date et l’heure de l’évènement. Sur une base premier entré, premier sorti, le rapport d’activités enregistrera une liste de jusqu’à 90 évènements avec le plus récent énuméré en premier.
1. Lorsque l’écran Lgn téléphon est affiché, choisir TEST. Si la base est mise en mode de veille, attendre 90 secondes après la restauration du courant pour effectuer le test radio cellulaire. Le système utilise une radio cellulaire pour envoyer tout signal. Ce signal doit être testé régulièrement. Le voyant CELL sur le clavier indiquera la présence d’un signal. Si le voyant CELL clignote, cela indique que le signal radio cellulaire est faible. Lgn téléphon QUIT TEST 2.
Sirène : MISE EN GARDE : SON STRIDENT. L’exécution de ce test causera un son bref et strident qui peut faire sursauter toute personne près de la base. A. Lorsque l’écran Sirène est affiché, choisir TEST. D. Choisir RET. Test/vibration OK RET. Sirène QUIT TEST E. Utiliser les flèches vers le haut ou le bas pour faire défiler le menu jusqu’au prochain dispositif de console à tester. DISPOSITIFS SANS FIL Les télécommandes porte-clés et les détecteurs doivent être testés régulièrement. 1. Choisir TEST.
4. Utiliser les flèches vers le haut ou le bas pour faire défiler le menu jusqu’à ce que l’écran Veille soit affiché. Choisir OK. SIRÈNES EXTERNES Des sirènes externes sont vendues séparément chez votre distributeur ou dans les centres de service autorisés. Pour plus d’informations, veuillez contacter le service clientèle DEWALT au 1-800-4-DEWALT (1-800-433-9258). MISE EN GARDE : SON STRIDENT. L’exécution de ce test causera un son bref et strident qui peut faire sursauter toute personne près de la sirène.
• Suivre attentivement toute instruction ou tout avertissement inclus sur l’étiquette ou l’emballage des piles. Lors de l’installation des piles, toujours respecter la polarité (+ et -) inscrite sur les piles et l’appareil. Ne pas forcer excessivement pour installer des piles. Si la pile ne rentre pas, vérifier que la polarité des bornes cadre avec les marques sur l’appareil. • Ne jamais mettre les bornes des piles en contact avec tout autre objet métallique. Cela pourrait provoquer un court circuit.
Carte de la zone de couverture cellulaire analogique Appendice 54
CODES DES VOYANTS DEL CONTINU ALIMENTATION Source d’alimentation primaire présente ARMÉ CELL APPEL Le système est armé Le signal cellulaire et puissant Appel terminé restera allumé en continu pendant 30 secondes) CLIGNOTANT • Source d’alimentation primaire absente (clignote en continu) • Pile faible (par séries de deux clignotements) ou • État de veille (un clignotement toutes les 5 secondes) Pendant le délai d'entrée ou de sortie Le signal cellulaire et faible Appel en cours DESCRIPTION DES CODES
CODES DES MESSAGES TEXTUELS DU TELEPHONE CELLULAIRE CODES D'ALERTE (BASE) Affichage Disp. x txt suspect Disp. x txt altéré Mvmt base suspect Vibration/base suspecte Alerte sys. Évènement Suspect Altéré PIR intérieur déclenché Vibrations intérieures déclenchées Début du cycle d'alerte (8 min.) DIAGRAMME ALPHA/NUMÉRIQUE CLAVIER 1 2 3 4 5 6 7 8 9 0 Appuyer 1 1 2 3 4 5 6 7 8 9 0 2 1 A D G J M P T W espace 3 1 B E H K N Q U X . 4 1 C F I L O R V Y espace 5 1 2 3 4 5 6 S 8 Z .
DESCRIPTION DES CODES D'ÉVÈNEMENT Code d'évènement Base : 0 C.A. Description Base privée d'alimentation Action Vérifier la source d'alimentation Base : ALI. RESTAURÉE Alimentation de la base restaurée NÉANT DISP x txt : N0 CA Appareil privé d'alimentation Vérifier la source d'alimentation DISP x txt : ALI.
DESCRIPTION DES CODES D'ÉVÈNEMENT Code d'évènement Description DISP x txt : ALERTE Disp. x suspect (seulement lorsque armé) Disp. x sûr (seulement lorsque armé) Vérifier le disp. x RADIO CELL : NON VALIDÉ Erreur Radio cell NÉANT RADIO CELL : NON VALIDÉ SUPP NC/BASE : NON VALIDÉ Erreur Radio cell.
Guide de dépannage Français PROBLÈME L'écran ACL ne fonctionne pas alors que SOLUTION La pile doit être réinitialisée par un centre de service DEWALT autorisé.la base est bien branchée. L'écran ACL ne fonctionne pas alors que la base Si l'appareil reste 10 minutes débranché, il se met en mode de veille. est débranchée. Appuyer sur une touche quelconque ou brancher l'appareil sur le secteur pour sortir du mode de veille. Un numéro de dispositif erroné est affiché sur l'écran ACL.
Glossaire Alimentation C.A. Courant alternatif à la prise murale. Altéré Une indication que le couvercle d'un dispositif a été enlevé ou que quelqu'un a altéré l'état physique du dispositif. Armement forcé Armement malgré une erreur. L'erreur n'a pas été adressée avant le réarmement du système. Armer Pour activer le service de sécurité. Base/console Pièce centrale du système contenant logiciel de programmation, clavier, sirène, stroboscope et autres matériaux.
SI TIENE ALGUNA PREGUNTA O COMENTARIO QUE HACER CON RESPECTO A ESTA O CUALQUIER OTRA HERRAMIENTA DEWALT, LLÁMENOS GRATUITAMENTE AL SIGUIENTE TELÉFONO: 1-800-4-DEWALT (1-800-433-9258) FIG.
Índice Introducción ..................................................................................................63 Características y opciones ..........................................................................76 Información de seguridad y precaución ..............................................63 Configuraciones del sistema ................................................................76 Restricciones del sistema ....................................................................
• Mantenga las pilas fuera del alcance de niños. • La pila es una unidad independiente. No intente abrirla. • Nunca bote una pila al fuego. Disponga de pilas gastadas según los reglamentos locales. Recicle sus pilas. No intente recargarlas. PRECAUCIÓN: POSIBLE AVERÍA O FALLA DEL EQUIPO. Use sólo los accesorios de alimentación DEWALT designados para este equipo.
• Puede que los dispositivos de advertencia, tales como sirenas y luces estroboscópicas no alerten a la gente si, por ejemplo, no hay nadie dentro del perímetro. Puede que la gente no escuche la advertencia si el sonido de la alarma es amortiguado por el ruido de radios, equipos de operación, aparatos eléctricos o tráfico. Puede que los dispositivos de alarma, a pesar de generar sonidos fuertes, no pongan en alerta a personas con discapacidades auditivas.
• El cliente debería tener en cuenta que el cumplimiento con las condiciones anteriores no necesariamente impedirá la degradación del servicio, bajo ciertas circunstancias. • Las reparaciones realizadas a equipos certificados debería ser coordinada por un representante designado por el proveedor. Cualquier reparación o alteración realizada por el usuario a este equipo, o cualquier falla del equipo puede ser causa de que la empresa de telecomunicaciones solicite que el usuario desconecte el equipo.
ESPECIFICACIONES DEL PRODUCTO Temperatura de funcionamiento 12˚C - 43˚C (10˚F - 110˚F) Temperatura de almacenamiento 29˚C - 60˚C (-20˚F - 140˚F) Humedad máxima 90% humedad relativa, sin condensación Fuente de potencia a conector de suministro de potencia 110 - 130 Voltios AC Alcance nominal hasta 6 100m (2000 pies) Características exclusivas Este sistema de seguridad le ofrece varios rasgos exclusivos.
CONTROL REMOTO DE LLAVERO DS200 El Control remoto de llavero DS200 ofrece el beneficio de armar y desarmar el sistema con sólo presionar un botón, a una distancia de hasta 6,100 m (2000 pies). El control remoto utiliza comunicación de espectro amplio de 900 MHz (EASF) para ofrecer un alcance y una fiabilidad superiores. La luz LED de retroalimentación notifica al usuario cuando se envía una señal a la unidad base. Además, se incluye un práctico gancho para mayor versatilidad.
Que hacer durante una alarma NOTA: Refiérase a los Códigos de mensaje de texto de teléfonos celulares en el Apéndice. MONTAJE INICIAL Conexión del equipo • Colocación de la unidad base • Configuración física Si el sistema está armado y recibe ya sea una señal de alarma instantánea de un sensor o si la hora de retraso de la entrada de un sensor se ha vencido, el sistema entrará a un estado de alarma por 8 minutos. MONITOREO Se hace una llamada inmediata al servicio de monitoreo.
Programación de la configuración inicial NOTA: La pila tomará más de 24 horas en cargarse completamente. Para evitar que la pila se vacíe, no use una toma de corriente controlada por un interruptor. La pila está diseñada para funcionar como una fuente de poder de reserva hasta por 8 horas. Si el servicio de monitoreo ha sido activado, la unidad base enviará un mensaje de pila gastada al servicio de monitoreo aproximadamente 1 hora antes de que la pila quede vacía.
Si los códigos maestros no corresponden 1. Seleccione OK. 2. Vuelva a ingresar el código maestro. Seleccione OK. 3. Utilice los números del teclado para programar la fecha. El caracter subrayado es el que está siendo cambiando. Para desplazarse entre los caracteres, utilice la flecha de abajo para moverse hacia atrás y la flecha de arriba para moverse hacia adelante. Seleccione CONFIG. Volver a ingr. cód. maestro Fecha: 01/04/04 ATRÁS < > CONFIG ATRÁS < > OK 3.
Para cambiar de números a letras, refiérase al siguiente cuadro alfanumérico: CUADRO ALFANUMÉRICO 3. Reposicione el dispositivo. Reposic. dispos. CANCEL TECLADO 1 2 3 4 5 6 7 8 9 0 PRECAUCIÓN: No toque las piezas electrónicas que se encuentran dentro del dispositivo, ya que son sensibles a estática. PARA OBTENER ACCESO AL BOTÓN DE REPOSICIONAMIENTO EN EL CONTROL REMOTO DE LLAVERO a. Con un destornillador de cabeza plana, abra la caja externa del control.
Una vez registrados los dispositivos, la unidad base mostrará la pantalla para agregar usuario. 1. Para agregar usuarios nuevos, seleccione OK. 2. Una prueba de recorrido verificará que cada sensor se puede comunicar con la unidad base. Asegúrese que todos los sensores hayan sido instalados en la ubicación deseada. Comience la prueba de recorrido seleccionando SÍ. Pba de recorrido? SALTAR Agr. usuarios? SÍ SALTAR 3. Durante la prueba, el sistema ciclará por la lista de dispositivos registrados.
Durante el armado, la unidad base emitirá un tono por 10 segundos, seguidos por 40 segundos de silencio. La unidad base emitirá estos tonos con mayor rapidez durante los últimos 10 segundos de armado. Si necesita desarmar el sistema antes de completar el armado (por ejemplo, si necesita volver a entrar al recinto), presione el botón desarmar ( ) a la derecha del control remoto de llavero o seleccione DESARM e ingrese el código maestro o un código de usuario.
7. Cuando se activa el armado automático, aparece la pantalla Autoarmado ENCEND. Seleccione SALIR. NOTA: Si aparece en pantalla Armando con fallas y suena una campanilla de advertencia, existe un problema grave que podría dejar al emplazamiento sin protección. Puede igualmente armar el sistema, a pesar de la falla (forzar el armado); sin embargo, se recomienda corregir el problema antes de armar. Para mayor información sobre los códigos de fallas, vea Fallas. 3.
Fallas IMPORTANTE: Para evitar las falsas alarmas, los sensores que tienen mayor posibilidad de ser activados a medida que el usuario entra y sale del emplazamiento para armar y desarmar la unidad, deberían permanecer configurados en modalidad de retraso Para mayor información, vea Cómo fijar una acción retrasada/instantánea bajo Características y opciones. Las fallas indican cuando hay un problema grave que requiere ser resuelto.
CARACTERÍSTICAS Y OPCIONES DESCRIPCIÓN DE CÓDIGOS DE FALLAS Código de falla Falla en pantalla Descripción Acción Potencia Pot. princ. perdida en base La unidad base no tiene potencia Revise la alimentación eléctrica Pot. del dispos. Bat. baja en la base Dispos. con bat. baja Senal débil No seguro NoVerifica Alteración Bat. mala en la base RadioCel Control de red Bat. baja base La batería de la unidad base está baja Dispos.
Para editar un dispositivo: 1. Use las flechas de arriba y abajo para desplazarse por el menú hasta que aparezca la pantalla de Editar dispositivos. Seleccione OK. Utilice las flechas de arriba y abajo para desplazarse por la lista de dispositivos y seleccionar el que desea cambiar. Si se selecciona un dispositivo previamente programado, el dispositivo existente será reemplazado al presionar el botón de reposición del dispositivo nuevo. Editar dispos. Dipos 1? SALIR SALIR Dispos.
Si los códigos maestros no corresponden 1. Seleccione OK. 2. Aparecerá la pantalla Cambiar cód. maestro. (Paso 5, Cómo cambiar el código maestro). El código maestro original es el código preconfigurado hasta que sea cambiado y verificado. CÓMO CAMBIAR EL CÓDIGO MAESTRO El código maestro permite SÓLO al usuario maestro efectuar cambios de programación al sistema, además de armar y desarmarlo. El código maestro se puede cambiar en cualquier momento, mientras se desarma el sistema. 1.
5. Seleccione GUARDA. 4. Luego, agregue un nombre para el usuario. Use el teclado para ingresar un nombre (de hasta 8 caracteres). El caracter subrayado es el que está siendo cambiado. Para desplazarse entre los caracteres, utilice la flecha de abajo para moverse hacia atrás y la flecha de arriba para moverse hacia adelante. Para seleccionar letras, refiérase al Cuadro alfanumérico del Apéndice. Nombre: SMITH SALIR Nombre: USUARIO2 SALIR < > GUARDA 6. Siga editando usuarios o elija SALIR.
7. Cuando se alcance el dispositivo a cambiar, seleccione CAMBIA. El botón CAMBIA cambia la opción de retraso a instantáneo. 8. Una vez que todos los dispositivos se hayan cambiado, seleccione SALIR para volver a la pantalla principal. 6. Use las flechas de arriba y abajo para desplazarse y elegir la luz o la sirena. La pantalla le indicará si la luz o sirena están encendidas o no. Para cambiar el estado de cada una, seleccione CAMBIA. Luz:ENCEND ATRÁS CAMBIA DISPOS. 14: Instant SALIR 7.
4. Use las flechas de arriba y abajo para desplazarse por el menú hasta que aparezca la pantalla Config. del sist. Seleccione OK. ENCENDIDO Y APAGADO DEL ARMADO AUTOMÁTICO El sistema puede fijarse para ser armado a una hora particular cada día. Esta función puede ser útil para asegurar que el sistema pueda ser armado debidamente si el usuario maestro u otros usuarios no pueden iniciar el armado del sistema. PRECAUCIÓN: RUIDO FUERTE.
5. Use las flechas de arriba y abajo para desplazarse por el menú hasta que aparezca la pantalla de Escoger idioma. Seleccione OK. 5. Use las flechas de arriba y abajo para desplazarse por el menú hasta que aparezca la pantalla Revisar cta. Seleccione OK. Revisar cta. Escoger idioma SALIR OK SALIR OK 6. Para continuar en inglés, seleccione OK. Información de servicio al cliente NOTA: Póngase en contacto con el departamento de servicio al cliente para activar el monitoreo de este sistema.
Prueba 6. Elija AM o PM. Utilice las flechas de arriba y abajo para cambiar entre AM y PM. Seleccione CONFIG. La unidad base conduce pruebas periódicas con el servicio de monitoreo. Al recibir la señal del servicio de monitoreo, el usuario puede ser notificado. A pesar de que el sistema notificará si hay una pila gastada o un dispositivo fuera de alcance, realice pruebas regularmente para verificar que el sistema esté funcionando como debe.
LÍNEA TELEFÓNICA PRECAUCIÓN: Cuando pruebe el sistema, esté preparado para: 1. Permanecer en la línea y explicar brevemente al operador la razón de la llamada, si lo contacta el servicio de monitoreo. 2. Realizar estas actividades en las horas de menor actividad, como temprano en la mañana o tarde por la noche. NOTA: La conexión a la línea telefónica debería probarse regularmente. La línea telefónica es el medio de comunicación de respaldo en el caso de que la señal celular no pueda completar la llamada. 1.
B. El sistema generará un mensaje que le indicará que debe sacudir la unidad base. Mueva la unidad base para activar el sensor. C. Una vez verificada la función, concluya la prueba seleccionando ATRÁS. Luz destellante ATRÁS Sacudir base CANCEL D. Use las flechas de arriba y abajo para desplazarse por el menú hasta encontrar el siguiente dispositivo de consola a probar. Sirena: PRECAUCIÓN: RUIDO FUERTE.
Apagado del sistema Sensor para contenedores: Espere 3 minutos a partir de la última vibración en el contenedor y luego genere vibración en el contenedor para probarlo. Ajuste el nivel de sensibilidad como sea necesario. Este sistema fue diseñado para ser portátil. Si el emplazamiento se cambia de lugar, se recomienda poner la unidad en standby para transportarla o almacenarla. Esto conservará la duración de la batería y protegerá la unidad base. 1. Empiece por la pantalla principal.
PILA DE LA UNIDAD BASE La unidad base contiene una pila de plomo. El usuario no tiene acceso a la pila. Esta deberá ser cambiada y debidamente desechada sólo por un centro de servicio autorizado DEWALT. No cargue la pila si está en posición invertida (al revés). La sobrecarga en posición invertida podría hacer que la pila presente fugas en su válvula de seguridad. PILAS DE DISPOSITIVOS • Nunca utilice una pila dañada o gastada.
Mapa de cobertura Apéndice 88
CÓDIGOS DE LUCES LED LUZ LED SÓLIDA POTENCIA Fuente principal de potencia Presente ARMADO CEL LLAMADA El sistema está armado La señal celular está fuerte La llamada fue completada (permanecerá sólida por 30 segundos) DESTELLANTE DESCRIPCIÓN DE CÓDIGOS DE FALLAS APAGADA • No hay una fuente principal de potencia presente (destellos continuos); • Batería baja (serie de dos destellos); • Estado standby (un destello cada 5 segundos) Unidad no tiene potencia y batería no tiene potencia En modalidad de r
CÓDIGOS DE ALARMA (UNIDAD BASE) Pantalla Dispos. no seguro x txt Dispos. alterado x txt Mov en base no seguro Vibrac. de unid. Base no seguro Alarma del sist. Evento Desactivado Alteración Activación PIR interna Activación de la vibración interna Comienza el ciclo de alarma (8 min.) CÓDIGOS DE MENSAJES DE TEXTO DEL TELÉFONO CELULAR NOTA: La línea de “Asunto” del Correo electrónico/Mensaje de texto identifica el nombre de la unidad base que está ya sea emitiendo alarma o en sesión de prueba.
DESCRIPCIÓN DE CÓDIGOS DE EVENTOS Código de evento Base: NO HAY CA Descripción La unidad base no recibe potencia Código de evento Revise la alimentación eléctrica Base: POT. RESTAURADA La potencia de la unidad base ha sido restaurada NA DISPOS. x txt: NO HAY CA Dispositivo no tiene potencia Revise la alimentación eléctrica DISPOS. x txt: POT. RESTAURADA La potencia del dispositivo ha sido restaurada NA DISPOS.
DESCRIPCIÓN DE CÓDIGOS DE EVENTOS Código de evento Descripción Acción USUARIO x: BORRADO El usuario x ha sido borrado del sistema NA HORA/FECHA CAMBIADA El usuario maestro ha cambiado la hora y/o la fecha NA FALLAS DESPEJADAS El usuario maestro ha despejado las fallas NA DISPOS. x txt: FALLA DEL Se ha perdido la transmisión RCPTOR. bidireccional del dispositivo Llame al servicio al cliente para probar el sistema DISPOS. x txt: FALLA DEL Se ha restaurado la transmisión RCPTOR. DESPEJ.
Guía de resolución de problmas PROBLEMA La pantalla de cristal líquido se queda en blanco cuando se enchufa la unidad base. SOLUCIÓN La batería debe ser reposicionada por un centro de servicio autorizado por DEWALT. La pantalla LED está en blanco mientras la unidad base está desenchufada. Si la unidad queda desenchufada por 10 minutos, pasa a la modalidad standby. Presione cualquier tecla o enchufe la unidad a una toma de corriente para salir de la modalidad standby.
Glosario Alteración Una indicación de que la tapa de un dispositivo se ha retirado o que alguien ha alterado el estado físico de un dispositivo. Armado forzado Armado a pesar de una falla. Una falla que no ha sido despejada antes de armar el sistema. Encender la protección del sistema de seguridad. Corriente Alterna de la toma de corriente. Un código de cuatro dígitos que se usa sólo para armar y desarmar el sistema, el usuario no puede hacer cambios en la programación.
SITELOCK LLC, 701 East Joppa Road, Baltimore, MD 21286 (APR05) Form No. 623754-01 DS100 Copyright © 2004, 2005 DEWALT DEWALT is a registered trademark of the DEWALT Industrial Tool Co., 701 East Joppa Road, Baltimore, MD 21286. The following are trademarks for one or more DEWALT power tools: the yellow and black color scheme; the “D” shaped air intake grill; the array of pyramids on the handgrip; the kit box configuration; and the array of lozenge-shaped humps on the surface of the tool.