Operation Manual
Manuals
Brands
DeWalt Manuals
Milling
dw 670 qs
1
2
3
4
5
6
7
8
9
10
2
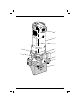
Figure 3
Figure 4
Figure 5
Figure 2
b
j
k
m
l
m
k
c
n
h
r
s
t
q
o
p
a
1
...
2
3
4
5
6
...
...
124