
Instruction manual


10
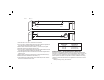
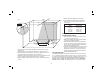
2. Turn on the laser’s vertical beam and position the unit at one end of the line,
facing the line.
3. Adjust the unit so its beam is aligned and centered on the line on the floor.
4. Mark the position of the laser beam on the ceiling (f). Mark the center of the
laser beam directly over the midpoint of the line on the floor.
5. Reposition the laser at the other end of the line on the floor. Adjust the unit once
again so its beam is aligned and centered on the line on the floor.
6. Mark the position of the laser beam on the ceiling (g), directly beside the first
mark (f).
7. Measure the distance between these two marks.
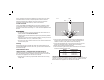
8. If the measurement is greater than the values shown
below, the laser must be serviced at an authorized
service center.
Ceiling Allowable Distance
Height Between Marks
2.5 m (8') 3.5 mm (5/32")
3.0 m (10') 4.5 mm (3/16")
4.0 m (14') 6.0 mm (1/4")
6.0 m (20') 9.0 mm (3/8")
9.0 m (30') 13 mm (1/2")
Troubleshooting
THE LASER DOES NOT TURN ON
• Make sure batteries are installed according to (+) and
(–) on the inside of the battery door.
• Make sure the batteries are in proper working condition.
If in doubt, try installing new batteries.
• Make sure that the battery contacts are clean and free
of rust or corrosion. Be sure to keep the laser level dry
and use only new, high-quality, name brand batteries to
reduce the chance of battery leakage.
• If the laser unit is heated above 50˚C (120˚F), the unit will
not turn on. If the laser has been stored in extremely hot
temperatures, allow it to cool. The laser level will not be
damaged by pressing the on/off button before cooling to
its proper operating temperature.
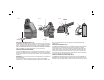
THE LASER BEAMS FLASH
The DW086-XE and DW087-XE have been designed to self-level up to an average
of 4° in all directions when positioned as shown in Figure 3. If the laser is tilted so
much that internal mechanism cannot level itself, it will flash the laser (Fig. 4) – the
tilt range has been exceeded. THE FLASHING BEAMS CREATED BY THE LASER
ARE NOT LEVEL OR PLUMB AND SHOULD NOT BE USED FOR DETERMINING OR
MARKING LEVEL OR PLUMB. Try repositioning the laser on a more level surface.
FIG. 8
f
g
f
g
1.5 m (5')
Step 1
Step 4
Steps 2, 3
Step 5
Step 7
Step 6