
Instruction manual


6
continue to drain, but the beam(s) will quickly dim. After fresh batteries are installed
and the laser is turned on again, the laser beam(s) will return to full brightness and the
red indicator light will stay off. (A flashing laser beam is not caused by low batteries;
see Out of Tilt Range Indicator.)
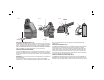
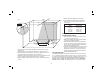
C
FIG. 2
B
B
C
D
DW087-XEDW086-XE
OPERATION
To Turn the Lasers On and Off (Fig. 2)
DW086-XE: With the laser off, place it on a flat surface. Press the ON/OFF button (C)
to power the laser on. The laser will turn on and project a horizontal laser line. Press
the ON/OFF button again to turn the laser line off.
DW087-XE: With the laser off, place it on a flat surface. This model has two ON/OFF
buttons, one for a horizontal laser line (C) and one for a vertical laser line (D). Each
laser line is powered on by pressing its ON/OFF button. The laser lines can be pow-
ered one at a time or at the same time. Pressing the ON/OFF buttons again turns the
laser lines off.
Using the Lasers
The beams are level or plumb as long as the calibration has been checked (see
Field Calibration Check) and the laser beam is not flashing (see Out of Tilt Range
Indicator).
• Use only accessories that are recommended by the manufacturer for your
model. Accessories that may be suitable for one tool, may become hazardous
when used on another tool.
SERVICE
• Tool service must be performed only by qualified repair personnel. Service or
maintenance performed by unqualified personnel could result in a risk of injury.
• When servicing a tool, use only identical replacement parts. Follow instruc-
tions in the Maintenance section of this manual. Use of unauthorized parts or
failure to follow Maintenance Instructions may create a risk of electric shock or
injury.
To locate your nearest D
EWALT service center call (AUS) 1800 654 155 or (NZ) 09
526 2556 or go to www.dewalt.com.au on the Internet.
Operating Tips
• Use only new, high-quality, name brand batteries for best results.
• Ensure batteries are in good working condition. If the low battery red indicator
light is flashing, the batteries need replacement.
• To extend battery life, turn laser off when not working with or marking the beam.
• To ensure the accuracy of your work, check to make sure your laser is calibrated
often. See Field Calibration Check.
• Before attempting to use the laser, make sure it is positioned securely, on a
smooth, flat surface.
• Always mark the center of the beam created by the laser.
• Extreme temperature changes may cause movement of internal parts that can
affect accuracy. Check your accuracy often while working. See Field Calibration
Check.
• If the laser has been dropped, check to make sure your laser is still calibrated.
See Field Calibration Check.
LOW BATTERY INDICATION
The DW086-XE and DW087-XE lasers are equipped with a red indicator light (B),
as shown in Figure 2. The red indicator lights are located to the left of the ON/OFF
buttons (C, D).
A flashing red indicator light indicates that the batteries are low and need to be
replaced. The laser may continue to operate for a short time while the batteries