
Instruction manual


9
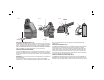
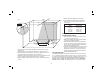
1. Attach the laser to one end of a wall using its pivot bracket.
2. Turn on the laser’s horizontal beam and pivot the laser toward the opposite end
of the wall and approximately parallel to the adjacent wall.
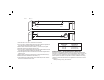
3. Mark the center of the beam at two locations (c, d) at least 9 m (30') apart.
4. Reposition the laser to the opposite end of the wall.
5. Turn on the laser’s horizontal beam and pivot the laser back toward the first end
of the wall and approximately parallel to the adjacent wall.
6. Adjust the height of the laser so that the center of the beam is aligned with the
nearest mark (d).
7. Mark the center of the beam (e) directly above or below the farthest mark (c).
8. Measure the distance between these two marks (c, e).
9. If the measurement is greater than the values shown below, the laser must be
serviced at an authorized service center.
Distance Allowable Distance
Between Walls Between Marks
9 m (30') 6.0 mm (1/4")
12 m (40') 8.0 mm (5/16")
15 m (50') 10.0 mm (13/32")
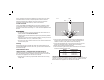
CHECKING ACCURACY – VERTICAL BEAM (DW087-XE MODEL ONLY)
Checking the vertical (plumb) calibration of the laser can be most accurately done
when there is a substantial amount of vertical height available, ideally 9 m (30'), with
one person on the floor positioning the laser and another person near a ceiling to
mark the position of the beam. It is important to conduct a calibration check using
a distance no shorter than the distance of the applications for which the tool will be
used (Fig. 8).
1. Start by marking a 1.5 (5') line on the floor.
FIG. 7
c
d
d
c
e
9m (30')
Step 1, 2
Step 3
Steps 4, 5
Step 6
Step 7
Step 8
Step 3