
Instruction manual


ENGLISH
any way. Unmodified plugs and matching outlets will reduce
5
Safety of others
This appliance is not intended for use by persons (includ-
ing children) with reduced physical, sensory or mental
capabilities, or lack of experience and knowledge, unless
they have been given supervision or instruction concern-
ing the use of the appliance by a person responsible for
their safety.
Children should be supervised to ensure that they do not
play with the appliance.
Residual risks.
Additional residual risks may arise when using the tool which
may not be included in the enclosed safety warnings. These
risks can arise from misuse, prolonged use etc.
Even with the application of the relevant safety regulations
and the implementation of safety devices, certain residual
risks can not be avoided. These include:
Injuries caused by touching any moving parts.
Injuries caused by touching any hot parts.
Injuries caused when changing any parts or accessories.
Injuries caused by prolonged use of the appliance. When
using any appliance for prolonged periods ensure you
take regular breaks.
Electrical safety
Warning! This product must be earthed.
Always check that the power supply corre-
sponds to the voltage on the rating plate.
Power plugs must match the outlet. Never modify the plug in
risk of electric shock.
If the supply cord is damaged, it must be replaced by
the manufacturer or an authorised Black & Decker
Service Centre in order to avoid a hazard.
Extension cables & Class 1 product
A 3-core cable must be used as your appliance is
earthed and of Class 1 construction.
Up to 30m (100 ft) can be used without loss of power.
Labels on the appliance
The following pictograms are shown on the tool:
Warning! To reduce the risk of injury, the user
must read the instruction manual.
Warning! Danger of scalding.
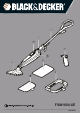
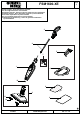
Features
This appliance includes some or all of the following features.
1. ON/Off switch
2. Smartselect
TM
dial
3. Water tank
4. Handle
5. Steam Head
6. Cleaning pad
7. Resting mat
8. Carpet glider
9. Jug
Assembly
Warning! Before attempting any of the following operations,
make sure that the appliance is switched off and unplugged
and that the appliance is cold and does not contain any water.
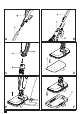
Attaching the handle (Fig. A & B)
Slide the hand grip (10) into the top end of the handle (4)
until it clicks into place.
Slide the bottom end of the handle (4) into the top end of
the steam mop body (11) until it clicks into place.
The handle can be removed from the Steam mop body for
easy storage by pressing the handle tube release button
(12) and pulling the handle (4) out of the steam mop body
(11).
Attaching the steam head (Fig. C)
Slide the bottom end of the steam mop body (11) onto the
steam head (5) until it clicks into place.
The steam head can be removed from the Steam mop
body by pressing the steam head release button (13) and
pulling the steam mop body (11) off the steam head (5).
Attaching a cleaning pad (Fig. D)
Replacement cleaning pads are available from your Black &
Decker dealer (cat. no. FSMP20-XE).
Place a cleaning pad (6) on the floor with the ‘hook & loop’
side facing up.
Lightly press the steam mop down onto the cleaning pad
(6).
Caution! Always place your steam mop on the resting mat (7)
with the handle (4) in the upright position when stationary and
make sure the steam mop is turned off when not in use.
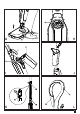
Removing a cleaning pad (Fig. E)
Caution! Always wear suitable shoes when changing the
cleaning pad on your steam mop. Do not wear slippers or
open toed footwear.
Return the handle (4) to the upright position and turn the
steam mop ‘OFF’.
(Original instructions)