
Instruction manual


ENGLISH
remove stubborn stains from vinyl or linoleum floors, you
Always vacuum or sweep the floor before using the steam
This steam mop is fitted with an Smartselect
cools down. (approximately five minutes)
tab (15) and press down firmly.
Place carpet glider on the floor.
tab (14) and press down firmly.
cools down. (approximately five minutes)
6
Place the steam mop on the resting mat and wait until it
Place the front of your shoe onto the cleaning pad removal
Lift the steam mop up off the cleaning pad.
Caution! Always place the steam mop on the resting mat (7)
with the handle (4) in the upright position when stationary and
make sure the steam mop is turned off when not in use.
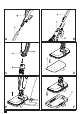
Attaching the carpet glider (Fig. F)
Lightly press the steam mop down onto the carpet glider
(8) until it clicks into place.
Caution! Always place the steam mop on the resting mat (7)
with the handle (4) in the upright position when stationary and
make sure the steam mop is turned off when not in use.
Removing the carpet glider (Fig. G)
Caution! Always wear suitable shoes when changing the
carpet glider on your steam mop. Do not wear slippers or
open toed footwear.
Return the handle (4) to the upright position and turn the
steam mop ‘OFF’.
Place the steam mop on the resting mat and wait until it
Place the front of your shoe onto the carpet glider removal
Lift the steam mop up off the carpet glider (8).
Caution! Always place the steam mop on the resting mat (7)
with the handle (4) in the upright position when stationary and
make sure the steam mop is turned off when not in use.
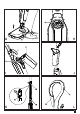
Filling the water tank (Fig. H, I & J)
This Steam Mop incorporates an anti-calc system to help
prolong the life of the system.
Note: Fill the water tank with clean tap water.
Note: In areas of very hard water, the use of de-ionised water
is recommended.
Ensure that the appliance is switched off and the power
cord is disconnected from the mains.
Place the steam mop on the resting mat (7) with the
handle (4) in the upright position.
Remove the filler cap (16) by turning it anti-clockwise.
Fill the tank (3) with water.
above the Max fill mark.
Fit the filler cap (16) by turning it firmly clockwise.
Warning!Your tank has a 0.5 litre capacity. Do not fill the tank
Note: When not in use, the jug may be clipped to the handle
for convenient storage (Fig. J)
the filler cap will prevent the steam mop from starting.
Note: Ensure the filler cap is firmly secured. Incorrect fitting of
Use
Switching on and off
To switch the appliance on, press the ON/OFF button (1).
It takes approximately 15 seconds for the steam mop to
heat up.
Note: When the steam mop is first turned on the water res-
ervoir will glow red. Once the steam mop is ready to use the
water reservoir will glow blue.
To switch the appliance off, press the ON/OFF button (1).
Caution! Never leave the steam mop in one spot on any
surface for any period of time. Always place the steam mop on
the resting mat (7) with the handle (4) in the upright position
when stationary and make sure the steam mop is turned off
when not in use.
Caution! Always empty the steam mop after use.
Smartselect
TM
Technology
TM
dial (2) which
shows various cleaning applications. They are used to select
the correct operating mode for your particular cleaning opera-
tion.
Using the Smartselect
TM
dial (2), choose from one of the follow-
ing applications:
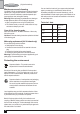
Wood/Laminate
Stone/Marble
Tiles/Vinyl
The steam mop will select the correct volume of steam
required for your particular cleaning operation.
Hints for optimum use
General
Caution! Never use the steam mop without first attaching a
cleaning pad.
mop.
The easiest way to use the machine is to tilt the handle to
a 45˚ angle and clean slowly, covering a small area at a
time.
Do not use chemical cleaners with your steam mop. To
can pre-treat with a mild detergent and some water before
using the steam mop.
(Original instructions)