® DW625E 93
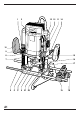
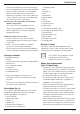
1 2 12 13 11 14 4 10 9 8 15 7 16 17 6 A1 97 5 3 4 21 20 19 18
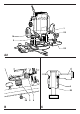
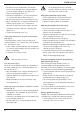
1 23 14 3 22 A2 3 25 24 B 3 4 C 98
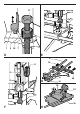
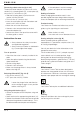
27 17 20 1 9 26 7 8 E D 8 28 11 12 19 13 G 29 18 22 23 17 30 F 99 H
ENGLISH ROUTER DW625E Congratulations! You have chosen a DEWALT Power Tool. Years of experience, thorough product development and innovation make DEWALT one of the most reliable partners for professional Power Tool users. Table of contents Technical data EC-Declaration of conformity Safety instructions Package contents Description Electrical safety Mains plug replacement (U.K.
ENGLISH Safety instructions When using Power Tools, always observe the safety regulations applicable in your country to reduce the risk of fire, electric shock and personal injury. Read the following safety instructions before attempting to operate this product. Keep these instructions in a safe place! General 1 Keep work area clean Cluttered areas and benches can cause accidents. 2 Consider work area environment Do not expose Power Tools to humidity. Keep work area well lit.
ENGLISH Check for misalignment and seizure of moving parts, breakage of parts and any other conditions that may affect its operation. Have damaged guards or other defective parts repaired or replaced as instructed. Do not use the tool if the switch is defective. Have the switch replaced by an authorized DEWALT repair agent. 20 Have your tool repaired by an authorized DEWALT repair agent This Power Tool is in accordance with the relevant safety regulations.
ENGLISH Assembly and adjustment Prior to assembly and adjustment always unplug the tool. Never use a light socket. Never connect the live (L) or neutral (N) wires to the earth pin marked E or . For 115 V units with a power rating exceeding 1500 W, we recommend to fit a plug to BS4343 standard. Using an extension cable If an extension cable is required, use an approved extension cable suitable for the power input of this tool (see technical data). The minimum conductor size is 1.5 mm2.
ENGLISH • For optimum ease of operation, the carriage return can be adapted to the required depth of cut by rotating or sliding the knurled nut (9). • Loosen the clamping screw (15). • Rotate the handwheel (11) until the fine adjuster (17) touches the revolver depth stop (20). • Set the measuring lens to a round figure (e.g. 0). • Adjust the depth of cut using the handwheel (11) and the measuring lens (12).
ENGLISH Connecting a dust extractor (fig. A & K) The dust extraction adapter (33) consists of a main section (34), a clamping piece (35), a cutter plate (36), two screws (37) and two nuts (38). • Slide the clamping plate (35) onto the main section (34) from the front. • Fit the screws (37) and nuts (38). • Insert the cutter plate (36) from the bottom and rotate it until it clicks in place. • Mount the unit to the router base. • Connect a dust extractor hose to the dust extraction adaptor (33).
ENGLISH GUARANTEE Unwanted tools and the environment Take your tool to an authorized DEWALT repair agent where it will be disposed of in an environmentally safe way. • 30 DAY NO RISK SATISFACTION GUARANTEE • If you are not completely satisfied with the performance of your DEWALT tool, simply return it within 30 days, complete as purchased, to a participating Dealer, or an authorized DEWALT repair agent, for a full refund or exchange. Proof of purchase must be produced.