
Technical data


20 en - 5
ENGLISH
Setting the sawdust blower (fig. A)
The sawdust blower conducts an adjustable stream
of air to the saw blade to keep the workpiece clear
of sawdust during operation.
• Set the sawdust blower using the lever (9).
It has two levels:
OFF For working with metals, when using
coolants and lubricants and for use with
dust extraction.
ON For working with wood and similar
materials in high speed.
Mounting and removing the anti-splinter shoe
insert (fig. D)
The anti-splinter shoe insert (15) which fits close to
the saw blade prevents splintering of the workpiece.
• Mount the anti-splinter shoe insert (15) into the
shoe as shown.
• To remove the anti-splinter shoe insert do the
above process in reverse order.
Mounting and removing the plastic anti-scratch
shoe cover (fig. E)
The anti-scratch shoe cover (16) prevents damage
to the surface of (sensitive) workpieces.
• Click the cover onto the shoe as shown.
Setting the pendulum stroke (fig. F)
• Slide the selector (3) to position 0 for fine cuts in
thin workpieces. Use position 2 for thick
workpieces only. Use position 1 for any other cuts.
Installing the parallel fence (fig. G)
• Install the parallel fence (17) as shown.
Installing the trammel bar (fig. H)
• Install the trammel bar (18) as shown.
• Secure the trammel bar in the centre of the hole
to be cut.
Instructions for use
• Always observe the safety instructions
and applicable regulations.
• Make sure your workpiece is well
secured. Remove nails, screws and other
fasteners that may damage the blade.
• Check that there is sufficient space for
the blade underneath the workpiece.
Do not charge the battery pack at
ambient temperatures <4 °C or >40 °C.
Recommended charging temperature:
approx. 24 °C.
• To charge the battery pack (11), insert it into the
charger (13) as shown and plug in the charger.
Be sure that the battery pack is fully seated in the
charger. The red charging indicator (14) will blink.
After approx. 1 hour, it will stop blinking and
remain on. The battery pack is now fully charged.
The battery pack can be removed at any time or
left in the connected charger indefinitely.
Inserting and removing the battery pack
• Insert the battery pack into the grip until it clicks
in place.
• To remove the battery pack, press the two
release buttons (12) simultaneously and pull the
pack out of the grip.
Fitting and removing a saw blade (fig. A, B & I)
The DEWALT tool-free system ensures quick and
easy changing of saw blades.
• Pull the rotating handle (10) up completely.
• Unlock the handle by rotating it as shown.
• Insert the saw blade into the blade holder (8)
guiding the back of the blade into the groove of
the guide roller (6).
• Turn the rotating handle (10) towards locked
position until a click is heard.
• Press the rotating handle halfway down
(freewheeling position) and continue rotating the
handle towards locked position.
• Press the handle (10) down completely.
• To remove the saw blade proceed in reverse order.
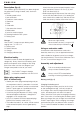
Setting the bevel angle (fig. C)
The adjustable shoe (5) allows cutting of LH and RH
bevel angles up to 45°. The 0° and 45° positions are
preset.
• Release the shoe lever (4).
• Slide the shoe (5) away from the saw blade.
• Tilt the shoe and set the desired bevel angle with
the help of the scale.
• Fine-tune the bevel angle and tighten the shoe
lever (4).
• To secure the 0° and 45° positions, slide the
shoe back to the front position.