
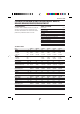
Technical data


ENGLISH
en - 6 23
• To charge the battery pack (9), insert it into the
charger (11) as shown and plug in the charger.
Be sure that the battery pack is fully seated in the
charger, but do not force it. The red charging
indicator (12) will blink. After approx. 1 hour, it will
stop blinking and remain on. The battery pack is
now fully charged. The battery pack can be
removed at any time or left in the connected
charger indefinitely.
Inserting and removing the battery pack
• Insert the battery pack into the grip (8) until it
clicks in place.
• To remove the battery pack, press the two
release buttons (10) simultaneously and pull the
pack out of the grip (8).
DE9108/DE9116 - Hot Pack Delay
When the charger detects a battery that is hot, it
automatically starts a Hot Pack Delay, suspending
charging until the battery has cooled. After the battery
has cooled, the charger automatically switches to the
pack charging mode. This feature ensures maximum
battery life. The red indicator (12) blinks long, then
short while in the Hot Pack Delay mode.
DE9116 - Refresh mode
The refresh mode helps to maintain the battery pack
at its peak capacity. It is recommended to use this
feature monthly or every 10 to 20 charge/discharge
cyles. Please make sure to use the feature whenever
you notice decreased battery pack performance.
• Start the charging process as described above.
• Press the refresh mode button (13). The red
charging indicator will stop blinking momentarily,
quickly blink three times and then resume blinking
as before. The charger is now in refesh mode.
• After up to 8 hours, the red charging indicator will
stop blinking and remain on. The battery pack is
now fully charged and can be removed at any
time or left in the connected charger indefinitely.
To cancel refresh mode, you can remove
and re-insert the battery pack at any time.
Inserting and removing bits (fig. A & B)
Your drill is equipped with a bit holder (7).
• Open the chuck by turning the sleeve (14)
counterclockwise and insert the bit shank.
• Place the bit in the chuck as far as it will go and
lift slightly before tightening.
• Tighten firmly by turning the sleeve clockwise.
• To remove the bit, proceed in reverse order.
Selecting the operating mode or adjusting the
torque (fig. C)
The collar of this tool has 15 positions for the
adjustment of the torque to suit the size of the screw
and the workpiece material. For torque adjustment,
refer to the section “Screwdriving”.
• Select the drilling mode or torque by aligning the
symbol or number on the collar (5) with the
indicator (15) on the housing.
DW909/DW912/DW914/DW997
The percussion drills can be used in the following
operating modes:
Rotary drilling:
for steel, wood and plastics
Percussion drilling:
for masonry drilling
Forward/reverse slider (fig. D)
• To select forward or reverse rotation, use the
forward/reverse slider (2) as shown (see arrows
on tool).
Always wait until the motor has come to
a complete standstill before changing the
direction of rotation.
Two gear selector (fig. E)
Your tool is fitted with a two gear selector (6) to vary
the speed/torque ratio.
1 low speed/high torque
(drilling large holes, driving screws)
2 high speed/low torque (drilling smaller holes)
For speed rates, refer to the technical data.
• Always push the two gear selector
completely forward or backward.
• Do not change gears at full speed or
during use.