6 Maintenance & Adjustments 6 Maintenance Schedule Each use or Every Every season or | Diversionary | Every season or Prior every 5-10 Hrs.
Spark Plug The spark plug should be leaned and the gap reset every 25 hours or once a season. Refer to the Engine Operator's Manual for correct plug type and gap specifications. Fuel Filter The fuel filter cannot be cleaned and should be replaced every 100 operating hours; more often if run with old gasoline. Clean Engine If the engine has been running, allow it to cool for at least 30. minutes before cleaning. Periodically remove dirt build-up from engine, Clean cooling fins every 25 fours.
18 Lubrication WARNING! Before lubricating, repairing, or inspecting, always disengage PTO, set parking brake, stop engine and remove key {if equipped) to prevent unintended starting, Pivot Points & Linkage Lubricate all the pivot points on the drive system and [ift linkage at least once a season with light oil. Rear Wheels The rear wheels should be removed from the axles once a season, Lubricate the axles and rim hubs well with an all-purpose grease before reinstalling them.
2. The top of each spindle pulley is marked with an arrow, See Figure 6-4, The arrows should be perpendicular (at 2 90° angle} to each other, Figure 6-4 3. If the arrows on the surface of each spindle pulley are not perpendicular {at a 80° angle) to each other, see an authorized service dealer to have the deal's blade timing belt reset, WARNING! Do not operate the machine without the declines blade timing belt properly set.
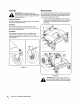
20 Service Cutting Deck Removal WARNING! Before performing any maintenance or repairs, disengage blades, stop engine and remove key (if equipped) to prevent unintended starting. To remove the cutting deck, proceed as follows: 1. Remove the belt cover by removing the three screws (a) and washers (b) (f equipped) which secure it to the frame. See Figure 7-1 for hardware location according to bait cover shape. Figure 741 WARNING: Do not operate mower without the belt cover installed.
8, Repeat the Step 7 on the mower’s fight side. 5. Carefully remove the front deck supports from the deck lift arms, See Figure 7-3. 10. Carefully unhook the mower’s lift assembly from the rear deck supports. 11. Use the deck height lever to raise the lift assembly to its highest position, 12. Remove the wooden blocks from under the deck and gently slide the cutting deck toward the rear of the machine. 13, Pull the click pin (8) out and unhook the drive spring cable from the idler arm assembly.
22 5. Test the blade’s balance using a blade balance. Grind metal from the heavy side until it balances evenly. NOTE: When replacing the blade, be sure to install the blade with the side of the blade marked “Bottom” {or with a part number stamped in 1) facing the ground when the mower is in the operating position, CAUTION: Use a torque wrench to tighten the blade spindle hex flange nut to between 70 ft-lb and 90 ft-bi. CAUTION: The cutting blades must be installed perpendicular to each other.
Changing the Deck Engagement Belt WARNING! Shut the engine OFF and remove key {if equipped) before removing the cutting blade(s) far sharpening or replacement. Protect your hands by using heavy gloves when grasping blades and pulleys. WARNING! The V-belts found on your mower ate specialty designed to engage and disengage safely. A substitute (non-UM) V-belt can be dangerous by not disengaging completely. For a proper working machine, use factory approved belts.