
Midi-Lathe Instruction Manual


17
CUTTING A SHOULDER
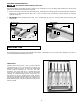
Use the parting tool first to reduce the wood to within
1/16” of the required shoulder diameter (Fig. A18). Clean
the waste stock out with the gouge (Fig. A19), then use
the skew (Fig. A20) for the actual cutting of the shoulder (a
duplication of squaring an end). Use the skew to make the
horizontal cut, but in a different manner from plain cylinder
work. If the shoulder is long, use the ordinary skew position
for the outer portion of the cut. At the angle between the
horizontal and vertical cuts, move the heel of the chisel
into a position tangent between the skew and the cylinder
(Fig. A21). Raise the handle of the chisel slightly to allow it
to cut while the tool moves along the rest. Use a very light
cut to produce a smooth workpiece. You can use the heel
of the skew to make the entire cut, if desired, but, whether
in this position or any other position, do not pick up the
cut directly at the end of the stock. Horizontal cuts started
directly from the end of the workpiece will have a tendency
to bite into the wood, often ruining the entire piece. Always
run off the end and not into it. Where a very short shoulder
makes this impossible, use the skew in a flat scraping
position. If the cutting technique is used, engage only with
the heel of skew in a very light cut.
Fig. A20
Fig. A18
Fig. 49
Fig. A19
Fig. A21
CUTTING SMALL BEADS
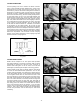
Beads can be scraped or cut. The spear chisel provides
the easiest method of scraping, and works well on beads
separated by parting tool cuts (Fig. A22). Scraping is
slower than cutting and is not as clean, but it has the
advantage of protecting the workpiece from long gashes.
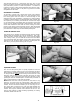
Cutting beads quickly and accurately with the small skew
is one of the most difficult lathe operations. You can use
various working methods. One method is a vertical incision
at the point where the two curved surfaces will eventually
come together. Make this cut with either the heel or the
toe of the skew. (Fig. A23 shows the use of the toe). Place
the skew at right angles to the workpiece. Place the chisel
flat on its side at the start, and evenly rotate it through the
successive stages of the cut (Figs. A24, A25, and A26). At
the same time, pull the chisel slightly backward to maintain
the cutting point. The entire cut is made with the heel of
chisel. The opposite side of the bead is cut in the same
manner, one cut serving to produce the full shape in each
instance. This action produces beads that are beautifully
smooth and polished, and the technique is well worth
mastering.
Fig. A23
Fig. A26
Fig. A25
Fig. A24
Fig. A22
"BEADS"
SCRAPING METHOD
Spear-Point
Chisel
Parting tool
cuts