
Midi-Lathe Instruction Manual


18
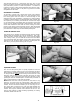
VEE GROOVES
Cutting the vee groove demands much the same technique
as the bead, except the skew is hinged straight into the
workpiece without rotation (Fig. A27). Only one-half of the
vee is made at a time, and one, two, or more cuts may be
needed on each side to obtain the desired shape. As in all
cutting with the skew, the bevel next to the cut must be
used as a fulcrum. Be careful not to allow full edge of the
chisel to catch and cause a run. You can also make Vee
grooves with the toe of the skew, in the same manner as
squaring an end.
LONG CUTS
Convex or straight-tapered surfaces usually require long
cuts. With a convex surface, the method used in making
the finishing cut is shown in Fig. A28. Turn the gouge on
the tool rest so that it will be inclined toward the direction
that it will move. The grind is tangent to the workpiece, and
the center point of the cutting edge is the contact point
with the wood. As the cut progresses toward and around
the end of the curve, gradually raise the handle and swivel
it to the right (Fig. A29) to maintain the tangency between
the grind and the workpiece .
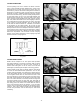
Figs. A30 and A31 show the cutting of a long taper with
a skew. The operation differs from smoothing a cylinder
only at the start of the cut. Make the starting cut with the
heel (Fig. A30) to prevent the tool from digging into the
workpiece. As the tool moves down the workpiece, pull the
chisel back to allow the center point of the cutting edge to
cut. However, you can make the full taper with the heel. Be
careful not to cut too deeply at the center of the taper. The
direction of cutting is always downhill.
Fig. A27
Fig. A31
Fig. A28
Fig. A29
Fig. A30
COVE CUTS
Second to forming a perfect bead, the cove or concave
cut is the most difficult to master. Make this cut with the
gouge, where the size of the tool depends on the size of
the cut. Push the gouge directly into the workpiece to
remove the surplus stock (Fig. A32).
Fig. A32