Outdoor Wall Light SKU: HOWL07A [Instruction Manual] Thank you for your purchase. Please contact us if you have any questions. We will get back to you within 24 hours. Email: support@dewenwils.com Please attach your Order ID so that we can serve you better.
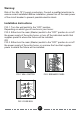
Warning: Risk of fire. Min 75°C supply conductors. Consult a qualified electrician to ensure correct installation.Before installation, please turn off the main power of the circuit breaker to prevent possible electric shock. Installation Instructions FIG.1. Turn the wall switch to the “OFF” position. Depending on which type of fuse box in your home: FIG.2.
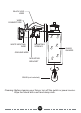
BLACK LIVE WIRE WIRE CONNECTORS WHITE NEUTRAL WIRE MOUNTING SCREWS GROUND WIRE GLASS SHADES MOUNTING BRACKET BULB (not included) Cleaning: Before cleaning your fixture, turn off the switch or power source. Wipe the fixture with a soft and damp cloth.
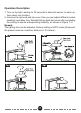
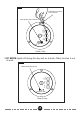
Operation Description 1. Turn on the light, waiting for 30 seconds to allow the sensor to warm up, then select one function. 2. Unscrew the top knob and top cover, then you can adjust different modes, sensitivity and delay time. Reinstall the top knob and cover after completing the setting to ensure waterproofing reliability, as shown in Figure 1~4. Remark: The lighting time can be adjusted. Factory setting is AUTO mode (60 second, the preset maximum induction distance is 10 meters.
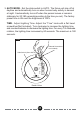
3. AUTO MODE - Set the slide switch to AUTO. The fixture will stay off at daytime and automatically turn on when human body activity is sensed at night. It automatically turns off when the person leaves or remains stationary for 20-180 seconds(according to the time you set). The factory preset time is 60s and the brightness is 100%. TIME - Adjust Lighting Time: Adjust the “Time” knob with a flat head screwdriver(Not Included).
SENS - Adjust Sensing Distance: Adjust the “Sens” knob with a flat head screwdriver(Not Included). Turn clockwise to increase sensing distance, and counterclockwise to decrease the sensing distance. The factory preset distance is 10M(Maximum), you can adjust the “Sens” knob to set it in the range of 3-10 meters. Fig.6 Flathead Screwdriver not included) Slide Switch (Set to AUTO) Low Level - + Time - + Sens - + PC Aut o Aut o+ Detail A View LOW LEVEL - This function is out of work when AUTO mode.
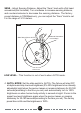
TIME - Adjust Lighting Time: Adjust the “Time” knob with a flat head screwdriver (Not Included). Turn clockwise to increase the lighting time, and counterclockwise to decrease the lighting time. For every 1/4 clockwise rotation, the lighting time increases by 60 seconds. The maximum is 180 seconds. Fig.
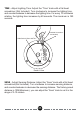
Fig.8 Flathead Screwdriver not included) Slide Switch (Set to AUTO+ ) Low Level - + Time - + Sens - + PC Aut o Aut o+ Detail A View LOW LEVEL - Adjust low-level brightness: Adjust the “Sens” knob with a flat head screwdriver(Not Included). Turn clockwise to increase brightness, and counterclockwise to decrease brightness. Note: This function is only available for Incandescent bulbs or dimmable LED bulbs.
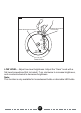
Fig.9 Flathead Screwdriver (not included) Slide Switch (Set to AUTO+ ) Low Level - + Time - + Sens - + PC Aut o Aut o + Detail A View 5.PC MODE:Lights off during the day and on at dusk. Other function is out of work. Fig.
NOTE: 1. The sensitivity of the motion sensor will increase as the environmental temperature gets colder. For best performance, gently clean the lens with a soft cloth every 1 or 2 months to ensure maximum sensitivity. 2. The magnitude of adjustment for sensitivity and time may not be precisely proportionate to the amount when the knob is turned. 3. When installed at a height of 6.
Specifications - Input Voltage: 120VAC 60Hz - Max.load Power: Incandescent Bulb 60W - Socket Type: Standard Medium E26 One Year Limited Warranty DEWENWILS warrants this product to be free from defects in material and workmanship for a period of one year from the date of purchase. Warranty is void if damage is caused by misuse or improper installation. Email: support@dewenwils.com. Our dedicated customer service team will get back to you within 24 hours.