
User's Manual


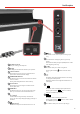

9
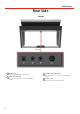
Before You Start to Play
4
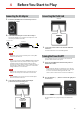
Connecting the AC Adaptor
1. Rotate the [VOLUME] knob toward the left position to
minimize the volume.
VOLUME
2. Connect the included power cord to the AC adaptor.
The indicator will light once you plug the AC adaptor into a wall
outlet (Only for the VIVO H3 model).
Power cord
AC Adaptor
To an AC outlet
NOTE
Depending on your area, the included power cord may dier
from the one shown above.
NOTE
Be sure to use only the AC adaptor (DEXIBELL DYS602-240250W)
supplied with the unit. Also, make sure the line voltage at the
installation matches the input voltage specied on the AC
adaptor body. Other AC adaptors may use a dierent polarity, or
be designed for a dierent voltage, so their use could result in
damage, malfunction, or electric shock.
NOTE
If you won’t be using the VIVO H1 for an extended period of
time, disconnect the power cord from the electrical outlet.
NOTE
To avoid malfunctions, never disconnect the AC/DC adaptor
while the instrument is turned on.
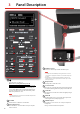
3. Connect the AC adaptor to VIVO H1’s DC IN jack
positioned to the rear bottom panel.
DC IN
USE THE SUPPLIED
ADAPTOR ONLY
PEDALS
REAR SIDE
Connecting the Pedal Cord
DC IN
USE THE SUPPLIED
ADAPTOR ONLY
PEDALS
REAR SIDE
1. Connect the pedal cord that come from the dedicated
stand here.
For further information see the Assembling Manual.
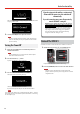
Turning the Power On/O
Once everything is properly connected, be sure to follow the
procedure below to turn on their power.
1. Rotate the [VOLUME] knob toward the left position to
minimize the volume.
NOTE
Before turning the VIVO H1 on/o, always be sure to turn the
volume down. Even with the volume turned down, you might
hear some sound when switching the VIVO H1 on/o.
However, this is normal and does not indicate a malfunction.
2. Press the VIVO H1’s [ " ] button located on the right panel
to switch it on.
VOLUME
The power will turn on, a progress bar appear in the VIVO H1’s
display,.