Regulatory and Safety Information Users in U.S.A This product has been tested and found to comply with the limits for a Class B digital devices, pursuant to Part 15 of the FCC Rules. These limits are designed to provide reasonable protection against harmful interference in a residential installation. This equipment generates, uses, and can radiate radio frequency energy and, if not installed and used in accordance with the instructions, may cause harmful interference to radio communications.
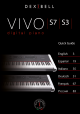
S7 & S3 Quick Guide You can download the full version of the owner's manual from www.dexibell.com site. Welcome to the quick guidel of VIVO S7/S3 and congratulations to purchasing this Digital Piano. Before telling you technical information, let me tell you a little about me. I am "VIVO" digital Piano . My designers used a completely new technology called T2L (True to Life), based on interaction between Sampling and Modelling methods.
1 Important Safety Instruction PLEASE READ CAREFULLY BEFORE PROCEEDING WARNING Always follow the following precaution listed below to avoid user to the risk of serious injury or even death from electrical shock, fire or other hazard . Only use non-tropical weather This unit and its AC adaptor can only be safely used in non-tropical weather. The operating temperature range is 5° - 40°C (41° - 104°F).
Important Safety Instruction CAUTION Always follow the following precaution listed below to avoid user to the risk of serious injury or even death from electrical shock, fire or other hazard . Grasp the plug connecting or disconnecting the AC adaptor When removing the electric plug from the instrument or an outlet, always hold the plug itself and not the cord. Pulling by the cord can damage it.
2 Relevant Indications In addition to the items listed under “Important Safety Instruction” on p. 4, please read and observe the following: Power supply related • Do not plug this unit into the same electrical outlet used same by an electrical appliance that is controlled by an inverter or a motor (such as a refrigerator, washing machine or air conditioner). Doing so, can result an audible noise. • The power adapter may become warm after long hours of consecutive use.
Relevant Indications Related to copyright and trademarks • Dexibell do not assume legal liability regarding any infringements of the user through the use of this unit. • Recording, copying, distribution of copyrighted material (songs, live performance, etc.) belonging to a third party in part or in whole without the permission of the copyright owner is forbidden by law. • Copyright © 2003 by Bitstream, Inc. All rights reserved. Bitstream Vera is a trademark of Bitstream, Inc.
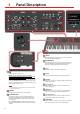
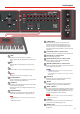
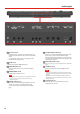
3 Panel Description 16 15 14 13 12 / 25 24 23 22 21 11 26 20 19 18 17 27 28 4 SOUND When this button is active (it's lit), you can select sounds by the Sound and Number buttons e. 29 5 30 6 Turns the power on or off (p. 11). With the factory settings VIVO S7/S3’s power will automatically be switched off 120 minutes after you stop playing or operating the VIVO S7/S3. If VIVO S7/S3’s power has been turned off automatically, you can use the [POWER] switch to turn the VIVO S7/S3 back on.
Panel Description 4 10 3 5 1 9 6 7 8 2 20 CHORD FREEZE Press this button to enable the Freeze function and memorize the chord played in the keyboard in that moment. From now on and until the function is active, whenever you press a note in the keyboard the chord memorized will be reproduced with the same tonality of the played note.. 21 LEVEL KNOBS (MAIN and LOWER/COUPLED) These knobs allow you to adjust the level of the relative part. 13 SONG This button allows you to switch in Song Mode.
Panel Description TE 24 24 25 26 27 Ground terminal 28 29 30 29 Depending on the circumstances of a particular setup, you could feel a tingling sensation at the point where touch this device. You can eliminate this sensation connecting the ground terminal with an external ground. 25 DC IN socket AUDIO OUTPUT R jack 30 31 NOTE * Carefully insert the USB Memory making sure that the connector on the device is appropriate and that it is connected in the proper direction.
4 Before You Start to Play Connecting the AC Adaptor 1. 2. Installing Music Rest Install the included music rest as shown in the illustration below. Rotate the [VOLUME] the knob toward the left position to minimize the volume. Connect the included power cord to the AC adapter. The indicator will light once you plug the AC adaptor into a wall outlet.
Before You Start to Play [POWER] switch, then unplug the power cord from the power outlet. If you do not operate the unit for a certain period of time while the power is on, this unit turns off automatically. The power will turn on, a progress bar appear in the VIVO S7/S3’s display,.
5 Connections Quick Guide Peripheral Devices NOTE Before to connect any external device to Audio IN socket, rotate the [VOLUME] knob toward the lower position to minimize the volume. Audio IN Audio Bluetooth 2 Headphones R L USB to Computer (MIDI) Continuous Pedal Switch Pedal Amplified Speakers Expression Pedal MIDI Expander NOTE Before to connect external Amplified Speakers, move the [VOLUME] slider toward the lower position to minimize the volume.
6 Quick Guide Recording/Playing a Song Effects for Keyboard Parts Rotate the [CONTROL] knobs to adjust the parameter value of the effect related to the current tone. Press the [ON] button to add or not the effect to the keyboard part. Press the [! ] button to start recording. Listening the Demo Song Play your song. Press the [! ] button to stop recording. Press the [ *-,] button play song. Simultaneously press the [ *-,] and [SONG] buttons.
Quick Guide Selecting a Tone Grand Piano Mode Press [SOUND] button Press one of buttons of the sounds family to recall a new tone. When you want to reset various settings and play Grand Piano: Press one of the [1] to [9] button to select another sound in the family. From the Main page, simultaneously press the first and last Function button. Press and hold the same Sound number button previously pressed.
Specifications 7 ITEMS KEYBOARD TYPE VIVO | S7| VIVO | S3| • TP-40 M: 88 - Keys Hammer action • TP-100 LR: 73 - Keys Hammer action • Triple contact - ivory feel • Triple contact TONE GENERATOR T2L: Sampling and Modelling Technology MODELLING Reactive to player articulation SAMPLING XXL wave size, holophonic recording up to 15 seconds on lower piano notes SOUND WAVE FORMAT 24 bit linear - 48 KHz (Internal processing and DSP at 32 bit floating) DIGITAL ANALOG CONVERTION (DAC) 24 bit linear -
Specifications ITEMS VIVO | S7| VIVO | S3| OPTIONS (sold separately) • Bluetooth® is registered trademarks of Bluetooth SIG, Inc. • Wi-FiTM is registered trademarks of Wi-Fi Alliance. NOTE In the interest of product, the specification and description are subject to change without notice.
For European countries 18 UK This Symbol indicates that in EU countries, this product must be collected separately from household waste, as defined in each region. Products bearing this Symbol must not be discarded together with household waste. SK Tento symbol vyjadruje, že v krajinách EÚ sa musí zber tohto produktu vykonávať oddelene od domového odpadu, podlá nariadení platných v konkrétnej krajine.
S7 y S3 Guía rápida Se puede descargar la versión completa del manual de instrucciones en www.dexibell.com. Bienvenidos a la guía rápida de VIVO S7/S3 y enhorabuena por haber comprado este Piano Digital. Antes de comunicarle la información técnica, deje que le cuente algo sobre mí. Soy "VIVO" Piano digital.
1 Instrucciones Importantes de Seguridad POR FAVOR LEA ATENTAMENTE ANTES DE CONTINUAR ADVERTENCIA Siga siempre las advertencias indicadas a continuación para evitar al usuario riesgos de lesiones graves o incluso la muerte por descarga eléctrica, incendio u otros peligros. Utilizar solo en un clima no tropical Esta unidad y su adaptador CA solo se pueden usar con seguridad en climas no tropicales. El rango de temperatura de funcionamiento es 5 °C - 40 °C (41 °F - 104 °F).
Instrucciones Importantes de Seguridad PRECAUCIÓN Siga siempre las advertencias indicadas a continuación para evitar al usuario riesgos de lesiones graves o incluso la muerte por descarga eléctrica, incendio u otros peligros. Sujete el enchufe al conectar y desconectar el adaptador CA. Cuando desenchufe el instrumento de la toma de corriente, hágalo cogiendo el enchufe y no el cable. Si tira del cable puede dañarlo. No conecte o desconecte el adaptador CA con las manos mojadas.
2 Indicaciones relevantes Además de los aspectos recogidos en “Important Safety Instruction”, en la pág. 20, le rogamos que lea y respete lo siguiente: Suministro de energía relacionado • No enchufe esta unidad en la misma toma eléctrica utilizada por un aparato eléctrico controlado por un inversor o un motor (como el refrigerador, lavadora o aire acondicionado). Si lo hace, puede producirse un ruido audible. • El adaptador de corriente puede llegar a calentarse después de muchas horas de uso continuado.
Indicaciones relevantes En relación al copyright (derechos de autor) y marcas • Dexibell no asume ninguna responsabilidad legal relacionada con las infracciones del usuario por el uso de esta unidad. • La grabación, copia, distribución en parte o en su totalidad de material con derechos de autor (canciones en vivo, etc.) perteneciente a terceros, sin el permiso del propietario del copyright está prohibida por la ley. • Copyright © 2003 Bitstream, Inc. Todos los derechos reservados.
3 Descripción del panel 16 15 14 13 12 / 25 24 23 22 21 11 26 20 19 18 17 27 28 4 SOUND Cuando este botón esté activo (encendido), usted puede seleccionar sonidos con los botones Sound y Number e. 29 5 30 6 Encender o apagar (pág. 27). Con la configuración de fábrica VIVO S7/S3 se apagará automáticamente después de 120 minutos de inactividad VIVO S7/S3. Si VIVO S7/S3 se ha apagado automáticamente, usted puede usar el interruptor [POWER] para encenderlo de nuevo VIVO S7/S3.
Descripción del panel 4 10 3 5 1 9 6 7 8 2 21 SELECTORES LEVEL (MAIN y LOWER/COUPLED) Estos selectores le permiten ajustar el nivel de la parte relativa. 22 MUTE (MAIN y LOWER/COUPLED) Usted puede silenciar la parte correspondiente. 23 ON/OFF AUDIO FX (MAIN y LOWER/COUPLED) Utilice estos botones para encender (ON) o apagar (OFF) los procesadores AUDIO FX para la parte correspondiente. 24 13 SONG Este botón le permite pasar al modo Song.
Descripción del panel TE 24 24 25 26 27 Terminal de tierra 28 29 30 29 Dependiendo de las circunstancias de un ajuste especial, usted podría sentir una sensación de hormigueo en el punto donde ha tocado este dispositivo. Usted puede eliminar esta sensación conectando el terminal de tierra con una planta externa.
4 Antes de empezar a tocar Conexión del adaptador CA 1. 2. Instalación del atril Instale el atril incluido como se muestra en la siguiente ilustración. Gire el selector [VOLUME] hacia la izquierda para poner al mínimo el volumen. Conecte el cable de alimentación incluido al adaptador CA. El indicador se iluminará una vez que usted haya enchufado el adaptador CA en la toma de pared.
Antes de empezar a tocar el interruptor [POWER], después desenchufe el cable de alimentación de la toma de corriente. Si no se utiliza la unidad durante un cierto periodo de tiempo, ésta se apaga automáticamente. El instrumento se encenderá, aparecerá una barra de progreso en el display de VIVO S7/S3.
5 Guía rápida de conexiones Periféricas NOTA Antes de conectar cualquier dispositivo externo a la toma Audio IN, gire el selector [VOLUME] a la posición más baja para reducir al mínimo el volumen. Audio IN Audio Bluetooth 2 auriculares R L USB para ordenador (MIDI) Pedal continuo Pedal interruptor Altavoces amplificados Pedal "Expression" MIDI Expander NOTA Antes de conectar amplificadores externos, gire el selector [VOLUME] hacia la posición más baja para reducir al mínimo el volumen.
6 Guía rápida Efectos para las partes de teclado Gire los selectores [CONTROL] para ajustar el valor del parámetro del efecto correspondiente al tono actual. Presione el botón [ON] para añadir o no el efecto a la parte de teclado. Grabación/Reproducción de una canción Escuchar las canciones Demo Presione el botón [! ] para empezar a grabar. Suene su canción. Presione el botón [! ] para detener la grabación. Presione el botón [ *-,] reproductor de canción.
Guía rápida Selección de un tono Presione el botón [SOUND] Modo Grand Piano Presione uno de los botones de los sonidos familia para recuperar un nuevo tono. Presione uno de los botones [1] a [9] para seleccionar otro sonido en la familia. Si desea restablecer las diferentes configuraciones y sonar el Grand Piano: CÓMO SELECCIONAR EL TONO SELECCIONADO COMO FAVORITO Presione y mantenga presionado el mismo botón de número de "Sound" previamente presionado.
Especificaciones 7 ITEMS TIPO DE TECLADO GENERADOR DE TONO VIVO | S7| VIVO | S3| • TP-40 M: 88 - Keys Hammer action • TP-100 LR: 73 - Keys Hammer action • Triple contacto - márfil sintético • Triple contacto T2L: Tecnología Sampling (muestreo musical) y Modelling (métodos de modelación del sonido) MODELLING Interacción con la ejecución del pianista SAMPLING XXL amplitud de onda, grabaciones holofónicas de hasta 15 segundos en las notas graves FORMATO WAVE DEL SONIDO 24 bits lineales - 48 KHz (
Especificaciones ITEMS ACCESORIOS SUMINISTRADOS VIVO | S7| VIVO | S3| Manual de instrucciones Adaptador CA OPCIONES (vendido por separado) • Bluetooth® es una marca de fábrica registrada de Bluetooth SIG, Inc. • Wi-FiTM es una marca registrada de Wi-Fi Alliance. NOTA En el interés del producto, las especificaciones y la descripción están sujetas a modificaciones sin preaviso.
For European countries 34 UK This Symbol indicates that in EU countries, this product must be collected separately from household waste, as defined in each region. Products bearing this Symbol must not be discarded together with household waste. SK Tento symbol vyjadruje, že v krajinách EÚ sa musí zber tohto produktu vykonávať oddelene od domového odpadu, podlá nariadení platných v konkrétnej krajine.
S7 & S3 Guida Rapida La versione completa del manuale è scaricabile dal sito www.dexibell.com. Benvenuto nel guida rapida di VIVO S7/S3 e congratulazioni per aver acquistato questo piano digitale. Prima di iniziare con le informazioni tecniche, lascia che io ti parli un po di me. Io sono "VIVO" il piano digitale . I miei progettisti hanno usato una nuova tecnologia chiamata T2L (True to Life), basata su la interazione tra il campionamento e i metodi di modellazione del suono.
1 Informazioni Importanti sulla sicurezza LEGGERE ATTENTAMENTE PRIMA DI PROCEDERE ATTENZIONE Seguire sempre le seguenti precauzioni elencate di seguito per evitare il rischio di lesioni gravi o addirittura la morte per scossa elettrica, incendio o altri pericoli. Non utilizzare in zone tropicali Questa unità ed il suo adattatore di rete possono essere utilizzati in modo sicuro in zone non tropicali. Il range di temperatura di esercizio è 5° - 40°C (41° 104°F).
Informazioni Importanti sulla sicurezza PRECAUZIONI Seguire sempre le seguenti precauzioni elencate di seguito per evitare il rischio di lesioni gravi o addirittura la morte per scossa elettrica, incendio o altri pericoli. Afferrare la spina di collegamento e scollegare l'adattatore di rete. Quando rimuovete il cavo elettrico dallo strumento o da una presa, tenere sempre la spina e non il cavo. Tirando dal cavo si può danneggiarlo.
2 Indicazioni Importanti Oltre alle avvertenze elencate nella sezione "Informazioni importanti sulla sicurezza", a pag. 5, si prega di leggere e rispettare le seguenti indicazioni: Alimentazione • Non collegare questa unità alla stessa presa elettrica utilizzata da un apparecchio elettrico che è controllato da un inverter o un motore (ad esempio un frigorifero, lavatrice o condizionatore). Questo può provocare un ronzio udibile dell'audio dell'unità.
Indicazioni Importanti Diritto d'autore e Marchi • Dexibel non si assume nessuna responsabilità giuridica in materia di eventuali infrazioni da parte degli utenti attraverso l'utilizzo di questo apparecchio. • La registrazione, la copia e la distribuzione di materiale protetto da copyright (canzoni, performance dal vivo, ecc) appartenenti a terzi in tutto o in parte, senza l'autorizzazione del titolare dei diritti è vietata dalla legge. • Copyright © 2003 Bitstream, Inc. Tutti i diritti riservati.
3 Descrizione del Pannello 16 15 14 13 12 / 25 24 23 22 21 11 26 20 19 18 17 27 28 4 SOUND Quando questo bottone è attivo (illuminato), tu puoi selezionare suoni attraverso i bottoni Sound/Memory e. 29 5 MEMORY Quando questo bottone è attivo (illuminato), tu puoi selezionare le memorie attraverso il banco (famiglia toni) ed i bottoni numerici e. Premere e mantenere premuto questo bottone per scrivere una memoria.
Descrizione del Pannello 4 10 3 5 1 9 6 7 8 2 20 CHORD FREEZE Premi questo bottone per abilitare la funzione Freeze e memorizzare l'accordo corrente. Da adesso in poi e fin quando la funzione è attiva, ogni volta che si preme una nota nella tastiera l'accordo memorizzato sarà riprodotto con la stessa tonalità della nota suonata. 21 LEVEL KNOBS (MAIN and LOWER/COUPLED) Queste manopole permettono di regolare il livello delle relative parti. 22 13 Questo tasto consente di passare in modo Song.
Descrizione del Pannello TE 24 24 25 26 27 Terminale di terra 28 29 30 29 A seconda delle circostanze di un particolare disposizione, si può avvertire una sensazione di formicolio nel punto in cui tocchi questa unità. È possibile eliminare questa sensazione collegando il terminale di terra con una messa a terra esterna. Per i dettagli vedi p. 43. 25 DC IN AUDIO OUTPUT R jack Collegare a questa presa un amplificatore.
4 Prima di iniziare ad usare VIVO S7/S3 Connettere l'adattatore di Rete 1. 2. Installare il leggio Installare il leggio incluso come mostrato nella figura seguente. Ruotare la manopola [VOLUME] tutta a sinistra per ridurre al minimo il volume. Collegate il cavo di alimentazione (incluso) all'adattatore di rete. L'indicatore si illumina una volta collegato l'adattatore alla presa di rete.
Prima di iniziare ad usare VIVO S7/S3 NOTE Se vuoi disattivare completamente l'alimentazione, prima premi il bottone [ " ], scollega poi il cavo di alimentazione dalla presa di corrente. Se non si utilizza l'unità per un certo periodo di tempo, l'unità si spegne automaticamente. Lo strumento si accende ed una barra di avanzamento compare sullo schermo di VIVO S7/S3.
5 Guida Rapida Connessioni Periferiche NOTE Prima di collegare qualsiasi dispositivo esterno alla presa AUDIO IN, girare la manopola [VOLUME] verso la posizione più bassa per ridurre al minimo il volume.
6 Guida Rapida Registrare/Riprodurre un Brano Effetti per le Parti di tastiera Premere il bottone [! ] per avviare la registrazione. Suonare il brano. Premere il bottone [! ] per fermare la registrazione. Ruotare le manopole [CONTROL] per regolare l'effetto relativo al tono corrente. Premere il bottone [ON] per aggiungere o no l'effetto alla parte della tastiera. Premere il bottone [ *-,] per riprodurre un brano. Ascoltare i Brani Demo Premere contemporaneamente i bottoni [ *-,] e [SONG].
Guida Rapida Selezione di un Suono Modo Grand Piano Premere il bottone [SOUND]. Premere uno dei bottoni della famiglia suoni per richiamare un nuovo suono. Se si desidera ripristinare le varie impostazioni e suonare il tono Grand Piano: Premere uno dei buttoni da [1] a [9] per selezionare un'atro suono nella stessa famiglia. COME IMPOSTARE UN TONO FAVORITO Dalla pagina principale, premere contemporaneamente il primo e l'ultimo dei bottoni funzione.
Specifiche Tecniche 7 VOCI TIPO DI TASTIERA VIVO | S7| VIVO | S3| • TP-40 M: 88 - Keys Hammer action • TP-100 LR: 73 - Keys Hammer action • Triplo contatto - simil avorio • Triplo contatto GENERATORE SONORO T2L: Sampling and Modelling Technology MODELLAZIONE Reattiva all'articolazione del pianista CAMPIONAMENTO FORMATO DEI CAMPIONAMENTI XXL dimensione dei campionamenti, registrazioni olofoniche fino a 15 secondi sulle note gravi 24 bit lineari - 48 KHz (Elaborazione interna e DSP a 32 bit virgo
Specifiche Tecniche VOCI VIVO | S7| VIVO | S3| ACCESSORI OPZIONALI (venduti separatamente) • Bluetooth® è un marchio registrato Bluetooth SIG, Inc. • Wi-FiTM è un marchio registrato Wi-Fi Alliance. NOTA Nell'interesse del prodotto, le specifiche e la descrizione sono soggette a modifiche senza preavviso.
For European countries 50 UK This Symbol indicates that in EU countries, this product must be collected separately from household waste, as defined in each region. Products bearing this Symbol must not be discarded together with household waste. SK Tento symbol vyjadruje, že v krajinách EÚ sa musí zber tohto produktu vykonávať oddelene od domového odpadu, podlá nariadení platných v konkrétnej krajine.
S7 & S3 Kurzhandbuch Die Vollversion des Handbuchs können von www.dexibell.com Website heruntergeladen werden. Willkommen in dem Kurzhandbuch von VIVO S7/S3 und Glückwünsche für den Kauf dieses Digitalpianos. Vor den technischen Informationen erzähle ich Ihnen ein wenig über mich. Ich bin das "VIVO" Digitalpiano. Meine Designer haben eine vollkommen neue Technologie namens TL2 (True to Life) angewandt, die auf der Interaktion zwischen Sampling- und Modelling-Methoden basiert.
1 Wichtige Sicherheitsanweisungen VOR DEM FORTFAHREN AUFMERKSAM LESEN WARNUNG Die nachfolgenden Vorsichtsmaßnahmen befolgen, um das Risiko schwerer Verletzungen oder Tod durch elektrischen Schlag, Brand oder andere Gefahren zu vermeiden. Verwendung nur bei nicht-tropischen Wetterbedingungen Dieses Gerät und das Netzteil können nur in nicht-tropischen Klimaverhältnissen unter sicheren Bedingungen verwendet werden. Der Betriebstemperaturbereich liegt bei 5° - 40°C (41° - 104°F).
Wichtige Sicherheitsanweisungen VORSICHT Die nachfolgenden Vorsichtsmaßnahmen befolgen, um das Risiko schwerer Verletzungen oder Tod durch elektrischen Schlag, Brand oder andere Gefahren zu vermeiden. Zum Anschließen oder Trennen des Netzteils den Stecker ergreifen. Beim Entfernen des Netzsteckers vom Instrument oder einer Steckdose, immer am Stecker selbst und nicht am Kabel ziehen. Ein Ziehen am Kabel kann dieses beschädigen.
Wichtige Anweisungen 2 Zusätzlich zu den unter "Wichtige Sicherheitsanweisungen" auf S. 52 aufgelisteten Angaben muss Folgendes gelesen und beachtet werden: Bezüglich der Stromversorgung Bezüglich der Wartung • Dieses Gerät nicht an dieselbe Steckdose anschließen, die auch für ein Inverter- oder motorgesteuertes Elektrogerät verwendet wird (wie Kühlschrank, Waschmaschine oder Klimaanlage) Dadurch kann ein stark hörbares Geräusch entstehen.
Wichtige Anweisungen Marken Bezüglich Urheberrecht und • Dexibell übernimmt keine Haftung in Bezug auf Verstöße des Benutzer durch die Verwendung dieses Geräts. • Die teilweise oder gesamte Aufnahme, Vervielfältigung, Verbreitung von urheberrechtlich geschütztem Material (Lieder, Live-Performance, usw.), eines Dritten, ohne die Erlaubnis des Inhabers des Urheberrechts ist gesetzlich verboten. • Copyright © 2003 von Bitstream, Inc. Alle Rechte vorbehalten.
3 Beschreibung der Bedientafel 16 15 14 13 12 / 25 24 23 22 21 11 26 20 19 18 17 27 28 4 TON Wenn diese Taste aktiviert ist (aufleuchtet), können über die Tonund Nummertasten Töne ausgewählt werden. 29 5 30 6 1 7 8 Falls VIVO S7/S3 automatisch ausgeschaltet worden ist, kann VIVO S7/S3 über die Taste [POWER] wieder eingeschaltet werden. Falls die Versorgung nicht automatisch ausgeschaltet werden soll, den "AUTO OFF" Parameter auf "OFF".
Beschreibung der Bedientafel 4 10 3 5 1 9 6 7 8 2 21 LEVEL KNOBS (MAIN und LOWER/COUPLED) Diese Drehknöpfe ermöglichen die Regelung des Levels des entsprechenden Bereichs. 22 MUTE (MAIN und LOWER/COUPLED) Der entsprechende Bereich kann stumm geschaltet werden. 23 ON/OFF AUDIO FX (MAIN und LOWER/COUPLED) Diese Tasten zum ON/OFF Schalten des AUDIO FX Prozessors für den entsprechenden Bereich verwenden. 13 SONG 24 Diese Taste ermöglicht das Umschalten auf Liedmodus.
Beschreibung der Bedientafel TE 24 24 25 26 27 28 Ground terminal 29 30 29 Abhängig von den Umständen eines bestimmten Setups, kann an der Stelle, an der das Gerät berührt wird, ein leichtes Kribbeln gespürt werden. Dieses Gefühl kann beseitigt werden, indem das Erdungskabel an eine externe Erdung angeschlossen wird. Für Details siehe S.59 25 DC IN-Buchse AUDIO OUTPUT R-Buchse An dieser Buchse kann ein externer Lautsprecher mit Verstärker angeschlossen werden.
4 Vor dem Spielen Anschluss des Netzteils 1. 2. Installation des Notenpults Das mitgelieferte Notenpult installieren, wie in der unteren Abbildung dargestellt. Die Taste [VOLUME] nach links drehen, um die Lautstärke zu minimieren. Das mitgelieferte Netzkabel an das Netzteil anschließen. Nach dem Anstecken des Netzteils an eine Steckdose wird die Anzeige aufleuchten.
Vor dem Spielen 2. An VIVO S7/S3 die Taste [ " ] rechts drücken, um das Gerät einzuschalten. Falls es nicht ausgeschaltet werden soll, die Funktionstaste "NO" betätigen. ANMERKUNG Falls das Gerät vollständig abgeschaltet werden soll, zuerst den Schalter [POWER] ausschalten und anschließend das Netzkabel von der Steckdose trennen. Die Stromzufuhr wird eingeschaltet, ein Statusbalken wird am Display von VIVO S7/S3 angezeigt.
5 Kurzanleitung Anschlüsse Peripheriegeräte ANMERKUNG Bevor ein externes Gerät an die Audio-IN-Buchse angeschlossen wird, den [VOLUME] Drehknopf in Richtung untere Position drehen, um die Lautstärke zu minimieren.
6 Kurzanleitung Effekte für Tastaturbereiche Die Drehknöpfe [CONTROL] drehen, um den Parameterwert des dem aktuellen Ton entsprechenden Effekts einzustellen. Die Taste [ON] drücken, um dem Tastaturbereich einen Effekt hinzuzufügen, oder nicht. Ein Lied wiedergeben/ aufzeichnen Anhören des DemoSongs Erneut auf [! ] drücken, um mit der Aufnahme zu beginnen. Das Lied spielen. Erneut auf [! ] drücken, um die Aufnahme zu unterbrechen Die Taste [ *-,] Lied abspielen drücken.
Kurzanleitung Eine Tonart auswählen Taste [SOUND] drücken Grand Piano Modus Eine der Tasten der Ton-Family drücken, um den neuen Ton aufzurufen Eine Taste von [1] bis [9] drücken, um einen anderen Ton aus der Family auszuwählen. Wenn verschiedene Einstellungen zurückgestellt und Grand Piano gespielt werden soll: EINSTELLEN DER AUSGEWÄHLTEN TONART ALS FAVORIT Von der Hauptseite gleichzeitig die erste und letzte Funktionstaste drücken.
Spezifikationen 7 ELEMENTE TASTATURTYP VIVO | S7| VIVO | S3| • TP-40 M: 88 - Keys Hammer action • TP-100 LR: 73 - Keys Hammer action • Dreifach-Kontakt Synthetisches Elfenbein • Dreifachkontakt TONGENERATOR T2L: Sampling and Modelling Technology MODELLIERUNG Reagiert auf Spielerartikulation SAMPLING XXL Wellengröße holophone Aufzeichnung bis zu 15 Sekunden an unteren Klaviernoten SAMPLING-FORMAT 24 bit linear - 48 KHz (Interne Verarbeitung und DSP bei 32 Fließkomma) DIGITALE ANALOG-KONVERTI
Spezifikationen ELEMENTE MITGELIEFERTES ZUBEHÖR VIVO | S7| VIVO | S3| Bedienungsanleitung Netzteil OPTIONEN (separat erhältlich) • Bluetooth® ist eine registrierte Handelsmarke von Bluetooth SIG, Inc. • Wi-FiTM ist eine registrierte Handelsmarke von Wi-Fi Alliance. ANMERKUNG Im Interesse des Produkts können die Spezifikationen und Beschreibungen ohne vorherige Ankündigung geändert werden.
For European countries 66 UK This Symbol indicates that in EU countries, this product must be collected separately from household waste, as defined in each region. Products bearing this Symbol must not be discarded together with household waste. SK Tento symbol vyjadruje, že v krajinách EÚ sa musí zber tohto produktu vykonávať oddelene od domového odpadu, podlá nariadení platných v konkrétnej krajine.
S7 & S3 Guide Rapide Vous pouvez télécharger la version complète du manuel d'instructions sur le site Web www.dexibell.com. Bienvenue dans le guide rapide de VIVO S7/S3 et merci d'avoir acheté ce Piano Numérique. Avant de vous fournir des informations techniques, laissez-moi me présenter. Je suis le piano numérique « VIVO ». Mes créateurs ont utilisé une toute nouvelle technologie appelée T2L (True to Life), basée sur l'interaction entre les méthodes d'échantillonnage et de modélisation.
1 Consignes de sécurité importantes VEUILLEZ LIRE ATTENTIVEMENT AVANT DE PROCÉDER AVERTISSEMENT Toujours suivre les précautions suivantes énumérées ci-dessous afin d'éviter le risque pour l'utilisateur de blessures graves ou même de mort pour cause de choc électrique, feu ou autre accident. Utiliser uniquement dans un climat non tropical. Cet appareil et son adaptateur secteur ne peuvent être utilisés en toute sécurité que dans un climat non tropical.
Consignes de sécurité importantes ATTENTION Toujours suivre les précautions suivantes énumérées ci-dessous afin d'éviter le risque pour l'utilisateur de blessures graves ou même de mort pour cause de choc électrique, feu ou autre accident. Saisir la fiche pour brancher ou débrancher l'adaptateur secteur. Lors du débranchement de la fiche d'alimentation électrique de l'instrument ou d'une prise, toujours tenir la fiche elle-même et non le câble. Toute traction du câble risque de l'abîmer.
2 Indications importantes Outre les éléments énumérés dans les « Consignes de sécurité importantes » page 68, lire et respecter les indications suivantes : électrique À propos de l'alimentation • Ne pas brancher cet appareil à la même prise électrique qu'un appareil électrique commandé par un inverseur ou un moteur (comme un réfrigérateur, une machine à laver ou un climatiseur). Ceci peut entraîner une interférence audible.
Indications importantes À propos des droits d'auteur et des marques commerciales • Dexibell décline toute responsabilité légale quant aux infractions commises par l'utilisateur avec cet appareil. • L'enregistrement, la copie, et la diffusion, totaux ou partiels, d'œuvres protégées par le droit d'auteur (morceaux, interprétation en live, etc.) appartenant à des tiers sans l'autorisation du titulaire du droit d'auteur sont interdits par la loi. • Copyright © 2003 détenu par Bitstream, Inc.
3 Description du panneau 16 15 14 13 12 / 25 24 23 22 21 11 26 20 19 18 17 27 28 4 SOUND Lorsque ce bouton est activé (allumé), il est possible de sélectionner des sons avec les boutons des familles de sons et les boutons numériques (3). 29 5 MEMORY/WRITE Lorsque ce bouton est activé (allumé), il est possible de sélectionner des mémoires avec les boutons de la banque (boutons des familles de sons) et les boutons numériques (3), en tenant ce bouton enfoncé pour écrire une mémoire.
Description du panneau 4 10 3 5 1 9 6 7 8 2 21 LEVEL (MAIN et LOWER/COUPLED) Ces boutons permettent de régler le niveau de la partie correspondante. 22 MUTE (MAIN et LOWER/COUPLED) Ces boutons permettent de rendre la partie correspondante silencieuse. 23 ON/OFF AUDIO FX (MAIN et LOWER/COUPLED) Utiliser ces boutons pour activer (ON) ou désactiver (OFF) les processeurs d'effets pour la partie correspondante. 24 13 SONG Ce bouton permet d'activer le mode « Song ».
Description du panneau TE 24 24 25 26 27 Borne de mise à la terre 28 29 30 29 Selon les circonstances d'une configuration particulière, il est possible de ressentir un léger fourmillement à l'endroit ou l'on touche le dispositif. Il est possible d'éliminer cette sensation en branchant la borne de mise à la terre à une mise à la terre externe. Pour plus de détails.
4 Avant de commencer à jouer Branchement de l'adaptateur secteur 1. 2. Installation du porte-partition Installer le porte-partition fourni comme indiqué sur l'illustration ci-dessous. Tourner le bouton [VOLUME] complètement vers la gauche pour régler le volume au minimum. Brancher le câble d'alimentation fourni à l'adaptateur secteur. Le voyant s'allume une fois que l'adaptateur secteur est branché à une prise murale.
Avant de commencer à jouer l'interrupteur [POWER], puis débrancher le câble d'alimentation de la prise électrique. Si l'appareil reste inutilisé pendant un certain temps alors qu'il est allumé, il s'éteint automatiquement. L'appareil s'allumera et une barre de progression s'affichera sur l'écran de VIVO S7/S3. Après un bref délai, la page principale s'affichera et VIVO S7/S3 sera prêt à produire du son.
5 Guide rapide de branchement Périphériques REMARQUE Avant de brancher tout dispositif externe à la prise d'entrée audio, tourner le bouton [VOLUME] vers la position inférieure pour baisser le volume.
6 Guide rapide Effets pour les parties du clavier Enregistrement/lecture d'un morceau Écoute d'un morceau de démonstration Appuyer sur le bouton [! ] pour commencer l'enregistrement. Jouer votre morceau. Tourner les boutons [CONTROL] pour régler la valeur du paramètre de l'effet associé au son actuel. Appuyer sur le bouton [! ] pour arrêter l'enregistrement. Appuyer sur le bouton [ON] pour ajouter ou non l'effet à la partie du clavier.
Guide rapide Sélection d'un son Mode Grand Piano Appuyer sur le bouton [SOUND]. Appuyer sur l'un des boutons de famille de sons pour en rappeler une. Pour réinitialiser les divers paramètres et jouer en mode « Grand Piano » : Appuyer sur l'un des bouton [1] à [9] pour sélectionner un autre son dans la famille. Sur la page principale, appuyer simultanément sur le premier et le dernier bouton de fonction.
Caractéristiques techniques 7 Éléments TYPE DE CLAVIER VIVO | S7| VIVO | S3| • TP-40 M: 88 - Keys Hammer action • TP-100 LR: 73 - Keys Hammer action • Triple contact - toucher ivoire • Triple contact GÉNÉRATEUR DE SONS T2L: Technologie d'échantillonnage et de modélisation MODÉLISATION Réactive à l'articulation du pianiste ÉCHANTILLONNAGE FORMAT DES ÉCHANTILLONS Dimension d'échantillonnage XXL, enregistrement holophonique d'une durée maximum de 15 secondes pour les notes de piano les plus grave
Caractéristiques techniques VIVO | S7| Éléments 17,5 kg (sans adaptateur secteur) POIDS 3 lbs 14 oz (sans adaptateur secteur) ACCESSOIRES FOURNIS VIVO | S3| 10,3 kg (sans adaptateur secteur) 2 lbs 5 oz (sans adaptateur secteur) Manuel d'utilisation Adaptateur secteur OPTIONS (vendues séparément) • Bluetooth® est une marque commerciale déposée de Bluetooth SIG, Inc. • Wi-FiTM est une marque commerciale déposée de Wi-Fi Alliance.
For European countries 82 UK This Symbol indicates that in EU countries, this product must be collected separately from household waste, as defined in each region. Products bearing this Symbol must not be discarded together with household waste. SK Tento symbol vyjadruje, že v krajinách EÚ sa musí zber tohto produktu vykonávať oddelene od domového odpadu, podlá nariadení platných v konkrétnej krajine.
Краткое руководство S7 и S3 Полное руководство пользователя можно загрузить с сайта www.dexibell.com. Добро пожаловать в краткое руководство по цифровому пианино VIVO S7/S3 и поздравляем с покупкой! Прежде чем переходить к технической информации, пара слов обо мне. Меня зовут VIVO. В моей основе – совершенно новая технология, которая называется T2L (True to Life), основанная на взаимодействии между технологиями семплирования и моделирования звука.
1 Техника безопасности ВНИМАТЕЛЬНО ПРОЧИТАЙТЕ ПЕРЕД НАЧАЛОМ ИСПОЛЬЗОВАНИЯ ВНИМАНИЕ! Всегда следуйте описанным ниже правилам во избежание риска серьёзного вреда здоровью и даже смерти от удара электрическим током, пожара и других рисков. Не использовать в тропических условиях Инструмент и его блок питания не рассчитаны на использование в условиях тропической среды. Температура эксплуатации 5°–40°C.
Техника безопасности БУДЬТЕ ОСТОРОЖНЫ! Всегда следуйте описанным ниже правилам во избежание риска серьёзного вреда здоровью и даже смерти от удара электрическим током, пожара и других рисков. Крепко держите вилку питания, подключая или отключая блок питания Отсоединяя блок питания от инструмента или от розетки, всегда держитесь за штекер, а не за шнур. В противном случае шнур может повредиться.
2 Важные замечания Помимо пунктов в разделе «Техника безопасности» на стр. 84 прочитайте следующее: Об электропитании • Не подключайте этот инструмент к одной розетке вместе с бытовыми электроприборами, в которых используется обратный преобразователь электрического тока или мотор (например, холодильник, стиральная машина или кондиционер). Это может создать ощутимый шум. • Блок питания может нагреваться после длительного непрерывного использования.
Важные замечания Об авторских правах • Dexibell не несёт ответственности за любые связанные с использованием этого инструмента нарушения пользователем авторских прав. • Запись, копирование и распространение объектов защиты авторских прав (песен, выступлений и т.д.), принадлежащих третьим лицам, без разрешения владельца таких прав преследуется по закону. • Bitstream Vera является торговой маркой Bitstream, Inc. Все права защищены. • iPad® и iPhone® являются зарегистрированными торговыми марками Apple Inc.
3 Описание передней панели 16 15 14 13 12 / 25 24 23 22 21 11 26 20 19 18 17 27 28 29 30 4 5 6 Заводские настройки предусматривают автоматическое отключение питания после 120 минут простоя. Если инструмент отключился автоматически, воспользуйтесь этой кнопкой, чтобы снова его включить. Чтобы отключить автоматическое отключение, установите параметр «AUTO OFF» в значение «OFF».
Описание передней панели 4 10 3 5 1 9 6 7 8 2 20 CHORD FREEZE Нажатие этой кнопки активирует функцию запоминания аккорда, который вы играете в данный момент. Далее при нажатии любой клавиши на клавиатуре будет воспроизводиться этот аккорд в тональности взятой ноты. 21 Регуляторы LEVEL (MAIN и LOWER/COUPLED) Эти регуляторы настраивают уровень соответствующей партии. 22 MUTE (MAIN и LOWER/COUPLED) Соответствующую партию можно заглушить. 13 SONG 23 Кнопка переключения в режим Song Mode.
Описание передней панели TE 24 24 25 26 27 Заземлитель 28 29 30 29 В определённых условиях подключения при лёгком прикосновении к металлическим поверхностям инструмента вы можете почувствовать специфическую вибрацию. Чтобы от этого избавиться, нужно заземлить инструмент с помощью зазаемлителя. Подробности на стр. 91. 25 26 27 30 31 ВНИМАНИЕ * Вставляйте USB-накопитель аккуратно, убедившись в том, что он имеет подходящий разъём и вы вставляете его правильной стороной.
4 Перед началом Подключение блока питания 1. 2. Установка пюпитра Установите пюпитр, как показано на рисунке ниже. Уберите громкость, повернув ручку [VOLUME] против часовой стрелки до конца. Подключите блок питания из комплекта поставки. Индикатор на блоке питания загорится, когда вы подключите его к розетке. к розетке блок питания шнур питания Заземление В некоторых случаях при лёгком прикосновении к устройству вы можете почувствовать специфическую вибрацию.
Перед началом выключите инструмент с помощью кнопки [" ], затем отключите блок питания от розетки. Если включённый инструмент не используется определённое время, он выключится автоматически. Питание включится и на дисплее отобразится полоса загрузки. Через некоторое время появится главная страница. Это значит, что инструмент готов к работе. Чтобы отключить автоматическое отключение, нужно изменить настройку функции «AUTO OFF».
5 Краткое руководство по подключению Периферийные устройства ВНИМАНИЕ Перед подключением каких-либо устройств к разъёму Audio IN полностью уберите громкость с помощью регулятора [VOLUME]. Bluetooth-аудио Audio IN 2 наушников R L компьютер (USB-MIDI) полудемпферная педаль активные мониторы педаль-переключатель педаль экспрессии MIDI-оборудование ВНИМАНИЕ Перед подключением внешних активных мониторов полностью уберите громкость с помощью регулятора [VOLUME].
6 Краткое руководство Запись/проигрывание песни Нажмите [! ], чтобы начать запись. Играйте. Эффекты для партий Нажмите [! ], чтобы остановить запись. Ручка [CONTROL] настраивает параметр эффекта, назначенного на звук. Нажмите [ *-, ] снова, чтобы остановить. Кнопка [ON] включает/выключает эффект у партии. Нажмите [ *-, ], чтобы проиграть песню. Нажмите [ $ ], чтобы вернуться в начало песни. Ручка LEVEL настраивает громкость воспроизведения.
Краткое руководство Выбор звука Нажмите кнопку [SOUND] Нажмите на кнопку интересующей вас категории. Режим рояля Нажмите на кнопку с [1] по [9] для выбора нужного звука из категории. Если вы хотите сбросить все настройки и перейти к звуку рояля: УСТАНОВКА ИЗБРАННОГО ЗВУКА Находясь в главном меню, одновременно нажмите первую и третью кнопки функций. Нажав на номер нужного звука, нажмите на него снова и удерживайте.
Спецификации 7 Параметр ТИП КЛАВИАТУРЫ VIVO | S7| VIVO | S3| • TP-40 M: 88 клавиш, молоточковая механика • TP-100 LR: 73 клавиши, молоточковая механика • тройной контакт, имитация слоновой кости • тройной контакт ТОН-ГЕНЕРАТОР T2L: технология семплирования и моделирования МОДЕЛИРОВАНИЕ имитирует отклик живого инструмента на манеру игры СЕМПЛИРОВАНИЕ голофоническая запись, XXL-семплы, до 15 секунд на нижних нотах рояля АУДИОФОРМАТ 24 бит линейное / 48 кГц (внутренний тракт и DSP 32 бит с плав
Спецификации • Bluetooth® является зарегистрированной торговой маркой Bluetooth SIG, Inc. • Wi-FiTM является зарегистрированной торговой маркой Wi-Fi Alliance. ВНИМАНИЕ В целях улучшения продукта спецификации могут быть изменены без уведомления.
Для стран Европейского союза 98 UK This Symbol indicates that in EU countries, this product must be collected separately from household waste, as defined in each region. Products bearing this Symbol must not be discarded together with household waste. SK Tento symbol vyjadruje, že v krajinách EÚ sa musí zber tohto produktu vykonávať oddelene od domového odpadu, podlá nariadení platných v konkrétnej krajine.
For European Countries This product complies with the requirements of EMC Directive 2004/108/EC. For Canada NOTICE This Class B digital apparatus meets all requirements of the Canadian Interference-Causing Equipment Regulations. AVIS Cet appareil numérique de la classe B respecte toutes les exigences du Règlement sur le matériel brouilleur du Canada. For European Countries EUROPEAN COMMUNITY DECLARATION OF CONFORMITY Radio and Telecommunications Terminal Equipment.