USER MANUAL PEC-A-3500-1M PORTABLE EVAPORATIVE COOLER Thank you for choosing Dial. Please read this User Manual before using this Portable Evaporative Cooler Retain the manual for future reference. Attention: If you are experiencing difficulty with your portable evaporative cooler, do not return it to the place of purchase. Contact Dial Manufacturing for help or disposition. Dial Manufacturing, Inc. 25 South 51st Avenue, Phoenix, AZ 85043 1-800-350-DIAL | customerservice@dialmfg.
CONTENTS SAFETY INSTRUCTIONS 3 APPLICATIONS, FEATURES, SPECIFICATIONS 4 HOW EVAPORATIVE AIR COOLERS WORK 5 EXTERIOR PARTS OF THE COOLER 6 UNPACKING AND INSTALLING THE CASTERS 7 CONTROL PANEL 7 OPERATING THE EVAPORATIVE AIR COOLER 8 MAINTENANCE 9 TROUBLESHOOTING 10 WARRANTY POLICY 11 DAMAGED SHIPMENT 11 PRODUCT RETURN 11 REPLACEMENT PARTS 12 Page 2 of 12
SAFETY INSTRUCTIONS • • • • • • • • • • • • • • • • • • • • • • • • Read the instructions thoroughly before operating the unit. Always place the unit on a dry, flat and stable surface and apply brakes on the caster wheels. Do not move or tilt the unit while the water tank is full. The outdoor use of this portable evaporative cooler must be supervised. The unit is not designed to be exposed to wet conditions such as rain.
ENERGY SAVING AND UNIT SAFETY PROTECTION TIPS • • • • • • • • Operate the unit at a location that has cross ventilation. Evaporative air coolers use evaporation to achieve a natural cooling effect which requires cross ventilation for maximum efficiency. To ensure the evaporative cooler operates efficiently, do not block or restrict the air-intake through the inlet grills on the side and back, or airflow out of the louvre in front.
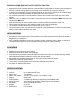
HOW EVAPORATIVE AIR COOLERS WORK The evaporative cooler cools the air by means of evaporation. When water evaporates, liquid water is converted into vapor using the thermal energy in the air resulting in a lower air temperature and spot cooling effect. Evaporative cooling therefore causes a drop in the temperature of air proportional to the sensible heat drop and an increase in humidity proportional to the latent heat gain. • The recommended relative humidity for optimum operation is 60% or lower.
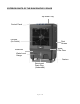
EXTERIOR PARTS OF THE EVAPORATIVE COOLER Top Water Tray Control Panel Louvres (Air Outlet) Dust Screen Water Filler Door Reservoir Water Level Gauge Castors Reinforced Drain Plug (Underside) Page 6 of 12
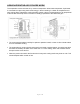
UNPACKING AND INSTALLING CASTERS • Keep the evaporative cooler in an upright position and remove the packaging. • Make sure all the parts are present: Castors (4pcs) & Screws (16pcs), Ice Pack (2 pcs). • Lay the evaporative cooler on its side gently. Locate screw holes for the casters under the Reservoir. Use the screws provided to fasten the casters to the underside of the Reservoir. Set the cooler right-side up when the casters are installed.
OPERATING THE EVAPORATIVE COOLER FILL THE RESERVOIR Fill the reservoir with clean water through the Water Filler Door manually. To open the Water Filler Door, depress the door at the center on the top edge of the door. Do not fill the water beyond the maximum water level. Close Water Filler Door when the reservoir is filled. Alternatively, connect a garden hose to the hose valve (use the hose adaptor provided) which also provide continuous water fill.
MAINTENANCE CLEANING CAUTION: Turn off the evaporative cooler and disconnect the plug from the electrical outlet before cleaning, servicing or performing any maintenance on the unit. CLEANING THE EXTERIOR SURFACE OF THE EVAPORATIVE COOLER • Clean the plastic housing with a duster or a soft moist cloth. • Do not use chemical solvents (such as benzene, alcohol or gasoline) as they may cause irreversible damage.
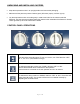
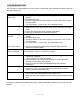
TROUBLESHOOTING Do not repair or disassemble the unit by yourself, unauthorized repair attempts will void the warranty and may cause injury. Problem A. Cooler does not work at all. Cause/Corrective Action (Control Panel) 1. GFCI Plug on the unit power cord is not plugged into the electrical outlet properly. 2. Re-set the GFCI Plug 3. The GFCI outlet may have been tripped and need to be re-set. Or use a non GFCI outlet. 4. Turn “FAN” dial to “L, M or H” turn “On” evaporative cooler. B. No Cool Air 1.
WARRANTY POLICY Refer to Warranty Form. DAMAGED SHIPMENT Dial is not responsible for any damages caused by shipment. Dial is not responsible for any shortages incurred during shipment. If there are any damages or shortages, please notify the carrier and file a claim. Do not dispose of the product, as the carrier may request evidence of the damage.
PEC-A-3500-1M PORTABLE EVAPORATIVE COOLER REPLACEMENT PARTS These replacement parts are available at participating dealers of Dial® Portable Evaporative Coolers or call 1-800-350-DIAL for assistance.