Fax Device Installation Manual Discusses what fax devices or communication software works with GFI FaxMaker and shows you how to configure GFI FaxMaker to use these options.
The information and content in this document is provided for informational purposes only and is provided "as is" with no warranty of any kind, either express or implied, including but not limited to the implied warranties of merchantability, fitness for a particular purpose, and non-infringement. GFI Software is not liable for any damages, including any consequential damages, of any kind that may result from the use of this document. The information is obtained from publicly available sources.
Contents 1 Installing fax devices 1.1 Which fax devices to use with GFI FaxMaker? 1.2 Installing a Dialogic Diva Server ISDN Adapter 1.3 Installing a Brooktrout Fax Board 1.4 Installing the Brooktrout SR140 (FoIP) 1.5 Installing XCAPI 1.6 Installing fax modems or multi port fax boards 1.7 Installing modems using the GFI modem drivers 1.8 Installing modems using the Windows® fax drivers 2 Troubleshooting and support 2.1 Introduction 2.2 Knowledge Base 2.3 Web Forum 2.4 Request technical support 2.
1 Installing fax devices 1.1 Which fax devices to use with GFI FaxMaker? GFI FaxMaker can use many fax devices, including modems. GFI however highly recommends investing in a professional fax server device such as a Brooktrout TR1034 or Trufax fax board, a Dialogic Diva Pro/Server ISDN fax card or an AVM B1 ISDN fax card. These devices are far superior to a modem or multi-port modem in terms of reliability and transmission speed.
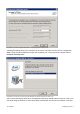
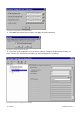
Screenshot 1: Diva Server Configuration Wizard: - Configuring CAPI to answer all calls. Installing the Dialogic Diva Server software on the server will launch the Diva Server Configuration Wizard. First choose the ISDN switch type that is used by your country and then configure CAPI to Accept all incoming calls’. Screenshot 2: Diva Server Line Check: Test the ISDN service using this utility from the start menu. After running the Dialogic Diva Server Configuration wizard you should restart the server.
check passes you can continue with installation of GFI FaxMaker. An unsuccessful line check will return an error code which can be referenced on the Dialogic technical support website for the cause and a list of possible solutions. NOTE You can use the Dialogic Diva Server Configuration Manager utility to setup advanced configurations such as sharing the Dialogic Adapter between GFI FaxMaker and Routing and Remote Access for dial-up access. For further information on this consult the Dialogic documentation.
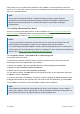
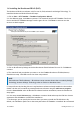
Screenshot 3: Add New Hardware wizard: Search and install options dialog 8. Go to Control Panel > Add New Hardware. Select Include this location in the search and provide the path where you have installed the Brooktrout TR1034 drivers. If you have opted to install the drivers in the default path, you should find these drivers in the same path where GFI FaxMaker is installed; else you should specify the same location that you have used in step 6 of this installation.
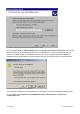
Screenshot 5: Configuration tool preferences dialog 11. Click Next and confirm the file paths. Click OK to proceed with setup. Screenshot 6: Configure Brooktrout SIP stack 12. If you have an IP enabled fax card, you will be asked to configure the Brooktrout SIP stack (i.e. FOIP - Fax over IP). Click Yes to proceed to the main configuration tool dialogs.
13. Check that the settings match your setup. If you did not make any configuration changes (i.e. you have left all settings as default), click Apply and close the Brooktrout Configuration tool. If you need configuration assistance, you can refer to the help included in the configuration tool. NOTES 1. If the drivers do not work immediately when you start the GFI FaxMaker Fax Server or some lines refuse to send or receive, please reboot the computer. 2.
1.4 Installing the Brooktrout SR140 (FoIP) The Brooktrout SR140 is a software-only Fax over IP (FoIP) solution from Dialogic Technology. To install the Brooktrout SR140 follow these steps: 1. Click on Start > GFI FaxMaker > FaxMaker Configuration Wizard. 2. In the Welcome page, click Next to continue. The wizard will stop the GFI FaxMaker Fax Server Service and the GFI FaxMaker Message Transfer Agent Service. Click Next to continue once the services are both stopped.
that you install to this default location, but if you want to change the default installation path, click Browse and specify the required path. To continue with the installation, click Next. 8. In the Ready to Install page, click Install. 9. In the Finish page, clear the Run Brooktrout configuration tool check box and then click Finish to close the GFI FaxMaker Brooktrout TR1034 Drivers wizard and complete the installation. 10. You now need to activate the Brooktrout SR140 by licensing it.
Screenshot 11: Selecting the license file 12. From the Specify License File dialog box, select the *.lic file provided by Dialogic Technology and click Open. 13. The Brooktrout License Manager will display the details of the license key you provided. To close the Brooktrout License Manager click Exit from the License menu.
15. You now need to configure the Brooktrout SR140 settings from the Brooktrout Configuration Tool. To start the Brooktrout configuration tool, from the Start menu click on All Programs > GFI FaxMaker Brooktrout TR1034 Drivers > Brooktrout Configuration Tool. Screenshot 14: Brooktrout configuration tool 16. From the Brooktrout Configuration Tool check that the settings match your setup. If you need configuration assistance, you can refer to the help included in the configuration tool.
1.5 Installing XCAPI XCAPI is a software-only Fax over IP (FoIP) solution from TE-SYSTEMS. This topic explains how to install XCAPI on your GFI FaxMaker server 1.5.1 Installing XCAPI Install XCAPI during the GFI FaxMaker Configuration Wizard, either after installation, or by launching it manually from Start > GFI FaxMaker > FaxMaker Configuration Wizard. 1. In the Welcome page of the GFI FaxMaker Configuration Wizard click Next to continue.
8. Specify the Start menu program folder for XCAPI. Click Next to start installation. 9. Click Finish to complete installation. 1.5.2 Adding an XCAPI FAX-over-IP controller Screenshot 16: XCAPI configuration 1. Open the XCAPI Configuration and from the Controller section select Click here to add a controller link. 2. From the Controller Wizard select Add Voice-over-IP controller (VoIP) and click Next. Screenshot 17: Add a new controller 3.
Screenshot 18: Define VoIP gateway properties 5. Depending on the VoIP gateway selected, provide the properties of the VoIP gateway. Typically this consists of the IP address of the VoIP gateway and any authentication settings required by your VoIP gateway. Click Next to continue setup. 6. Provide a meaningful description of the newly created controller and decide how many channels should be available for GFI FaxMaker. 7. Click Next and Finish to finalize settings. 8.
NOTE The Microsoft® Fax modem drivers have wider modem support and 2D faxing, which can give faster fax transmission to some fax machines. You can have a maximum of 2 fax lines using Windows® 2000 fax drivers and a maximum of 4 fax lines using Windows® 2003 fax drivers! Windows® XP only supports 1 fax line. NOTE For reliability ensure that you implement a high quality modem solution. 1.7 Installing modems using the GFI modem drivers Installing a modem using GFI drivers implies just plugging in the modem.
2. Go to Control Panel > Add/Remove Programs > Add/Remove Windows® components and ensure that Microsoft® Fax services are enabled. 3. Go to Control Panel > Administrative Tools > Services applet and ensure that the Microsoft® Fax service (‘Fax’) is started and set to automatic. 4. Go to Control Panel > Printers and Faxes and ensure that the Microsoft® Fax printer driver is installed. 5. Send a test fax to the Microsoft® Fax printer driver to ensure it is working. 6.
2 Troubleshooting and support 2.1 Introduction This topic explains how to resolve any issues encountered during installation of GFI FaxMaker. The main sources of information available to solve these issues are: This manual - most issues can be solved through the information in this help system. GFI Knowledge Base articles Web forum Contacting GFI Technical Support 2.2 Knowledge Base GFI maintains a comprehensive Knowledge Base repository, which includes answers to the most common installation problems.
USA, CANADA AND CENTRAL AND SOUTH AMERICA 15300 Weston Parkway, Suite 104 Cary, NC 27513, USA Telephone: +1 (888) 243-4329 Fax: +1 (919) 379-3402 ussales@gfi.com UK AND REPUBLIC OF IRELAND Magna House, 18-32 London Road, Staines-upon-Thames, Middlesex, TW18 4BP, UK Telephone: +44 (0) 870 770 5370 Fax: +44 (0) 870 770 5377 sales@gfi.co.uk EUROPE, MIDDLE EAST AND AFRICA GFI House, Territorials Street, Mriehel BKR 3000, Malta Telephone: +356 2205 2000 Fax: +356 2138 2419 sales@gfi.