AMPLIFIER INSTALLATION MANUAL D1 250.2 | D1 300.4 | D1 400.
Congratulations! Thank you for choosing a Diamond Audio Technologies D1 Series amplifier. We sincerely believe that DAT products offer you outstanding performance and value. DAT products are engineered and produced with the highest quality materials and incorporate the latest technology. We think you will find your new DAT amplifier meets or exceeds your expectations and provides excellent value. Properly installed, your new DAT D1 Series amplifier will provide years of high quality sonic reproduction.
Frequency Response: 20Hz to 20KHz +/-3 dB Signal to Noise Ratio: >95dBA (20 to 20kHz) Channel Separation 50dB THD+N(Total Harmonic Distortion + Noise) <0.2% (Output-1W 4 Ohms) RCA Input Sensitivity: 150mV to 4V RCA Input Impedance: >20K Ohms Hi-Level Input Sensitivity: 1.5V to 14V Hi-Level Input Impedance: 32 Ohms Min to Max Voltage requirements 10.2V to 15.
218 x 57.5mm 218 x 57.5mm 218 x 57.5mm Connections and Controls This section describes how all of the terminals and adjustments of DAT D1 Series amplifiers function. 3 Primex 3ptPrimex 3pt 10˚ slant Primex slant .33pt pt10˚line .3 pt line 10˚ slant .3 pt line 5 4 FILTER X-OVER X-OVER 40Hz 400Hz X-OVER 40Hz 400Hz D1.250.2 D1.250.2 D1 250.2 D1.250.
1 RCA Input and Pass-Thru Output - These RCA jacks allow for a normal Left and Right channel signal input. Simply connect to the source unit using RCA type audio cables, keeping them away from power wiring wherever possible. On the 4 channel amplifiers (D1 300.4) “Front” and “Rear” input jacks are present. The “Pass-Thru” output allows the signal to pass on to other amplifiers. The Pass-Thru output is unaffected by the onboard crossover.
Installation Guidelines Tools and Supplies Listed below are the tools and supplies needed to complete this installation: • • • • • • • • • • Volt/Ohm Meter Wire strippers and wire cutters #2 Phillips screwdriver Battery post wrench Hand held drill w/assorted bits High quality electrical tape or heatshrink tubing Soldering iron and solder or assorted crimp connectors Adequate Length— Power Wire (minimum 4 gauge recommended) Adequate Length— Ground Wire (minimum 4 gauge recommended) Adequate Length—Remote
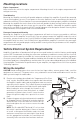
Mounting Locations Engine Compartment Never mount this unit in the engine compartment. Mounting the unit in the engine compartment will void your warranty. Trunk Mounting Mounting the amplifier vertically will provide adequate cooling of the amplifier. If you will be mounting it to an existing panel, be sure it’s not prone to excessive vibration (such as mounting to the back of a subwoofer enclosure). Excess vibration is not recommended for electronic products, amplifiers included.
3) 4) 5) Trim the power cable within 18 inches (45.7mm) of the positive battery post and splice in a in-line fuse holder. DO NOT install the fuse at this time. Strip 1/2 inch (12.7mm) from the battery end of the power cable and crimp a large ring terminal to the cable. Connect the ring terminal to the positive (+) battery post.
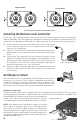
Connecting Multiple Speakers If you must connect more than one speaker per channel, there are two methods in which to do so: Series or Parallel. Parallel connections are harder on the amplifier than series connections, as the total impedance is lower compared to driving a single speaker, and the amplifier must produce more current to drive them. The following diagrams show “bridged” connections from the amplifier.
EVgVaaZa 8dccZXi^dc HZg^Zh 8dccZXi^dc For more wiring options, see the support section at www.diamondaudio.com Installing the Remote Level Controller The D1 400.1 comes packaged with a remote level control. This allows you to control the level by attenuating the amplitude or increasing (up to the maximum set-point) of the amplifier’s input gain control. This control does not add additional bass boost, it simply allows you to control the level to suit your tastes.
Adjustment of Built-In Crossover (All Models) Placing the switch in the HP position sets the amplifier to the High Pass mode, enabling frequencies above the cutoff point to pass. Placing the switch in the LP position sets the amplifier to the Low Pass mode, enabling frequencies below the cutoff point to pass. Placing the switch in the OFF position sets the amplifier to Full Range, preventing any crossover adjustment. This setting allows ALL frequencies to pass to the speakers. (Not available on D1 400.1).
Diamond Audio Warranty Diamond Audio Technologies, LLC (DAT) warrants this product to be free from defects in material and workmanship for a period of one (1) year from the original date of purchase provided it was purchased from an authorized DAT retailer within the United States. However, if this product was installed by an authorized DAT retailer, the warranty period will be extended to three (3) years.