DIAMOND DIGITAL DV226BW Colour TFT LCD Monitor 22.
Copyright 2001, Mitsubishi Electric Australia Pty. Ltd. All rights reserved. No part of this publication may be reproduced, transmitted, transcribed, stored in a retrieval system or translated into any language or computer language, in any form or by any means, electronic, mechanical, magnetic, optical, chemical, manual or otherwise, without the prior written permission.
Table of Contents 1 2 3 4 5 6 7 8 9 10 Important Safety Instructions ..........................................1 Features.............................................................................2 Unpacking the Monitor .....................................................3 Hardware Installation .......................................................5 Windows Driver Installation.............................................6 Setting the Display Resolution ........................................
Diamond View is a registered trademark of Mitsubishi Electric Australia Pty. Ltd. Microsoft and Windows are registered trademarks of Microsoft Corporation. All other trademarks remain the property of their respective owners. Reference Information For future reference, write the following information about your monitor in the space below. The serial number is found on the back of the product or on the bottom of its stand.
1 Important Safety Instructions Please read the following safety instructions before installing or cleaning your Diamond View monitor: 1. Unplug the monitor’s power cable from the wall outlet before cleaning. Do not use liquid or aerosol cleaners. Use a soft cloth to clean the monitor housing. 2. Slots and openings on the back or top of the cabinet are provided for ventilation. They must not be blocked or covered.
2 Features Your Diamond Digital DV226BW monitor features: ♦ Native (Maximum) Resolution: 1680 x 1050 @ 60Hz ♦ High Brightness – 300 cd/m2 ♦ High Contrast Ratio – 700:1 ♦ True Colour Display The Diamond Digital DV226BW monitor supports 16.7 million colours. ♦ High Quality Ratiometric Expansion The Diamond Digital DV226BW can expand any resolution within the monitor’s specified range to full screen. ♦ Auto Adjustment Function The auto-adjustment key automatically optimises the displayed image.
3 Unpacking the Monitor Please check that the following items are included with your monitor. If they are missing or damaged, please contact your place of purchase immediately. LCD monitor User’s Manual Audio Cable r's Use nual Ma D-sub (VGA) cable DVI cable Power Cord Locate the model name and the serial number label on the back of your monitor, and write the details of the monitor and your place of purchase in the space on page (ii) of this manual for future reference.
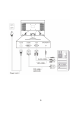
4 Hardware Installation Your monitor is equipped with a power supply with a voltage range from 100 to 240 Volts AC at a frequency of 50 to 60 Hz. Make sure that your local power supply is within the supported range. If you are unsure, please contact your electricity supplier. To install your Diamond Digital DV226BW monitor: 1. Please ensure the computer and monitor power cables are both unplugged. 2.
5
5 Windows driver installation The DV226BW is fully Windows compatible so no specific Windows drivers are required to be loaded. Windows 98, ME, and 2000 After connecting your new monitor, the system will detect the monitor and automatically start the Add New Hardware wizard. Follow the prompts to load the Plug and Play drivers. Windows XP and 2000 Windows XP and 2000 will automatically load the Plug and Play drivers.
6 Setting the Display Resolution Choosing The Best Resolution All LCD panels have a native resolution, which is the maximum resolution that may be displayed on the LCD panel. In the case of the DV226BW the native resolution is 1680 x 1050 pixels. Lower resolutions can still be displayed at full screen, however as the lower resolution must be expanded, the quality of the displayed image is not as good as when the native resolution is displayed.
and change it to All. Select the resolution and refresh rate as above. A colour depth of either Thousands or Millions is recommended. MacOS X 1. Click the Apple icon at the top, left corner of the screen, select System Preferences and then select Displays. 2. Select a resolution of 1680 x 1050 pixels with 60Hz refresh rate. 3. A colour depth of either Thousands or Millions is recommended.
Please Note: • Some graphics modes may not be supported. For an optimal picture it is recommended that you select 1680x1050. The default setting may require some adjustment using the monitor’s OSD before use. • The displayed image may show some distortion or noise that can be caused by the signal from the VGA card if it does not correspond with the usual standard. This is not a problem with the monitor.
7 Adjusting the Monitor Picture Optimisation Press the Auto button, to optimize the picture. This works best if the videocard is set to display the native resolution of the LCD monitor, and if a suitable stationary image is displayed. (such as the desktop). The monitor will remember the settings obtained by the auto calibration settings and use them whenever you turn the monitor on.
Manual Picture Adjustment Adjustments to the displayed image and audio volume are made using the On-Screen Display (OSD), and the buttons on the front of the monitor. 1 Power LED 2 POWER 3 AUTO Power light Blue is On, Orange is standby mode. Power On/Off Power Switch Blue-Operation mode / Orange-Power saving mode OSD Off: Executes auto adjustment Auto Adjustment function. Button OSD On: Confirms an OSD selection.
4 5/6 MENU OSD Function <> Left Button Decrease Button Enters / Exits OSD OSD Off: Pressing < or > can directly adjust the “volume” and brightness. OSD On: Use these buttons to adjust the values of a selected function. To Manually adjust the image: 1. Display a test pattern image on the monitor. This is the best way to observe changes as you adjust the image. Alternatively, a stationary image may be used, preferably one with small text or thin vertical lines. 2.
8. Select H-Position or V-Position and press AUTO. Adjust the horizontal and vertical position so that the image is centred. Its width and height should be the same as the visible width of the screen. Close this submenu by pressing MENU. 9. Press MENU to close the OSD menu and save your changes. If you are still not satisfied with the result, check the videocard is set to native resolution the refresh rate is set to 60Hz, before repeating this procedure. Please Note: You must use one of the factory modes.
On Screen Display (OSD) Functions The On Screen Display (OSD) provides functions that allow you to adjust the displayed image, change the audio volume, reset the monitor and get information about the displayed graphics signal. The OSD has five functional groups for Brightness/Contrast, Image Control, Color, OSD Control, Other. Brightness/Contrast Brightness and Contrast adjustments. Image Control Auto Adjustment – Optimises the picture quality for the current resolution.
8 Frequently Asked Questions The image is blurred, how can I get the best quality picture? ♦ ♦ Read chapter 6, Setting the Display Resolution, and select a video signal with the correct resolution and refresh rate. Then read chapter 7, Adjusting the Monitor, and make adjustments to the displayed image based on these instructions. Have you used a VGA extension cable? If so, remove the extension cable and check the displayed image.
No image is displayed, what can I do? ♦ Check that the light (LED) next to the monitor’s power button is lit and is blue in colour. If the LED is blue, press the MENU button on the monitor to access the On Screen Display. If the message NO SUPPORT appears there, please read chapter 6, Setting the Display Resolution and reset the graphics card to one of the monitor’s supported graphics signals. ♦ If the LED is orange the monitor is in power saving mode.
9 Specifications Model: Diamond Digital DV226BW Display Characteristics Display Type 22.1“ diagonal widescreen TFT LCD Viewable Diagonal Area 56 cm / 22.1” Native (Maximum) Resolution 1680 x 1050 pixels Colours 16.7 million Contrast Ratio 700:1 (typical) Brightness 300 cd/m² (typical) Response Time 5 ms typical (Tr + Tf) Viewing Angle (Horizontal, Vertical) 170°, 160°(typical) Dot Pitch 0.264 mm User Interface Controls Power switch, Auto adjust, < or > and Menu.
Video Signal Analogue VGA Digital DVI Signal Connection 15-pin VGA, 24-pin DVI-I Physical Characteristics Power Management VESA DPMS, Energy Star Maximum Power Consumption 55 Watts (Blue LED) Power Saving Mode < 4 Watts (Orange LED) Operating Voltage 100 - 240 VAC, 50 - 60 Hz Dimensions (W x H x D) 513.76 x 418.2 x 67.34mm Weight 5.
10 Service Contacts If problems persist after checking this manual, please contact your place of purchase or contact: Australian Service Contacts Visit the Customer Support section of Mitsubishi Electric Australia’s web site at www.mitsubishielectric.com.
Victoria and Tasmania 4 / 303 Burwood Hwy East Burwood, VIC, 3151 Telephone: (03) 9262-9899 Fax: (03) 9262-9850 Western Australia 5 / 329 Collier Road Bassendean, WA, 6054 Telephone: (08) 9377-3411 Fax: (08) 9377-3499 20