
Blind Corner Base Cabinet Install Instructions
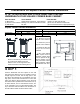

(6.18.13) SCB INSTRUCTIONS A5131
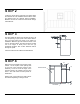
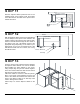
STEP 8
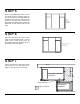
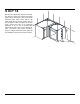
STEP 9
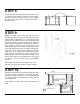
STEP 10
Measure from the corner to the first wall stud mark.
Transfer this measurement to the inside of the wall corner
cabinet. Mark the placement of the next wall stud. Drill
through the wall cabinet back into the prelocated studs
with a 3/32" diameter drill bit, approximately 2" deep. The
holes should be positioned 3/4" down from the inside top
of the cabinet but should come no closer than 2" to any
inside vertical edge of the cabinet. Cement, block, brick,
or tile walls will require anchors for screws or toggle bolts.
These will need to be purchased separately if needed.
Insert #10 x 2 1/2" screws into the holes until they are
nearly tight. Do not tighten the screws until you have
finished all final leveling and shimming as needed. Check
the front sides and tops of all cabinets with a level. After
the cabinet is level and plumb, tighten the installation
screws.
NOTE: Never use nails to mount cabinets. The use of
nails may void your factory warranty, written or implied.
Once the square corner base cabinet is positioned in step
5, confirm that the cabinet is sitting level and straight.
Remove the adjacent cabinet to allow for room to install
the square corner base cabinet. If needed, add shims to
level the cabinet.
Level
Following your design layout, replace the adjacent cabinet
next to the square corner base cabinet that has been
installed. The width of the filler, Z, can now be determined
in accordance with the specifications on page one and
your design layout.
*Filler Board is located under cabinet with Blind Cover
Panel.
SQUARE CORNER
CABINET
ADJACENT
CABINET
Z
Y
X
Filler Board
Wall
=Open Space