
Manual


Operating the CG-2
Handlebars
The handlebars are used to help the operator guide
and maneuver the saw.
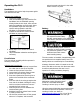
Adjusting the Handlebars
1. Loosen the handle lock knobs.
2. Hold the handlebar grip and place the first
handlebars into the handlebar opening
directly below the lock knob, there are two
paths the handlebar can fit through. Select
the handlebar angle that works best for
specific cutting operation and slide
handlebar in to determined length.
3. Tighten the handle lock knob to secure
handlebar at proper position.
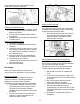
Handle Lock Knob & Handlebar
4. Repeat steps 2-3 to secure the second
handlebar.
5. Adjust handlebar orientation and length as
necessary.
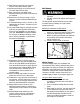
Front Pointer
The front pointer assembly aids the operator in
following a cutting line.
Adjusting the Front Pointer
1. Remove the tensioned pointer lanyard from
the cable cleat on the top of the dash.
2. Lower the front pointer to the floor.
3. Loosen both front pointer frame screws.
4. Divide a 10’ piece of string in half.
5. Place the looped end of the string into a
gullet on the backside of the outermost
blade.
6. Place one side of the string up against the
front side of the blade, holding the string
ends in one hand; tension the lines out
towards the front pointer rod.
7. Slide the pointer rod over between the
tensioned string lines.
8. Retighten both front pointer frame screws
to secure pointer rods.
9. Lift the front pointer frame off the ground
when cut is complete, and re-tension
pointer lanyards and place it in the cable
cleat to secure it in place.
Pointer Alignment Using String
Battery
• Ignitable & explosive gasses
are emitted from the battery.
DO NOT expose battery to any sparks or
open flames, and keep are around battery
well ventilated.
• Use proper battery tester, such as a
voltmeter, to test the battery strength.
• Use protective eyewear or face
shield and avoid skin contact
when handling battery.
The saw contains an installed, charged battery with
one positive and one negative battery lead. The
battery cables are connected prior to saw delivery.
A battery disconnect switch is located on the left
side of the dash on the saw, this disconnect switch
should be used whenever the saw is not in
operation for safety and battery longevity.
Diamond Blades
DO NOT Exceed the maximum RPM printed on the
blade when cutting. Excessive blade
speed can cause blade breakage,
resulting in serious injury or death.
Using the proper blade helps preserve the blades
life and also improves the operator’s efficiency,
resulting in lower cost. Refer to
www.diamondproducts.com for a list of all the
different blades available to suite each job.
9