
Manual


11. After bearing cap halves are removed,
remove outer shield and set aside.
12. Remove the bearing on the lifting end of
the blade shaft and set aside.
13. Next, remove the Left Blade Cover
Weldment leaving the water shield and lock
pin attached.
14. Remove the (4) Hex nuts using a 1-1/8”
wrench or socket holding the Blade Flange
in place.
15. If the Blade Flange is stuck, use the (4) pre
tapped holes to thread ½-13 bolts to press
off the flange.
16. Once the Blade Flange is removed you have
access to the cutting blades and spacers,
these will vary depending on the setup of
your saw. REMEMBER to inspect all blades
for any signs of damage including, cracks,
dents, missing segments or discoloration
and replace immediately.
Blade Removal (Please Refer to the Parts Manual
Section of This Manual for Larger Illustration).
17. Repeat steps 10-16 in reverse order for
reassembly, take note that the blade shaft
spins at very high RPM’s and all fasteners
must be double checked for proper fitment
and torque (4 bolts retaining Blade Flange
must be 185 ft lbs or 250 Nm) prior to
reinstallation to ensure operator and
machine safety.
18. When installing new blades, be sure the
blades are correct for the cutting task.
19. Cleanliness is very important in this area of
the machine, take the extra time to ensure
all debris, slurry and foreign materials have
been fully eliminated before reassembly.
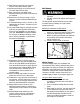
20. Always make sure the arrow on your
Diamond Products blade is pointed in the
same direction as the rotation of the blade
shaft.
21. Reinstall blade shaft assembly in the
reverse order of removal; reinstall belts,
guards and depth stop wheels before
restarting machine.
Belt Guards
• DO NOT operate machine with belt guards
removed.
• DO NOT remove belt guards when engine is
running.
The belt guards shield the belt drive to prevent
accidents and must always be in place when
operating the saw.
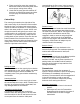
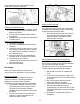
Removal & Installation of Belt Guards
1. Remove the (6) 3/8” bolts using a 9/16”
wrench or socket that retain the belt guard.
2. Lift the belt guard away from machine.
NOTE: the belt guard shields the underside
of the pulleys and must be removed by
pulling straight back.
3. Install in reverse order of removal.
Remove the six bolts attaching belt guard.
Water Supply
The water supply helps cool the blades and
minimize dust when cutting. Approximately five to
eight gallons of water per minute are required to
adequately cool blades when running.
NOTE: this
machine is equipped with a water safety switch
meaning it will NOT operate unless there as a
suitable supply of water to the water supply line.
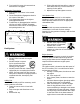
Using the Water Supply System
1. Connect water source to the hose
connection on the left side of the dash of
the machine.
2. Turn on the Water Safety Switch on dash
panel.
3. When ready to start cut, turn the water flow
to the ON position using the level next to
the Machine Control Handle on the right of
the dash. Remember the water source
needs to be ON and adequate in order for
the machine to be started.
11