
Specifications


VIDEO WINDOWING
Cropping
74 Operation Edition 1.08 CXPS Manual
2. CHOOSE “CROP”
You must choose to crop the selected window using the Toggle Crop Mode key, the lower-
case “t” key.
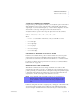
Pressing this key will change the Crop Control setting at the bottom of the control field to
read “Normal” (as in Figure 19) or “Crop.” If Crop Control is set to “Normal,” no cropping
action may be taken.
3. CROP THE SELECTED WINDOW
Once you have set Crop Control to “Crop,” you may then perform this action on a portion of
the selected window using the Cropping Adjustment control keys.
All lower-case control keys (h, l, i, m) crop the chosen area of the window by one preset
increment of pixels. To reverse this action, use the upper-case control keys. The upper-case
control keys (H, L, I, M) decrease the cropped area by one increment, exposing the
previously hidden portion of the window.
The table below explains the action each cropping adjustment control key can perform in
this step.
Cropping at a Specific Location and Size
With multiple arguments, you can crop a window by providing the number of pixels you
would like to remove from the sides, top, and bottom.
The command is:
CROP <window #> <left> <top> <right> <bottom> <cropmode>
Where:
• <window #> is the number of the window (1-36) you would like to control.
Key Action
h Crops the left side of the window by one increment.
H Decreases the left crop by one increment.
l Crops the right side of the window by one increment.
L Decreases the right crop by one increment.
i Crops the top of the window by one increment.
I Decreases the upper crop by one increment.
m Crops the bottom of the window by one increment.
M Decreases the lower crop by one increment.