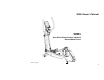
500Er Owner’s Manual 500Er Rear Drive Elliptical Owner’s Manual Diamondback Fitness release v.
TABLE OF CONTENTS INTRODUCTION ................................................................................................................................................................................... 5 SAFETY INSTRUCTIONS & WARNINGS................................................................................................................................................. 6 500Er ASSEMBLY INSTRUCTIONS .............................................................................................
500Er Owner’s Manual INTRODUCTION Congratulations on the purchase of your new Diamondback Fitness rear drive elliptical. You have made a great choice and are about to enjoy one of the most effective and technically‐advanced methods of low‐impact cardio‐ vascular exercise available today. Founded in 1991 as an off‐shoot of the legendary bicycle company, Diamondback Fitness was in many ways a complimentary addition to the Diamondback brand.
SAFETY INSTRUCTIONS & WARNINGS Every piece of Diamondback Fitness equipment is built for maximum safety and meets or exceeds all applicable domestic and international standards. However, certain precautions must be taken when operating any piece of fitness equipment. NOTE: Please read the entire owner’s manual before operating the unit. Save this manual for future reference. Cautions – For Safe Operation Keep hands and feet away from all moving parts and pinch points.
500Er Owner’s Manual Keep children away from the unit. Hands and feet may become entangled with the moving parts and could result in serious injury. Place the unit in an area that will meet minimum clearance requirements: ▫ front & sides = 24 inches; rear = 12 inches. The unit is intended for indoor use only. Place the unit on a solid, level surface. Always adjust the leveling feet before using to ensure stability.
8
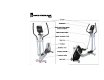
500Er Owner’s Manual 500Er ASSEMBLY INSTRUCTIONS 1. Install the four (4) stabilizer feet assemblies (A1 & A2) into the under‐side of the front and rear stabilizers. Thread all the way in. 2. Remove the eight (8) hex bolts (F1), eight (8) lock washers (F2), four (4) flat washers (F3) and four (4) curved washers (F4) from rear frame assembly B and set aside. 3. Remove the two (2) hex bolts G1 from the left and right sides of the console mast assembly (C) and set aside. 4.
7. Parts G2, G3, G4, G5 and G6 will arrive from pre‐assembled on the unit. Remove the four (4) hex bolts (G5) from the lower console mast front cover (G6) and set aside. Remove hex bolt G2 from the right side and set aside with the two (2) G1 hex bolts already set aside. 8. Gather the left (G3) and right (G4) lower console mast covers and bring together as a clamshell over the console mast/main frame union.
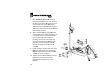
500Er Owner’s Manual Fig. 1. Fig. 2. Fig. 3. 11. The handlebar pivot fixing hardware will be pre‐installed on the console mast (C) as shown in Fig. 2. Remove bolt H1 and washer H2 from the left and right sides of the pivot axle, and set aside. 12. Washer I should remain in place, on the axle. 13. Handlebars (H6 & H7) are packaged with the pivot covers (H4) installed. Remove the four (4) hex fixing bolts (H5) and pivot cover (H4) from each handlebar as shown in Fig. 2. and set aside. 14.
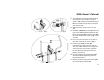
18. The forward pivots of the step arms (K2 & K3) will arrive with the fixing hardware pre‐installed as depicted in Fig. 4.A. Remove the hardware assembly (parts J1, J2 and J3) from the step arms and set aside. 19. Spacer K1 should remain in place on the pivot axles. 20. Bring the pivots of the left step arm (K3) and handlebar together. Slide the handlebar pivot over the step arm pivot axle and press into place. 21. Thread fixing nut J3 onto the pivot axle and tighten with the provided wrench. 22.
500Er Owner’s Manual 24. Remove the two (2) Philips screws (L3) and the console hinge cover (L2) from the back of the console (L1) and set aside. 25. Remove the four (4) Philips console mounting screws (L6) from backside of the console (L1) and set aside. 26. While supporting the console (L1), carefully join connectors L4 with M1 and L5 with M2. Apply firm pressure to ensure positive engagement. 27.
WORKOUT GUIDELINES Good Health is an Exercise in Common Sense In the study titled, “The Surgeon General’s Call To Action To Prevent and Decrease Overweight and Obesity”, the surgeon general indicates that 61% of American adults are either overweight or obese. The study indicates that being overweight increases the risk of health problems, such as heart disease, certain types of cancer, as well as Type‐2 diabetes among other afflictions.
500Er Owner’s Manual Heart Rate is an Important Key to Your Exercise The Surgeon General also released a report on physical activity and health. This report dictates that exercise and fitness are beneficial for a person’s health and reiterated the need for exercise as a key component for disease prevention and healthier living. The best way to determine exercise intensity is to monitor your pulse rate.
a very low intensity will not offer maximum benefits. Conversely, if the workout intensity is too high, injury or fatigue may slow the progression of your exercise goals as the body attempts to recover. It is most effective to train at a heart rate between 60% and 85% of your maximum heart rate. Maximum heart rate is calculated as a percentage of your maximum heart rate (estimated as 220 beats‐per‐minute minus your age).
500Er Owner’s Manual WORKOUT QUALITY AND QUANTITY It is recommended that you accumulate at least thirty (30) minutes of physical activity most days of the week. The American College of Sports Medicine makes the following recommendations for the quantity and quality of training for developing and maintaining cardio‐respiratory fitness in healthy adults: An activity that uses large muscle groups, maintained continuously, and is rhythmical and aerobic in nature.
After an aerobic workout of roughly 20‐30 minutes, spend 10 minutes gradually reducing your heart rate by moving slower or with less resistance. NOTE: Start slow, with intensity low until you build up endurance and strength. Always consult your physician before beginning any exercise program.
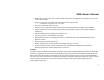
500Er Owner’s Manual 500Er CONSOLE OVERVIEW Console Layout Adjustable Fan Louvers LED Indicators SmartFan© ON/OFF Switch Switch Main LCD Display: Time, Pulse, Data and Brickyard Matrix Program Keys Integrated Book Rest Accessory Tray Input/Control Keys Mp3, iPod, iPhone Input Jack Stereo Speakers iPod® and iPhone® are registered trademarks of Apple.
CONSOLE DISPLAY WINDOWS Time Display Located in the upper left‐hand corner of the LCD window, the Time field will display the amount of time remaining in the current program or Warm Up and Cool Down periods. During the Setup mode, the value will blink when user input is requested. Pulse Display Located in the upper right hand corner, Pulse will display the user’s current heart rate in Beats‐per‐minute (Bpm).
500Er Owner’s Manual Strides/min, or Strides‐per‐minute, is the number of complete revolutions a single pedal completes every sixty (60) seconds. Watts are units of energy generation and frequently adopted to track the amount of work generated during a workout. Watts are calculated with input from the user’s current Speed and Load. Workout Profile or Brickyard During the Setup mode and while a program is operating, this field will graphically display the resistance level of the current workout program.
CONSOLE KEYS Start/Quick Start Key From the Idle mode press the START/QUICK start to immediately launch the Quick Start program and bypass data entry. The START key will launch a program when in the Setup mode. During a workout program, the user can bypass the Warm Up session and immediately launch the program by pressing START. Press START to repeat a program during Cool Down program or Workout Summary display.
500Er Owner’s Manual CONSOLE FEATURES SmartFan© The 500Er is equipped with a fan on the console to offer a greater level of comfort during the workout. The adjustable louver allows the user to direct the airflow. Pressing the SmartFan© once will power the fan on in the “smart” mode. The fan speed and airflow will increase as the speed and resistance increase. Pressing the SmartFan© button a second, third and fourth time will scroll through the Low, Medium and High preset fan speeds respectively.
CONSOLE OPERATION Glossary of Terms Idle Mode LCD LED Watts Resistance Level Heart Rate Control Heart Rate Sensors Default Values Age Weight Time Resistance Level The console has been reset and waiting for user input. The brickyard matrix displays an animated “DB”, while the LED lamps light in series. If no input is detected for five (5) minutes, the console will enter the power save mode. An acronym for liquid crystal display.
500Er Owner’s Manual English Unit Mode and Metric Unit Mode The default unit setting for the console is the English or standard system. To toggle between the English and metric units modes, press and hold the START and ENTER keys, simultaneously for two (2) seconds during Idle mode. The brickyard matrix will display “EN” or “ME” to designate English or metric units. Press the UP or DOWN keys until the desired unit mode is displayed, pressing ENTER to accept the selection and return to the idle mode.
PROGRAMMING FEATURES Warm Up The 500Er will automatically launch a three (3) minute Warm Up program beginning of each program. “Warm‐Up” will be displayed on the console. This program is designed to prepare your body for an intensive workout and reduce the possibility of receiving and injury during workout. There is no Warm Up session when the Quick Start program is selected or 0:00 minutes was entered for the Warm Up period in the Setup mode.
500Er Owner’s Manual “Cool Down” will display above the brickyard. 3:00 minutes will be displayed in the Time field. The Pulse display will show a heart rate is a signal is detected via the touch heart rate sensors. The Data Display fields will continue to track Calories and Distance as well as the current values for Speed, Resistance Level, Strides‐per‐minute and Watts. The user may adjust the resistance level from 1 to 5 only during the Cool Down program.
Quick Start The Quick Start program option is for users who wish to bypass the User Setup mode and launch a workout immediately. Select. Press the Quick Start button to skip the Warm Up session and launch the program with the following default values: Time = 30 minutes; Resistance Level = 1 Age and weight will default to the data entered in the previously‐saved workout. Launch. Once the program begins: The LED lamp over the MANUAL button will light. 30:00 minutes will be displayed in the Time field.
500Er Owner’s Manual Manual Program Overview. The Manual program offers the user the ability to build a customized workout profile on‐the‐fly, during the workout Selecting. From the Idle model, press the MANUAL program button. The LED indicator above the button will light. Press ENTER to begin the Setup mode. Random Cross Program Overview. The Random program offers a nearly infinite number of computer‐generated workout profile options to choose from.
Classic Programs Setup Mode Once a Classic Program has been selected, on‐screen messaging will guide the user throughout the Setup Mode. NOTE: The user may press the START key at anytime during the Setup mode to skip the setup and begin the workout immediately the with previously‐saved default values. Age Data Entry “Enter Age” will flash, prompting the user to adjust the age value up or down using the UP/DOWN keys. Once the desired value is visible, press the ENTER key to accept.
500Er Owner’s Manual Press the STOP key once to immediately enter the Cool Down mode. Refer to the section titled Cool Down on page 25 for more information. Press STOP twice to enter the Workout Summary mode. Pressing STOP three times will reset the console and return to the Idle mode, or press START to restart the program. Ending a Classic Program When the program time has elapsed or the STOP key is pressed, the Cool Down program will launch, followed by the Workout Summary display.
For the greatest cardio‐vascular benefit, most persons should target a heart rate that is between 60% and 85% of their calculated maximum heart rate. An individual’s calculated maximum heart rate is estimated as 220 Bpm, minus their age. It is unsafe to exceed 90% of this calculated heart rate. The 500Er elliptical is programmed to warn the user if the heart rate exceeds 95% of their maximum.
500Er Owner’s Manual User Weight Data Entry “Enter Weight” will flash. Adjust the value and accept by pressing ENTER. This value is now the default. Program Time Data Entry “Time” will flash. Adjust the time and press the ENTER key to accept this displayed value launch the program. Heart Rate Control Program Launch Once the Target Heart Rate program has been launched: A three (3) minute Warm Up session will begin followed by the main program.
Press STOP twice to enter the Workout Summary mode. Press the STOP key three times to reset the console and return to the Idle mode, or press START to restart the Interval Trainer program. Ending the Heart Rate Control Program When the program time has elapsed or the STOP key is pressed, the Cool Down program will launch, followed by the Workout Summary display. Press START to restart the Heart Rate Control program or STOP to return to Idle mode.
500Er Owner’s Manual WARRANTY INFORMATION Diamondback Fitness warrants the 500Er Rear Drive Elliptical to be free from defects in material and workmanship under normal use in the home environment. Diamondback Fitness’s obligation under this warranty is limited to the repair or replacement of any defective part, provided free of charge through an Authorized Service Agent. This warranty is extended to the original purchaser.
Voided Warranty The warranty does not apply to any failure of the product or its components due to alterations or modifications, misuse and abuse, accidental damage, lack of maintenance or improper assembly. Improper assembly can be avoided if the unit is assembled by an authorized technician. Damage due to improper assembly is not covered by the warranty. Common assembly errors can include damaged wire harnesses, stripped screws and nuts, crank arms or damaged threads.
500Er Owner’s Manual 37
38
500Er Owner’s Manual PURCHASER’S REFERENCE INFORMATION Model Number: Serial Number: 500Er E □□□□□□□□□□ SERIAL NUMBER IIII III IIIII IIIIII E0000000000 WARNING: REMOVAL OR ALTERATION OF THIS LABEL VOIDS WARRANTY Serial Number Location The serial number is imprinted on a metal badge located on the rear of the unit, just under the transport handle (see figure to the right). Record of Purchase NOTE: Please record details associated with the purchase of your Diamondback Fitness unit below.