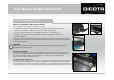
DataBox Allround XL Gebrauchsanleitung DataBox Allround XL Seite 1 User Manual DataBox Allround XL Page 5 Mode d´emploi DataBox Allround XL Page 9
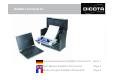
Gebrauchsanleitung DataBox Allround XL Sehr geehrte Kundin, sehr geehrter Kunde, wir danken Ihnen, dass Sie sich für ein DICOTA - Produkt entschieden haben. Bevor Sie Ihre DataBox Allround XL zum ersten Mal benutzen, lesen Sie bitte die folgende Gebrauchsanleitung sorgfältig durch. Die DataBox Allround XL ist für die momentan handelsüblichen Drucker HP DJ 450, HP DJ 460, Canon Serie i70/i80 und iP90 mit oder ohne Unterstützung des Canon Portable Kits geeignet (andere Drucker auf Anfrage!).
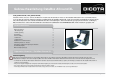
Gebrauchsanleitung DataBox Allround XL Betriebsspannung / Ladevorgang → Bitte beachten Sie beim Anschluss an die Betriebsspannung (Netz), dass Sie Ihr Netzkabel zuerst mit dem Koffer und anschließend mit der Spannungsquelle verbinden! → Der Ladevorgang Ihrer Geräte sollte grundsätzlich bei geöffnetem Zustand Ihrer DataBox Allround XL passieren! Lieferumfang Lieferumfang –– DataBox DataBox Allround Allround XL XL (1) 1 x 220 V – Kaltgerätestecker, Kabelbaum 2 x EURO 8 und 2 x IBM (2) Abnehmbare Kabeltas
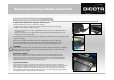
Gebrauchsanleitung DataBox Allround XL Installation Installation Ihres Ihres mobilen mobilen Druckers Druckers Öffnen Sie die DataBox Allround XL. Falls Sie die „QuickFix“ Druckerhalterung für Ihren Druckertyp nicht bestellt haben, gehen Sie wie folgt vor: 1) 2) Nehmen Sie die 8 Velcro® Streifen (vier Hakenstreifen und vier Schlaufenstreifen) und bilden Sie damit vier entsprechende Paare (Abb. 3) Jetzt haben Sie vier Velcro® Paare mit jeweils einer Schutzschicht auf beiden Außenseiten.
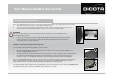
Gebrauchsanleitung DataBox Allround XL Verbindung: Verbindung: Notebook Notebook -- Drucker Drucker Schalten Sie Ihr Notebook ein und gehen Sie wie folgt vor: Es gibt zwei Möglichkeiten um Notebook und Printer zu verbinden 1) Verbinden Sie das Notebook und den Drucker mit einem USB-Druckerkabel. Dieses Kabel gehört nicht in den Lieferumfang der DataBox Allround XL. → Achten Sie auch hierbei auf eine saubere Kabelführung! Am besten führen Sie das USB-Druckerkabel um den Drucker herum.
User Manual DataBox Allround XL Dear Customer, We thank you for choosing a DICOTA product. Before using your DataBox Allround XL for the first time, please read the following manual carefully. DataBox Allround XL can be used with printers currently on the market, HP DJ 450, HP DJ 460, Canon series i70/i80 and iP90 with or without support from the Canon Portable Kit (more printers on request!). For more information please consult your dealer or check www.dicota.
User Manual DataBox Allround XL Operational current / charging procedure → When connecting to a power socket, please ensure that the power cable is first connected to the case and then to the power socket! → The charging procedure should generally be done while the case is open! Scope Scope of of supply supply –– DataBox DataBox Allround Allround XL XL 1) 1 x 220 V power socket, cable tree 2 x EURO 8 and 2 x IBM 2) Detachable cable pouch 3) Detachable CD case 4) Detachable accessory pouch 5) 8 x
User Manual DataBox Allround XL Installation Installation of of mobile mobile printer printer Open your DataBox Allround XL. If you have not ordered the „QuickFix“ printer holder for your specific printer, proceed as follows 1) 2) Take eight Velcro pads and press two corresponding pairs together (Fig. 3) Now you have four Velcro pairs with protective films on each side.
User Manual DataBox Allround XL Connection Connection Notebook Notebook –– printer printer Switch on your Notebook and proceed as follows: There are two options for connecting the Notebook to your printer: 1) Connect printer and Notebook with a USB cable. This cable is not included in the DataBox Allround XL! → Ensure correct cabling here as well! It is best to lead the USB cable around the printer.
Mode d´emploi DataBox Allround XL Cher/Chère client(e), Merci d’avoir choisi un produit DICOTA. Avant d’utiliser la mallette DataBox Allround XL pour la première fois, veuillez lire attentivement le manuel d’utilisation suivant. La mallette DataBox Allround XL est conçue pour les imprimantes HP DJ 450, HP DJ 460, Canon Serie i70/i80 et iP90 disponibles dans le commerce avec ou sans le kit Portable Canon (autres imprimantes sur demande).
Mode d´emploi DataBox Allround XL Tension d’alimentation / Recharge → Lors du raccordement à la source d’alimentation (au réseau), connectez le câble de raccordement d’abord à la mallette, puis à la source d’alimentation! → La recharge de vos appareils doit absolument être effectuée avec la mallette ouverte! Contenu Contenu de de la la boîte boîte –– DataBox DataBox Allround Allround XL XL (1) 1 fiche femelle pour connexion au 220 V, 2 ensembles de câbles (8 EUROS) et 2 IBM (2) Sacoche amovible pour câb
Mode d´emploi DataBox Allround XL Installation Installation de de l’imprimante l’imprimante portable portable Ouvrez la mallette DataBox Allround XL. Si vous ne possédez pas le système de fixation rapide «QuickFix» adapté à votre imprimante, procédez comme suit: 1) Prenez les 8 bandes Velcro® (4 bandes crochet et 4 bandes velours) et rassemblez-les pour former 4 paires correspondantes (Figure 3). 2) Les 4 paires Velcro® ainsi obtenues sont chacune dotée d’une protection sur les deux côtés extérieurs.
Mode d´emploi DataBox Allround XL Raccordement Raccordement de de l’ordinateur l’ordinateur portable portable et et de de l’imprimante l’imprimante Mettez l’ordinateur sous tension et procédez comme suit: 1) Raccordez l’ordinateur à l’imprimante à l’aide d’un câble USB. Ce câble n’est pas fourni avec la mallette DataBox Allround XL. → Vérifiez également que le cheminement du câble n’est pas entravé! Pour une utilisation optimale, faites passer le câble USB sur le côté de l’imprimante.