
Operator`s manual


• 11 •
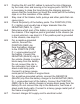
Set the Amp/Volt Selector switch to the proper setting for the 3.
battery being charged.
Connect the AC power following the precautions listed in 4.
section 8.
If you’ve connected everything correctly, the CHARGING 5.
(yellow) LED should be lit indicating that the charger is
charging. If the CHARGING (yellow) LED does not light or if
the CHECK BATTERY (red) LED is lit, check the connections
or have the battery checked/replaced.
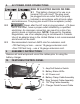
USING THE QUICK-DISCONNECT CABLE CONNECTORS
Connect any of the three output cable assemblies to the charger in
seconds. Make sure to place the charger on a dry, non-
ammable surface.
NOTE: Never connect the clamp and ring terminal connectors
together for use in other applications, such as external battery or
other power source charging, or to extend the output cable length, as
reverse polarity and/or overcharge conditions will occur.
50 AMP BATTERY CLIPS
Connect the end of the charger output cable to the end of the 1.
50 Amp Battery clips cable.
Follow the steps in sections 6 and 7 to connect the output 2.
clips to the battery.
After a good electrical connection is made to the battery, plug 3.
the power cord into a 120V AC electrical wall outlet. Make
sure to place the charger on a dry, non-ammable surface.
PERMANENT RING CONNECTORS
The ring connectors permanently attach to the battery providing easy
access to quickly charge your battery. This application is appropriate
for motorcycles, lawn tractors, ATVs and snowmobiles.
To permanently attach to a battery, loosen and remove each 1.
nut from the bolt at the battery terminal.
Connect the red POSITIVE connector ring to the POSITIVE 2.
battery terminal.
Connect the black NEGATIVE connector ring to the 3.
NEGATIVE battery terminal.
Replace and tighten the nuts to secure. 4.