
Operator`s manual


• 12 •
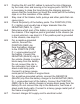
Connect the cable to the end of the charger output cord. 5.
Take care to keep the wires and plug away from metal and
moving parts.
Plug the charger power cord into a 120V AC electrical 6.
wall outlet. Make sure to place the charger on a dry,
non-ammable surface.
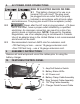
12V ACCESSORY PLUG
Charge or maintain your battery without lifting the hood.
Connect the end of the 12V Accessory Plug Cable Quick-1.
Connect to the charger.
Insert the 12V accessory plug into the 12V accessory outlet.2.
Route the power cord from the charger through the vehicle’s 3.
open window.
Plug the charger power cord into a 120V AC electrical 4.
wall outlet. Make sure to place the charger on a dry, non-
ammable surface.
If the vehicle’s ignition key has to be on in order for the 5.
accessory outlet to supply/receive power, turn the key on.
Battery Connection Indicator
If the charger does not detect a properly connected battery, the
CHECK BATTERY (red) LED will light continuously until such
a battery is detected. Charging will not begin while the CHECK
BATTERY (red) LED is on. When charging begins, the CHARGING
(yellow) LED will be lit.
Completion of Charge
Charge completion is indicated by the CHARGED (green) LED. When
lit, the charger has stopped charging and switched to the Maintain
Mode of operation.
Maintain Mode (Float-Mode Monitoring)
When the CHARGED (green) LED is lit, the charger has started
Maintain Mode. In this mode, the charger keeps the battery
fully charged.
NOTE: If the charger has to provide its maximum maintain current for
a continuous 12 hour period, it will go into Abort Mode (see Aborted
Charge section). This is usually caused by a drain on the battery or