Manuel d'instructions
Instructions importantes sur la sécurité et le fonctionnement Lorsque vous utilisez ce lecteur de DVD, les précautions élémentaires doivent toujours être respectées, notamment les points suivants : 1) Lisez les instructions. 2) Conservez les instructions. 3) Prêtez attention à tous les avertissements. 4) Respectez toutes les instructions. 5) N’utilisez pas cet appareil à proximité de l’eau. 6) Ne nettoyez l’appareil qu’avec un chiffon sec.
Instructions importantes sur la sécurité et le fonctionnement POUR REDUIRE LES RISQUES D’INCENDIE ET D’ELECTROCUTION, N’EXPOSEZ PAS CET APPAREIL A LA PLUIE OU A L’HUMIDITE. ATTENTION RISQUE DE CHOC ELECTRIQUE NE PAS OUVRIR PRECAUTION : Pour réduire les risques d’incendie et d’électrocution, ne retirez pas le couvercle (ni le couvercle arrière) de l’appareil. Consultez du personnel qualifié pour toutes les interventions d’entretien.
CONTENU Instructions importantes sur la sécurité et le fonctionnement..........................................2-3 Contenu......................................................................................................................…...4 Description succinte des commandes 1. Fonctions en façade………………………………………………………….............……….6 2. Fonctions au dos de l’appareil........................................................................................6 3. Télécommande.............................
C)Audio setting……………………………………………………………………………..22 D) Video setting…………………………………………………………………………….22 E) Réglage enceinte..……………………………………………………………………..
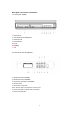
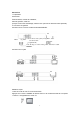
Description succinte des commandes 1. Fonctions en façade : 1. TRAPPE CD 2. CAPTEUR TELECOMMANDE 3. OPEN/CLOSE 4. PLAY/PAUSE 5. STOP 6. POWER 7. USB 2. Fonctions au dos de l’appareil : 1. Sortie audio 2.0 CH MAIN-L 2. Sortie audio 2.0 CH MAIN-R 3. Sortie audio numérique COAXIALE 4. Sortie S-Vidéo 5. Sortie vidéo Composite 6/7/8. Sorties vidéo composantes Y Pb/Cb Pr/Cr 9. Sortie OPTIQUE du signal audio numérique 10.
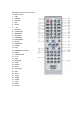
Description succinte des commantes 3. Télécommande 1. OSD 2. POWER 3. REPEAT 4. N/P 5. SLOW 6. L / R 7. RETURN 8. LANGUAGE 9. WEATHER 10. SUBTITLE 11. FORWARD 12. BACKWARD 13. SETUP 14. MENU/PBC 15. PAUSE 16. PLAY 17. NUMERIC BUTTONS 18. PROG 19. OPEN/CLOSE 20. A – B 21. RAN 22. RESUME 23. STEP 24. ANGLE 25. PDVD 26. VOLUME+/27. PRE 28. NEXT 29. TITLE 30. INTRO 31. ZOOM 32. STOP 33. MUTE 34.
Connexions 1. Préparation Accessoires Télécommande, manuel de l’utilisateur, Carte de garantie, sortie A/V (Lorsque vous ouvrez l’emballage, assurez-vous que tous les éléments soient présents) 2.
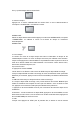
S’il n’y a pas de disque dans le lecteur DVD. 2. Insérer un disque Appuyez sur la touche OPEN/CLOSE du lecteur DVD ou de la télécommande et l’inscription « OUVERTURE » va s’afficher à l’écran. OPEN/CLOSE Placez un disque dans le lecteur DVD et appuyez sur la touche OPEN/CLOSE, l’inscription « FERMETURE » va s’afficher à l’écran et la lecture du disque va commencer automatiquement. OPEN/CLOSE 3.
pré-arrêt. Dans le même temps, l’affichage à l’écran indique « Pré-arrêt ». Pour reprendre à nouveau, appuyez deux fois sur la touche STOP. En état de pré-arrêt, le lecteur se rappelle de l’endroit ou reprendre la lecteur et le lecteur DVD reprend là ou vous l’avez arrêté. En état d’arrêt, lorsque vous appuyez sur PLAY, le lecteur accède au mode de lecture de séquence. B) Lecture du titre (uniquement avec les disques DVD compatibles) a.
Opérations de base Disques SVCD-VCD/CD/HD-CD : Si le PBC est activé, cette opération va le désactive alors que les chapitres / pistes sont lus dans l’ordre programmé. Selon les éléments en surbrillance, utilisez les touches numériques pour saisir les chapitres/pistes dans l’ordre dans lequel vous voulez les lire. Une fois terminé, appuyez sur PLAY ou utilisez ▲▼►◄ pour mettre l’article PLAY en surbrillance et appuyez sur la touche ENTER. Les chapitres/pistes seront lus dans l’ordre programmé.
5. Saut de pistes Appuyez sur la touche NEXT au début pour accéder au titre/chapitre/piste suivante sur le disque. Appuyez sur la touche PREV au début pour accéder au titre/chapitre/piste précédent sur le disque. 6. Lecture rapide multi vitesse Appuyez sur la touche FWD pour obtenir une vitesse de lecture x2, x8, x64 ou x128, puis normale, suivant le cycle de lecture rapide.
Il y a trois modes de répétition disponibles : Désactivé, Lecture en boucle du chapitre et Lecture en boucle du titre. A chaque fois que vous appuyez vous passez au mode suivant. En appuyant quatre fois sur la touche, vous revenez sur l’option Désactivé. 9. Fonction OSD Insérez et lisez un DVD. Appuyez une première fois sur la touche OSD; Appuyez une seconde fois sur la touche OSD: Appuyez encore une fois sur la touche OSD et le menu va disparaitre. 10.
11. Changer la langue audio Durant la lecture d’un disque, appuyez une fois sur la touche LANGUAGE et l’indicateur d’informations sur la langue va s’afficher. Lorsqu’un DVD ou un SVCD est enregistré avec plusieurs bandes-son, vous pouvez utiliser la fonction de choix de la langue pour modifier temporairement la langue audio. 12. Sous-titres (compatible DVD ou SVCD), appuyez sur la touche SUBTITLE de la télécommande et l’indicateur des informations des sous-titres va apparaître.
Utilisez les touches ▲▼►◄ pour vous déplacer à l’écran lorsque le facteur de grossissement à une valeur de : 2/3/4. 17. Modifier le mode audio Appuyez sur la touche L/R pour afficher la bande audio courante. 18. Utilisation de la fonction visionnage Appuyez sur la touche VIEW lorsque l’appareil n’est pas en cours de lecture Lorsqu’un disque SVCD ou VCD est chargé, l’écran affiche des vignettes des pistes disponibles.
Vous pouvez appuyer sur la touche de contrôle du volume se trouvant sur la façade du téléviseur ou sur l’amplificateur pour régler le niveau du volume. En appuyant sur la touche VOL+ de la télécommande, vous pouvez augmenter le volume et en appuyant sur la touche VOL-, le diminuer. Notes : Durant la lecture de DVD MIC (PCM) cette fonction n’est pas disponible. 21.
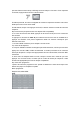
Notes : Appuyez sur les touches pour accéder indépendament à l’arborescence des répertoires, aux fichiers et à la zone de modification des fichiers. La zone en surbrillance va être dans la zone des répertoire et, comme indiqué dans l’illustration précédente alors qu’un carré transparent va apparaître sur la zone de modification des fichiers. Dans la zone de modification des fihciers, vous pouvez appuyer sur les ▲▼►◄ pour moidifier la sélection en surbrillance.
1. Etapes générales du menu de réglage A) Appuyez sur la touche SETUP et le menu principal va s’afficher. Une fois le menu principal présent, le système DVD se met automatiquement en pause. B) Appuyez sur les touches pour mettre en surbrillance l’icône de la page voulue et pour activer cette page ; si vous désirez par exemple modifier les appuyez sur pour mettre en surbrillance l’icône video paramètres vidéo, appuyez sur les touches et la page correspondante va apparaître à l’écran.
VIEW, GOTO, REPEAT, A-B, ANGLE, LANGUAGE, L/R, 3D, DISPLAY MUTE, SETUP. 2. Présentation du réglage des paramètres A) REGLAGE SYSTEME Le réglage système optimal est indiqué ci-dessous. Vous pouvez choisir le système TV en fonction du système de couleurs de votre téléviseur. AUTO : Choisissez ce réglage si votre lecteur DVD est connecté à une TV multi système. NTS : Choisissez ce réglage si votre lecteur DVD est connecté à une TV NTSC.
un scan progressif avec des câbles vidéo Y, Cb et Cr. Réglage système TV TYPE 16:9 (écran large) : Choisissez cette option si votre lecteur DVD est connecté à un téléviseur à écran large. Si vous choisissez cette option sans disposer d’une TV à écran large, l’image va apparaître déformée à cause de la compression verticale. 4:3 LB (letterbox) : Choisissez cette option si votre lecteur DVD est connecté à un téléviseur classique.
Il y a huit options de classement : Sélectionnez l’option ADULTE pour modifier la limite du classement Le réglage par défaut est TOUT VOIR. Notes : Si l’option mot de passe est bloquée, vous ne pouvez pas fixer la limite de classification, la limite fonctionne lorsque l’option mot de passe est ouverte. PREREGLAGE Choisissez cette option pour revenir aux valeurs par défaut de tous les réglages.
pour Choisissez l’option MENU LANGUAGE et appuyez sur les touches choisir la langue de menu que vous préférez. Appuyez sur ENTER pour confirmer. Si le disque que vous êtes en train de lire dispose de cette langue pour l’affichage du menu, ce dernier se fera dans cette langue. Notes : Si votre langue préférée n’est pas disponible, la langue par défaut du disque sera utilisée.
vidéo, la page vidéo va s’afficher à l’écran. Appuyez sur la touche pour sélectionner l’option luminosité et appuyez sur ENTER pour effectuer la sélection. L’option luminosité va apparaître sur la droite. CONTRAST Utilisez les touches pour modifier le réglage et ajuter le contraste. HUE Utilisez les touches pour modifier le réglage et ajuter la teinte. SATURATION pour modifier le réglage et ajuter la saturation.
DOWNMIX Utilisez les touches pour modifier le réglage et ajuter la saturation. LT/RT : Choisissez ce paramètre, la sortie son sera similaire à celle d’un cinéma si le film à été enregistré au format Pro Dolby Digital. STEREO : Choisissez ce réglage lorsque vous lisez au format 5.1 canaux, deux canaux de signal de sortie seront émis pour les bandes audio gauche et droite. Lors d’une lecture avec deux canaux audio, le signal de sortie sera en stéréo.
Détection des défaillances Un problème ne signifie pas forcément la présence d’une défaillance. Avant de renvoyer le produit pour le faire réparer, vérifiez l’état de votre appareil en utilisant le tableau suivant. Ne tentez en aucun cas de réparer vous-même l’appareil, ceci annulerait la garantie. Symptôme Solution Pas d’alimentation Assurez-vous que le câble d’alimentation soit bien branché. Assurez-vous qu’il y ait du courant lorsque vous branchez un autre appareil.
se referme pas Le lecteur ne peut ouvrir le disque Si le plateau est bloqué par un obstacle ou par le disque, veuillez utiliser un cure-dent et le placer dans l’orifice d’ouverture d’urgence, déplacez manuellement la barre interne se trouvant à l’extrémité du lecteur.
Titelseite Bedienungsanleitung, nach Ihrer Wahl zu gestalten
Wichtige Sicherheitshinweise Beachten Sie beim Betrieb dieses Gerätes immer die grundsätzlichen Sicherheitsvorschriften, eingeschlossen der Folgenden: 1) Lesen Sie die Anweisungen 2) Bewahren Sie sie auf 3) Beachten Sie alle Warnhinweise 4) Befolgen Sie alle Anweisungen 5) Benutzen Sie das Gerät nicht in der Nähe von Wasser .
Wichtige Sicherheitshinweise SETZEN SIE DAS GERÄT ZUM SCHUTZ VOR FEUER UND KURZSCHLUSS KEINEM REGEN ODER FEUCHTIGKEIT AUS ACHTUNG STROMSCHLAGGEFAHR! NICHT ÖFFNEN! ACHTUNG: Zum Schutz vor Stromschlägen und Feuer, nehmen Sie die Abdeckung des Gerätes (oder Rückenabdeckung) nicht ab. Überlassen Sie alle Wartungsarbeiten qualifiziertem Fachpersonal.
INHALT Wichtige Sicherheitshinweise.......................................................................................... Inhalt…............................................................................................................................. Kurze Einführung in die Bedienung 1.Frontplatte Funktionen……………………………………………………….............………. 2.Rückenplatte Funktionen…………………………………………………….............………. 3.Fernbedienung.............................................................................
C) Audio Einstellungen……………………………………………………………………….. D) Video Einstellungen…………………………………………………………………………. E) Lautsprechereinstellungen……………………………………………………………….. F) USB Funktion…………………………………………………………………………… … Fehlersuche………….……………………………………………………………… ………. 22 22 23 24 25 Technische Daten……..
Kurze Einführung in die Bedienung 1.Frontplatte Funktionen: 1. CD FACH 2. SENSOR FERNBEDIENUNG 3. OPEN/CLOSE 4. PLAY/PAUSE 5. STOP 6. POWER 7. USB 2.Rückenplatte Funktionen: 1. Audio Ausgang 2.0 CH links 2. Audio Ausgang 2.0 CH rechts 3. COAXIAL digitaler Audio-Ausgang 4. S-Video-Eingang 5. Komposit Videoausgang 6./7/8. Komposit Video Ausgänge Y Pb/Cb Pr/Cr 9. OPTICAL Ausgang digitales Audiosignal 10.
Kurze Beschreibung der Bedienung 3.Fernbedienung 1. OSD 2. POWER 3. REPEAT 4. N/P 5. SLOW 6. L / R 7. RETURN 8. LANGUAGE 9. WEATHER 10. SUBTITLE 11. FORWARD 12. BACKWARD 13. SETUP 14. MENU/PBC 15. PAUSE 16. PLAY 17. NUMERIC BUTTONS 18. PROG 19. OPEN/CLOSE 20. A – B 21. RAN 22. RESUME 23. STEP 24. ANGLE 25. PDVD 26. VOLUME+/27. PRE 28. NEXT 29. TITLE 30. INTRO 31. ZOOM 32. STOP 33. MUTE 34.
Anschlüsse 1. Vorbereitung Zubehör Fernbedienung, Bedienungsanleitung Garantiekarte, A/V Ausgang (Überprüfen Sie das Zubehör nach dem Öffnen auf Vollständigkeit) 2.
Grundfunktionen 1.Einschalten von TV Gerät und DVD Player Drücken Sie auf dem DVD Player oder Ihrer Fernbedienung die POWER-Taste. Auf dem Bildschirm erscheint nun “Reading” Wenn keine DVD eingelegt ist. 2.Disc einlegen Drücken Sie auf dem DVD Player oder Ihrer Fernbedienung die OPEN/CLOSE -Taste. Auf dem Bildschirm erscheint nun “OPEN” (offen) . OPEN/CLOSE Legen Sie eine DVD ein und drücken Sie die OPEN/CLOSE-Taste.
Hauptmenü; bei SVCD oder VCD 2.0 und eingeschaltetem PBC dazu die RETURN Taste drücken. e. Stop Beim erstmaligen Drücken von STOP, geht der Player in einen Pre-Stop-Zustand. Gleichzeitig zeigt das OSD “Pre-Stop” Zur erneuten Wiedergabe zweimal STOP drücken. Im Pre-Stop-Zustand wird die Wiedergabe am selben Punkt wieder aufgenommen, an dem sie gestoppt wurde. Im STOP-Zustand wird beim Drücken der PLAY Taste die Sequenz von Beginn an abgespielt. B)Titel Wiedergabe a.
Grundfunktionen SVCD-VCD/CD/HD-CD Discs: Bei aktiviertem PBC, schaltet diese Programmeinstellung das PBC für die Dauer der Wiedergabe der Kapitel/ Titel aus. Entsprechend den markierten Elementen wählen Sie anhand der Zahlentaste die Reihenfolge der Kapitel/ Titel, die abgespielt werden sollen. Drücken Sie danach PLAY oder wählen Sie ▲▼►◄ zum Markieren des PLAY Symbols und drücken Sie ENTER. Die Kapitel/ Titel werden nun in der programmierten Reihenfolge abgespielt.
Drücken Sie zu Beginn NEXT um zum nachfolgenden Kapitel/ Titel einer Disc zu springen. Drücken Sie zu Beginn PREV um zum vorhergehenden Kapitel/ Titel zu springen. 6. Schnellvorlauf Drücken Sie FWD um die Normalwiedergabe 2X 8X 32X 64X 128X schneller vorlaufen zu lassen. Drücken Sie REV um die Normalwiedergabe 2X 8X 32X 64X 128X schneller zurücklaufen zu lassen. Drücken Sie zum Fortsetzen der Wiedergabe PLAY. Für die Wiedergabe von CD, HDCD MP3, hat F.R x2 einen Audio Ausgang. 7.
dem vierten Drücken ist der Kreis beendet und der Wiederholungsmodus wieder ausgestellt (OFF). 9. OSD Funktion Einlegen und Wiedergeben einer DVD Drücken Sie die OSD Taste einmal; Drücken Sie die OSD Taste ein zweites Mal; Sprache Audiotyp Untertitel Winkel Drücken sie die OSD Taste ein drittes Mal und das Menü verschwindet. Disctyp Titel Zeit Kapitel auf Display Kapitel 10.
Bei eingelegten DVD oder SVCD mit mehreren Tonspuren kann über die Sprachwahlfunktion die Sprache für die Wiedergabe temporär geändert werden. 12. Für Untertitel (DVD oder SVCD kompatibel) drücken Sie auf Ihrer Fernbedienung SUBTITLE. Auf dem Bildschirm erscheint die Untertitel Anzeige. Über die Untertitelfunktion können bei DVD oder SVCD (mit gespeicherten Untertiteln) die Untertitel auf dem Bildschirm angezeigt werden. In der Standardeinstellung sind die Untertitel ausgeschaltet.
Nutzen Sie bei Zoomfaktor 2/3/4 die ▲▼►◄Tasten für einen Bildlauf. 17. Wiedergabemodus ändern Drücken Sie die L/R Taste zum Anzeigen des aktuellen Audioband. 18. Funktionen Drücken Sie im Stop Zustand VIEW. Bei eingelegten SVCD oder VCD werden auf dem Bildschirm kleine Minibilder der verfügbaren Titel angezeigt. Abhängig von der Titelsequenz der Disc werden bis zu neun Minibilder auf dem Bildschirm angezeigt. Jedes Bild wird 3 Sek. gezeigt. 19.
ANMERKUNGEN: Beim Abspielen von DVD PCM funktioniert diese Funktion nicht. 21. MP3 und JPEG abspielen Legen Sie eine MP3/JPEG Disc in die Schublade. Die automatische Suchfunktion sucht nach Verzeichnissen im MP3/JPEG Format. Nach abgeschlossener Suche wird automatisch das erste Verzeichnis im MP3 Format abgerufen (bei Discs die Dateien im MP3 und JPEG Format enthalten.
beispielsweise eine Disk mit MP3 und JPEG, jedoch ohne NES eingelegt ist, erscheinen die Buchstaben „M“ und „P“ in weiß und „G“ in schwarz. Beim Abspielen einer MP3 wird “M” dunkler. Drücken Sie bei Discs mit MP3 und JPEG Dateien zur Rückkehr zur JPEG Liste RETURN. Zur Auswahl der gewählten Datei können auch die Zahlentasten verwendet werden. Wollen Sie zum Beispiel Titel Nr. 15 der aktuellen Liste abspielen, drücken Sie 10+ und danach „5“. Titel Nr. 15 wird abgespielt.
Sie diese Seite durch . Wollen sie die Videoseite einstellen, drücken Sie Markieren des Videosymbols. Die Videoseite wird angezeigt. zum Taste zum Markieren der gewünschten Option. Drücken Sie zur Auswahl C) Drücken Sie die Taste. Die Optionen erscheinen auf der rechten Seite. Nach Wählen sie ENTER oder die durch Drücken der Taste die BRIGHTNESS (Helligkeits-) Option und ENTER zur Bestätigung. Die Helligkeitsoptionen erscheinen auf der rechten Seite.
NTS: Wählen Sie diese Einstellung, wenn Ihr DVD Player an ein NTSC TV angeschlossen ist. PAL: Wählen Sie diese Einstellung, wenn Ihr DVD Player an ein PAL TV Gerät angeschlossen ist. PAL60: Wählen Sie diese Einstellung, wenn Ihr DVD Player an ein PAL60 TV Gerät angeschlossen ist. SCREEN SAVER (BILDSCHIRMSCHONER) Der Bildschirmschoner (sofern aktiviert), erscheint, sobald der DVD Player angehalten oder geöffnet wird, keine Disc eingelegt ist oder ein Bild für mehr als 80 Sek. gezeigt wird.
angeschlossen ist. Wenn Sie diese Einstellung wählen, ohne dass Sie ein Breitbildschirm TV Gerät besitzen, können die Bilder aufgrund der vertikalen Komprimierung verzerrt dargestellt werden. 4:3 LB (Briefkasten): Wählen Sie diese Option, wenn Ihr DVD an ein TV Gerät mit normaler Rate angeschlossen ist. Wenn Sie Videos in der originalen Aspektrate (Verhältnis Bildbreite/ Bildhöhe) sehen, wird das volle Bild mit schwarzen Balken darüber und darunter angezeigt.
Systemeinstellung B) Sprachauswahl Die Optionen zur Spracheinstellung werden nachfolgend beschrieben: Tasten die Markieren Sie die OSD LANGUAGE Option und wählen sie anhand der gewünschte Anzeigesprache. Zur Bestätigung ENTER drücken. Die Anzeige ist auf die gewünschten Sprache eingestellt. Tasten Markieren Sie die AUDIO LANGUAGE Option und wählen sie anhand der die bevorzugte Audiosprache. Zur Bestätigung ENTER drücken.
ANMERKUNGEN: Ist die gewünschte Sprache nicht vorhanden wird die werksseitig eingestellte Sprache angezeigt. C) Audio Einstellungen Die Optionen zur Spracheinstellung werden nachfolgend beschrieben: Markieren Sie die AUDIO OUTPUT Option und wählen sie anhand der bevorzugte Audiosprache. Zur Bestätigung ENTER drücken. Tasten die ANALOG: Aus den Koaxial- und optischen Ausgängen kommt kein Signal.
CONTRAST (Kontrast) Verändern Sie über die HUE (Farbeinstellung) Verändern Sie über die Tasten die Kontrasteinstellungen. Tasten die Farbeinstellungen. SATURATION (Sättigung) Tasten die Sättigungseinstellungen. Verändern Sie über die E) Lautsprechereinstellungen Die Optionen zur Lautsprechereinstellung werden nachfolgend beschrieben: DOWNMIX (Mehrkanal Tonformat) Verändern Sie über die Tasten die Tonformateinstellungen.
F)USB FUNKTION 1: Schließen Sie ein USB Gerät an die USB Buchse an. 2: Durch Drücken der PLAY Taste liest der DVD Player die auf dem USB Gerät gespeicherte Information. Bei gleichzeitig eingelegter Disc und angeschlossenem USB Gerät wird zuerst die Disc abgelesen. Über die Fernbedienung können Sie jedoch die Quelle ändern. 1: SOURCE drücken 2: Auf dem Bildschirm erscheint USB Disc Wählen sie die Richtungspfeile um das gewünschte Gerät auszuwählen.
Störungssuche Probleme bedeuten nicht automatisch eine Störung. Bevor Sie das Gerät zur Reparatur bringen überprüfen Sie das Gerät folgendermaßen. Versuchen Sie nie, das Gerät eigenständig zu reparieren. Die Garantieansprüche würden verloren gehen. Symptom Lösung Kein Strom Überprüfen Sie, ob das Netzkabel korrekt angeschlossen ist. Prüfen Sie, ob Wechselstrom vorhanden ist. Kein Bild Prüfen sie, ob das TV Gerät eingeschaltet ist. Prüfen Sie den Videoanschluss.
Der Player reagiert nicht auf gewisse Befehle. Die Funktion wird von der Disc nicht unterstützt. Die Schublade schließt nicht. Die Schublade öffnet sich nicht. Legen sie die Disc erneut in die Mitte der Schublade ein. Blockiert die Schublade aufgrund von Hindernissen oder die Disc führen Sie einen Zahnstocher in die ‚emergency opening‘ (Notfallöffnung) ein und öffnen Sie den Sperrriegel im Innern des Players manuell.
Gebruikshandleiding (Cover volgens uw ontwerp)
Belangrijke veiligheid- en gebruiksaanwijzingen Bij gebruik van deze DVD speler dienen algemene voorzorgsmaatregelen altijd gevolgd te worden, waaronder de volgende: 1) Lees de instructies. 2) Bewaar de instructies. 3) Let goed op alle waarschuwingen. 4) Neem alle instructies in acht. 5) Gebruik dit apparaat niet in de buurt van water. 6) Maak het apparaat uitsluitend met een droge doek schoon. 7) Blokkeer nooit de ventilatieopeningen, en installeer het apparaat volgens de instructies van de fabrikant.
Belangrijke veiligheid- en gebruiksaanwijzingen STEL DIT TOESTEL NOOIT BLOOT AAN REGEN OF VOCHT OM HET RISICO OP BRAND OF ELEKTRISCHE SCHOKKEN TE VERMINDEREN. OPGELET RISICO OP ELEKTRISCHE SCHOKKEN NIET OPENEN OPGELET: Verwijder nooit de behuizing (of achterkant) van het apparaat om het risico op brand of elektrische schokken te verminderen. Laat alle reparaties uitsluitend over aan gekwalificeerd servicepersoneel.
INHOUDSOPGAVE Belangrijke veiligheid- en gebruiksaanwijzingen..........................................................2-3 Inhoudsopgave................................................................................................................4 Korte omschrijving van de bedieningen 1.Voorpaneel functies………………………………………………………….............…… 6 2.Achterpaneel functies.................................................................................................. 6 3.Afstandsbediening...................
C) AUDIO SETTING………………………………………………………………………… 22 D) Video setting……………………………………………………………………………. 22 E) Luidsprekerinstelling………………………………………………………………………. 23 F) USB functie……………………………………………………………………………… … 24 Probleemoplossing……………………………………………………………… ……….
Korte omschrijving van de bedieningen 1. Voorpaneel functies: 1. CD-DEURTJE 2. AFSTANDSSENSOR 3. OPEN/CLOSE 4. PLAY/PAUSE 5. STOP 6. POWER 7. USB 2. Achterpaneel functies: 1. Audio-uitgang 2.0 CH MAIN-L 2. Audio-uitgang 2.0 CH MAIN-R 3. COAXIALE digitale audio-uitgang 4. S-Video uitgang 5. Composite video-uitgang 6./7/8. Component video-uitgangen Y Pb/Cb Pr/Cr 9. OPTISCHE digitale audio-signaaluitgang 10.
Korte omschrijving van de bedieningen 3. Afstandsbediening 1. OSD 2. POWER 3. REPEAT 4. N/P 5. SLOW 6. L / R 7. RETURN 8. LANGUAGE 9. WEATHER 10. SUBTITLE 11. FORWARD 12. BACKWARD 13. SETUP 14. MENU/PBC 15. PAUSE 16. PLAY 17. NUMERIC BUTTONS 18. PROG 19. OPEN/CLOSE 20. A – B 21. RAN 22. RESUME 23. STEP 24. ANGLE 25. PDVD 26. VOLUME+/27. PRE 28. NEXT 29. TITLE 30. INTRO 31. ZOOM 32. STOP 33. MUTE 34.
Aansluitingen 1. Voorbereidingen Accessoires Afstandsbediening, Gebruikshandleiding, Garantiebewijs, A/V uitgang (Controleer of alles aanwezig is na openen van de verpakking) 2. Systeemaansluiting Aansluiting op een TV met de audio/video/SCART kabel TV Wit Rood Geel Rood Wit Naar video-ingang (geel) Naar audio-ingang (rood/wit) Geel Sluit de SCART kabel aan als de TV een scart ingang heeft Aansluiting op een audiosysteem en TV met YUV video-ingang.
Algemene bedieningen 1. Uw TV en DVD speler inschakelen Druk op POWER op de DVD speler of afstandsbediening en het woord “Inlezen” zal op het TV scherm verschijnen. Als geen disk in de DVD speler is geladen. 2. Een disk laden Druk op OPEN/CLOSE op de DVD speler of afstandsbediening en het woord “OPEN” zal op het TV scherm verschijnen. OPEN/CLOSE Plaats een disk in de DVD speler en druk op OPEN/CLOSE, “SLUITEN” zal op het TV scherm verschijnen en de disk wordt automatisch afgespeeld. OPEN/CLOSE 3.
gebruiken om een track te selecteren om af te spelen. c. Druk op ENTER of PLAY om een gehighlight onderwerp te openen. d. Replay: Druk tijdens het afspelen van een DVD op MENU om terug te keren naar het hoofdmenu; met een SVCD of VCD 2.0 en PBC ingeschakeld, kunt u terugkeren naar het menu door op RETURN te drukken. e. Stop De eerste keer dat u op STOP drukt, schakelt u de speler op een “vóór-stop” status. Op dat moment zal de OSD “Vóór-stop” tonen. Druk tweemaal op STOP om een titel weer te starten.
Algemene bedieningen SVCD-VCD/CD/HD-CD disks: Indien PBC is ingeschakeld, zal deze procedure de PBC uitschakelen, terwijl de hoofdstukken / tracks in de geprogrammeerde volgorde worden afgespeeld. Aan de hand van wat u hebt gehighlight, kunt u de cijfertoetsen gebruiken om de hoofdstukken/tracks in te voeren in de volgorde waarop u deze wilt afspelen. Druk vervolgs op PLAY of gebruik ▲▼►◄ om het onderwerp START te highlighten en druk op ENTER.
Druk in het begin op PREV om de vorige titel/hoofdstuk/track van een disk te openen. 6. Multisnelheid spoelen Druk op de toets FWD om achtereenvolgens 2X 8X 32X 64X 128X de normale afspeelsnelheid vooruit te spoelen. Druk op de toets REV om achtereenvolgens 2X 8X 32X 64X 128X de normale afspeelsnelheid terug te spoelen. Druk op PLAY te hervatten of af te spelen. Wanneer een CD, HDCD of MP3 wordt afgespeeld, kan alleen bij x2 spoelen audio gehoord worden. 7.
Druk de tweede keer op de OSD toets: TAAL AUDIOTYPE ONDERTITELING HOEK Druk de derde keer op de OSD toets en het menu zal verdwijnen. DISKTYPE Titel TIJD Hoofdstuk op Display Hoofdstukken Druk nogmaals op de OSD toets en het menu zal verdwijnen. 10. Zoekfunctie gebruiken U kunt de zoekfunctie gebruiken om een titel/track/hoofdstuknummer te selecteren of om naar een specifiek punt van een titel te gaan.
Druk nogmaals op SUBTITLE om de ondertiteling weer te geven. De ondertitelingsinformatie zal de vooringestelde taal met het corresponderende serienummer ervan tonen en de ondertiteling zal in die taal op het scherm verschijnen. Algemene bedieningen 13. Camerahoek veranderen (compatibel met DVD’s) Druk tijdens het afspelen van een disk op de toets ANGLE en het hoekicoontje zal verschijnen.
17. Audiomodus veranderen Druk op de L/R toets om de huidige audioband weer te geven. 18. Viewfunctie gebruiken Druk in stopstatus op de toets VIEW. Wanneer een SVCD of VCD disk is geladen, zal het scherm kleine “miniafbeeldingen” van de beschikbare tracks vertonen. Afhankelijk van de trackvolgorde van de disk zullen maximaal negen miniafbeeldingen op het scherm verschijnen, en elke afbeelding wordt voor 3 seconden afgespeeld. 19.
schermvoorbeeld in onderstaande afbeelding Huidige MP3/JPEG bestandsnaam. Als een JPEG Naam van huidige folder bestand wordt afgespeeld, dient de naam *.jpeg te zijn. Het afspelende bestand is een MP3, muziek Bestand Wisselzone: Geeft het bestandstype weer van het afspelen en wisselen. Het afspelende bestand is een JPEG, afbeelding. om de folderzone te openen en markeer de gewenste folder; de Gebruik eerste track van de folder zal afgespeeld worden.
Opmerkingen: Tijdens het afspelen van een disk met MP3 bestanden werkt de video-uitgang niet langer, maar alleen digitale audio kan uitgevoerd worden. Druk tijdens weergave van TPEG afbeeldingen op de toets PROGRAM om de overdrachtmodus voor de afbeeldingen te selecteren. Er zijn 17 overdrachtmodi.
C) Druk op om de gewenste optie te markeren. Druk op ENTER of om te selecteren; de opties zullen rechts worden weergegeven; u kunt bijvoorbeeld op drukken om de optie HELDERHEID te markeren en vervolgens op ENTER drukken om te selecteren; de helderheidoptie zal rechts worden weergegeven. D) Gebruik om de optie INSTELLINGEN VERLATEN te markeren en druk nogmaals op ENTER of SETUP om het instellingsmenu te verlaten.
of wanneer een afbeelding langer dan 80 sec. onbewogen blijft, zal de schermbeveiliging verschijnen. Deze functie kan uw scherm beveiliging tegen beschadiging. ON : Selecteer deze instelling om de schermbeveiliging te activeren. OFF: Selecteer deze instelling om de schermbeveiliging te deactiveren De standaard instelling is ON. VIDEO INTERLACE-YUV: Selecteer deze optie als uw DVD speler is aangesloten op een TV met Y, Cb, Cr videokabels.
PASSWORD De wachtwoordoptie is geïnitialiseerd in vergrendelde status, waardoor u het classificeringslimiet en wachtwoord niet kunt wijzigen. De wachtwoordmodus dient geactiveerd worden om de classificeringsfunctie te kunnen gebruiken. Indien u het classificeringslimiet wilt aanpassen, dient u eerst het vooringestelde wachtwoord 0000 in te voeren en ter bevestiging op ENTER te drukken. Bij wijziging van het wachtwoord wordt eerst om het oude wachtwoord gevraagd en vervolgens om het nieuwe.
Markeer de optie OSD TAAL en gebruik om de gewenste OSD taal te selecteren. Druk op ENTER ter bevestiging en de OSD zal in die taal worden weergegeven. Markeer de optie AUDIO LANGUAGE en gebruik om de gewenste audiotaal te selecteren. Druk op ENTER ter bevestiging; de audio zal in die taal worden uitgevoerd, zolang de afspelende disk die taal ook beschikbaar stelt. Markeer de optie SUBTITLE LANGUAGE en gebruik om de gewenste ondertitelingstaal te selecteren.
Opties voor audio-instellingen staan hieronder beschreven: Markeer de optie AUDIO OUTPUT en gebruik uitgangsmodus te selecteren. om de gewenste audio Druk op ENTER ter bevestiging ANALOOG: Er komt geen signaal vanuit de coaxiale en optische uitgangsconnectoren. D) Video setting Als u de videopagina wilt configureren, kunt u op de toets drukken om het video-icoontje te markeren; de videopagina zal op het scherm verschijnen.
HUE Gebruik om de instelling te bewegen en de tint aan te passen SATURATION om de instelling te bewegen en de verzadiging aan te passen. Gebruik E) LUIDSPREKERINSTELLING Opties voor de luidsprekerinstellingen staan hieronder beschreven: DOWNMIX Gebruik om de instelling te bewegen en de downmix aan te passen. LT/RT: Selecteer deze instelling; het geluid zal klinken zoals in een bioscoop als de film aanvankelijk was opgenomen in Pro Dolby Digital. STEREO: Selecteer deze instelling; wanneer u 5.
om de bron te selecteren: 1: Druk op SOURCE 2: “USB Disk” zal op het scherm verschijnen Gebruik de navigatietoetsen om de speler of de disk in te laten lezen of het USB apparaat. Waarschuwing: haal het USB apparaat uit de aansluiting nadat u de DVD speler eenmaal hebt uitgeschakeld.
Probleemoplossing Een probleem betekent niet noodzakelijk een defect. Controleer uw speler met als referentie onderstaande tabel, voordat u het product opstuurt voor reparatie. Probeer in geen enkel geval het systeem zelf te repareren; dit verklaart de garantie als ongeldig. Symptoom Oplossing Geen voeding Zorg ervoor de voedingskabel goed aan te sluiten. Controleer of er AC voeding is door een ander apparaat aan te sluiten. Geen weergave Controleer of de TV is ingeschakeld. Controleer de videoverbinding.
Technische specificaties Afspeelmodus NTSC / PAL / AUTO Diskmodus DVD, VCD, CD, MP3, CD-R, CD-RW, MPEG 4 Resoluties ≥ 500 lijnen Verhouding videosignaal/ruis ≥ 56dB Frequentieresponsie fs 192KHz: 4Hz-44KHz:+/-1dB Verhouding audiosignaal/ruis ≥-90dB Dynamisch bereik ≥-90dB Verstoring <0,01% D/A omzetter 192KHz124bit Video-uitgang Audio-uitgang Voeding 110-240 V~ 50/60Hz Stroomverbruik ≤15W Specificaties kunnen zonder voorafgaande kennisgeving gewijzigd worden. Gemaakt in P.R.C.
Instruction Manual Cover By your Design
Instrucciones importantes de seguridad y de función Al usar este Reproductor de DVD, las precauciones básicas se deben seguir siempre, incluyendo lo siguiente: 1) Lea estas instrucciones 2) Guarde estas instrucciones 3) Preste atención a todas las advertencias 4) Siga todas las instrucciones 5) No utilice este aparato cerca del agua 6) Limpie solamente con el paño seco 7) No bloquee ninguna abertura de la ventilación, instale de acuerdo con las instrucciones del fabricante 8) No instale cerca de ninguna fue
Instrucciones importantes de seguridad y de función PARA REDUCIR EL RIESGO DE FUEGOS Y DE CHOQUES ELÉCTRICOS, NO EXPONGA ESTA UNIDAD A LA LLUVIA O A LA HUMEDAD. PRECAUCIÓN: Para reducir el riesgo del fuego y de choque eléctrico, no quite la cubierta (o trasero) de la unidad. Refiera el mantenimiento solamente al personal de servicio calificado.
CONTENIDO Instrucciones importantes de seguridad y de función......................................................2-4 Contenido...........................................................................................................................4 Breve instrucción de controles 1.Función de panel delantero…………………………………………………………..............6 2.Función de panel posterior...............................................................................................6 3.Control remoto....................
C) Ajuste de Audio……………………………………………………………………………..22 D) Ajuste de Video……………………………………………………………………………...22 E) Ajuste de Altavoz…………………………………………………………………………….23 F) Función USB………………………………………………………………………………….24 Localización de Averías………………………………………………………………………...24 Especificaciónes técnicas ….………………………………………………………………….
Breve instrucción de controles 1. Función del panel delantero: 1. PUERTA CD 2. SENSOR REMOTO 3. ABRIR/CERRAR 4. REPRODUCIR/PAUSA 5. DETENER 6. ENERGÍA 7. USB 2. Función del panel posterior: 1. Toma de salida audio 2.0 CH PRINCIPAL-I 2. Toma de salida audio 2.0 CH PRINCIPAL-D 3. Toma de salida audio señal digital COAXIAL. 4. Toma de salida S-video 5. Toma de salida vídeo compuesto 6./7/8. Salidas vídeo componente Y Pb/Cb Pr/Cr 9. Toma de salida audio señal digital OPTICAL 10.
Breve instrucción de controles 3. Control remoto 1. OSD 2. ENERGÍA 3. REPETICIÓN 4. N/P 5. LENTO 6. I/D 7. VOLVER 8. IDIOMA 9. TIEMPO 10. SUBTÍTULO 11. AVANZAR 12. RETROCEDER 13. AJUSTE 14. MENÚ/PBC 15. PAUSA 16. REPRODUCIR 17. BOTÓN NUMÉRICO 18. PROG 19. ABRIR/CERRAR 20. A-B 21. RAN 22. RESUMIR 23. PASO 24. ÁNGULO 25. PDVD 26. VOLUMEN +/27. ANTERIOR 28. SIGUIENTE 29. TÍTULO 30. INTRO 31. ZOOM 32. PARAR 33. SILENCIO 34.
Conexiones 1. Preparaciones Accesorios Control Remoto, Manual de usuarios, Tarjeta de garantía Salida audio/video (Revise que sea completo después de abrir la caja) 2.
Operaciones básicas 1. Encienda la TV y su Reproductor de DVD Presione el botón de Power en el Reproductor de DVD o el Control Remoto, y "Leer" aparece en la pantalla de la TV. Si no tiene un disco en el Reproductor de DVD. 2. Coloque un disco Presione el botón OPEN/CLOSE en el Reproductor de DVD o en el Control Remoto, y “OPEN” aparece en la pantalla de la TV.
c. Presione el botón ENTER o PLAY, usted puede comenzar a reproducir con el destacado. d. Volver al Reproducir: Cuando está reproduciendo un disco de DVD, presione el botón MENU, y usted puede volver al menú raíz; Como SVCD o VCD2.0, y PBC es prendido, presione el botón Return y usted puede volver al menú. e. Parar Cuando usted presiona el botón Stop por primera vez el reproductor entre en estado casi parado. Al mismo tiempo el OSD aparece “Pre-Parado”.
Operaciones básicas Discos de SVCD-VCD/CD/HD-CD: Si PBC está encendido, esta operación apagara el PBC mientras que los capítulos/pistas se reproducen en orden programada. Según a lo destacada, utilice los botones numéricos para entrar los capítulos/pistas en la orden que usted desea que se reproduzcan. Después presione el JUEGO o utilice () los botones para destacar el artículo de PLAY y presione ENTER. Los capítulos/pistas se reproducirán en la orden programada.
(1-9, 10). Para seleccionar la pista sobre 10, presione 10+, después presione los botones 1-10. 5. Saltar pistas Presione el botón NEXT al principio para ir al título/capítulo/pista siguientes en un disco. Presione el botón PREV al principio para ir título/capítulo/pista anterior en un disco. 6. Reproducción rápido de multi velocidades Presione la tecla FWD para conseguir a 2X 8X 32X 64X 128 función de reproducción normal, avanzar rápido circular del disco.
de repetir. Hay tres opciones de repetición: Apagado, Repetición del capítulo y Repetición del título. Con cada presión consecutiva del botón, cambia el modo de repetición, si usted presiona el botón cuatro veces, el modo de la repetición completa un ciclo vuelve a apagado. 9. Usar la característica de OSD Cargar y Reproducir DVDs. Presione el botón de OSD por primera vez; Presione el botón OSD por segunda vez: Presione el botón OSD por tercera vez, el menú de la exhibición se desaparece.
11. Cambiar idioma de audio Durante reproducción del disco, presione el botón LANGUAGE una vez, y la bandera de Info de Idioma de audio aparece. Cuando un DVD o un SVCD es grabado con múltiples bandas de sonido, usted puede utilizar la característica de idioma para cambiar temporalmente el idioma de audio. 12. Los subtítulos (compatibles con DVD o SVCD) presione el botón SUBTITLE en el control remoto una vez, y la bandera de Info del subtítulo aparece.
Zumbido apagado. Utilice los botones () para filtrar a través de la pantalla cuando el factor de Zumbido es 2/3/4. 17. Cambiar el modo de sonido Presione el botón de L/R para exhibir la banda de sonido actual. 18. Utilice la característica de Ver Presione el botón VIEW durante estado parado. Cuando se carga un disco de SVCD o de VCD, la pantalla demuestra imágenes pequeños “mini imágenes” de las pistas disponibles.
Operaciones básicas 20. Control de volumen Usted puede presionar el botón Volume en el frente del aparato de TV o del amplificador para controlar el nivel de sonido. Presionando el botón de VOL+ en el control remoto permite que usted amplifique el nivel de sonido; Presione el botón del VOL- reducirá el nivel de sonido Notas: Durante reproducción de salida de DVD PCM, esta característica no funciona 21.
Notas: los botones, usted puede activar la región del directorio, la región del Presione archivo y la región de cambio de archivo por separado. El destacado en la región del directorio y se demuestra como la imagen de arriba; Mientras que aparece un rectángulo transparente en la región de cambio de archivo. En la región del cambio del archivo, usted puede presionar los botones () para cambiar la opción destacada, después presione ENTER; el botón "M ", “P”, “G” se ilustra en la imagen antedicha.
Ajuste del sistema 1. Pasos generales del Menú de Ajuste A) Presione el botón SETUP, el menú principal de ajuste aparece. Cuando el menú principal es exhibido, el sistema de DVD auto pausa. B) Presione el botón para destacar el icono de la página deseada, después para activar está página; Por ejemplo, si usted desea ajustar la presione el botón para destacar el icono de video, la página de página de video, presione el botón video será exhibido en la pantalla. para destacar la opción deseada.
2. Introducción de los artículos de Ajuste A) AJUSTE DEL SISTEMA El ajuste óptimo del sistema se ilustran abajo. Según el sistema del color de la TV, usted puede elegir el sistema de la TV. AUTO: Elija este ajuste si su Reproductor de DVD está conectado con un TV de multi-sistema. NTS: Elija este ajuste si su Reproductor de DVD está conectado con un TV de NTSC. PAL: Elija este ajuste si su Reproductor de DVD está conectado con un TV de PAL.
exploración progresiva cables de video Y, Cb, Cr. Ajuste del sistema TIPO DE TV 16:9 (pantalla ancha): Elija está opción si su Reproductor de DVD está conectado una TV de pantalla ancha. Si usted elije está opción y usted no tienen una TV de pantalla ancha, las imágenes en la pantalla pueden aparecer torcidas debido a la compresión vertical. 4:3 LB (caja de letra): Elija está opción si su Reproductor de DVD está conectado con un conector de TV de cociente normal.
La característica de Clasificación es un sistema del límite de clasificación, como clasificación de la película. Funciona con los discos de DVD que se han asignado una clasificación. Esto le ayuda a controlar los tipos de DVDs que su familia mira. Hay ocho opciones de clasificación: Seleccione la opción de ADULTO para cambiar el límite de clasificación. El ajuste preestablecido es VER TODO.
Destaque la opción IDIOMA DE SUBTÍTULO, y presione los botones para elegir el idioma de subtitulo que usted prefiere. Presione ENTER para confirmar, si el disco que usted está reproduciendo tiene ese idioma disponible, hará salir el subtitulo en ese idioma. para elegir el Destaque la opción IDIOMA DE MENÚ, y presione los botones idioma de subtitulo que usted prefiere. Presione ENTER para confirmar, si el disco que usted está reproduciendo tiene ese idioma disponible, hará salir el menú en ese idioma.
D) Ajuste de video Si usted desea ajustar la página de video, presione el botón para destacar el icono de video, la página de video será exhibido en la pantalla. Presione el botón para destacar a la opción de brillo, después presione Enter para seleccionar, las opciones del brillo aparecen a la derecha. CONTRASTE Utilice los botones para mover del ajuste y ajustar el contraste. TONALIDAD Utilice los botones para mover del ajuste y ajustar la tonalidad.
SATURACIÓN para mover del ajuste y ajustar la saturación. Utilice los botones E) AJUSTE DEL ALTAVOZ Las opciones de ajuste del altavoz se ilustran abajo: DOWNMIX Utilice los botones para mover del ajuste y ajustar la saturación. LT/RT: Elija este ajuste; será sonido como adentro un teatro de la película, si la película original que fue registrado en el disco fue codificado en formato Pro Dolby Digital. ESTEREO: Elija este ajuste, cuando reproduce sonido de 5.
Localización de averías Cuando hay un problema no significa el malfuncionamiento, antes de enviar para la reparación, por favor revise su dispositivo según a lo siguiente. Bajo ningunas circunstancias, procure reparar el sistema por si mismo; esto invalidará la garantía. Síntoma Remedio Sin energía Asegúrese de correctamente. que cable eléctrico esté conectado Revise si hay energía en AC al lado de enchufe conectado en otro aparato. Sin imagen Revise que la TV es encendido.
El Reproductor no puede cerrar la bandeja Por favor coloque el disco otra vez en el centro de la bandeja. El Reproductor no puede abrir la bandeja Si la bandeja es bloqueada por el obstáculo o disco, por favor utilice un palillo e inserte en el agujero de la abertura de emergencia y mueva la barra interior en el fondo del reproductor manualmente.
Especificación Técnica Modo de Reproducción NTSC/PAL/AUTO Modo de disco DVD, VCD, CD, MP3, CD-R, CD-RW, MPEG 4 Resolución ≥ 500 líneas Cociente Señal/Ruido de video ≥ 56dB Respuesta en frecuencia fs 192KHz: 4Hz-44KHz:+/-1dB Cociente Señal/Ruido de audio ≥-90dB Gama dinámica ≥-90dB Distorsión <0.01% Convertidor D/A 192KHz124bit Salida de Video Salida de Audio Voltaje de energía 110-240 V~ Consumo de energía ≤15W 50/60Hz Las especificaciones están conforme a cambio sin previo aviso.