410BT Series Bluetooth® Battery Powered Irrigation Controller 410BT-000 | 410BT-075 | 410BT-100 | 410BT-150 | 410BT-200 I N S T R U C T I O N M A N U A L FCC certified | Bluetooth® certified | Waterproof | 3-year Limited Warranty
1. INTRODUCTION Thank you for purchasing DIG’s 410BT Single Station Battery Operated Controller. This manual describes how to get the 410BT series controller up and running quickly. After reading this manual and becoming familiar with the basic functionality of the controller, use the manual as a reference for less common tasks in the future. 2.
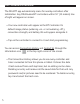
4. INSTALLING THE BATTERIES 1. Open the battery compartment cap by turning it counterclockwise. 2. Install two fresh, brand name, AA alkaline batteries (not included) and note the proper direction of the positive and negative orientation on the underside of the controller. 3. Insert and screw the battery cap clockwise. Make sure to securely tighten the cover firmly by hand only. The controller will now appear on the smartphone app and is ready to be connected to and programmed. 5.
counter clockwise 1/2 to 3/4 of a turn, or until you hear or see water flowing through the valve. To turn the water off, turn the solenoid clockwise 1/2 to 3/4 of a turn and wait a few seconds for the valve to close. 8. Program the 410BT series controller (see pages 4-12).
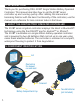
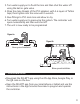
3. Turn water supply on to flush the line and then shut the water off using the ball or gate valve. 4. Wrap the male threads of the PVC adapters with 4-6 layers of Teflon tape, then tighten into the valve with a wrench. 5. Glue fittings to PVC main line and allow to dry. 6. Turn water supply on to pressurize the system. The controller will open momentarily and then will shut off. 7. The unit is now ready to be programmed Figure 6a flow Figure 6b Above-ground installation Below-ground installation 7.
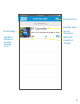
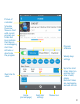
APP SCREENS OVERVIEW The DIG BTT app automatically scans for nearby controllers after installation. Any DIG Bluetooth® controllers within 50′ (15 meters) line of sight will appear on screen. • Your new controller will appear as the BT Controller. Its default image, status (watering -on- or not watering -off-), connection strength, and battery life will appear alongside it. • Tap on the controller to connect to it and start programming.
Information icon Controller name Default image Indicates if controller is currently runnning or not Last run information Battery life Connection strength 6
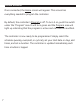
HOME SCREEN Once connected, the Home screen will appear. This screen has everything needed to program the controller. By default, the controller’s Program is off. To turn it on, push the switch under the “Program” area. It will turn green and the Program area will light up indicating that the program is active and can now be modified. The controller is now ready to be programmed. Simply select the schedule (weekly, even/odd, or cyclical), set your start date or days, add times, and set a duration.
Picture of controller Schedule Overview: Shows a chart with current program run times. Red lines indicate that there is an overlapping start time Program schedule Activate or deactivate the program Weekly days settings Up to five start times. Select an existing start time to edit/ delete.
CONTROLLER SETTINGS The controller’s Settings screen contains everything else needed to fully control your irrigation system. It can be reached by selecting the Controller Settings button on the bottom of the screen.
Turn the entire system on/off. Controller will not water when system is off Budgeting per month (affects duration only) View monthly watering history for the past 12 months Set a rain delay Set up to nine dates where the controller will prevent watering Set name of the controller Set picture for the controller Set password for controller. Password will only be seen when entering controller from a new phone.
MANUAL RUN The Manual Run screen allows for manual operation of the controller. It can be reached by selecting the Manual Run button on the bottom right of the screen. To manually run the controller, tap the button on the right of the screen. This button can also be used to stop any existing run. The default manual run time is for five minutes; this can be changed by tapping on the time and changing it. The controller can also manually run from the controller itself by tapping the water droplet button .
Set Manual Run duration Start/Stop Manual Run Manual Run 12
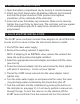
RESET TO FACTORY DEFAULTS • Press and hold the button on the 410BT for 15 seconds. This will remove all app settings, historical information, and any set passwords. This is the only way to remove a password so try not to forget it! TECHNICAL ASSISTANCE Should you encounter any problem(s) with this product or if you do not understand its many features, please refer to this operating manual first.
FCC This device complies with FCC and IC radiation exposure limits set forth for an uncontrolled environment. The device should be installed and operated with a minimum distance of 20cm between the radiator and your body. This device must not be collocated or operating in conjunction with any other antenna or transmitter. I. Changes or modifications not expressly approved by DIG Corporation could void the user’s authority to operate the equipment. II.
WARRANTY DIG CORPORATION warrants these products to be free from defects in material and workmanship for a period of three years from date of purchase. This warranty does not cover damage resulting from accident, indoor uses, misuse, neglect, modification, improper installation or subjection to line pressure more than 125 lbs. per square inch for anti-siphon valves, in-line valves and from an actuator. This warranty shall extend only to the original purchaser of the product for use by the purchaser.