
User's Manual
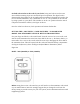

Set both code switches to the code of your choice, being sure both are set the same
since a different setting of just one switch will prevent operation. The digital code is
determined by the position of the 10 small switches numbered 1 through 10 located in the
receiver and the transmitter. Any combination of “on” or “off” positions can be selected
by using a pencil or a pen. (Note: The switches are in the “on” position when the switch
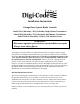
is depressed toward the number.) See Figure #3 above.
Once the codes have been set, check operation and reinsert the hatches.
SETTING THE ( “RECEIVER” ) CODE SWITCHES - TO WORK WITH
MODEL 5020 AND MODEL 5022 DUAL BUTTON TRANSMITTERS
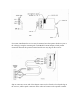
Use your finger to slide the “code switch hatch” from the receiver for access to the code
switch. On the transmitter the entire front lower half of the case ( “ the battery hatch” ) is
removeable. Use a coin or the curved end of the visor clip to disengage the lower half of
the transmitter front. This will expose both the code switch and the battery compartment.
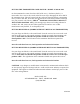
See Figure #3 (Receiver) above and Figure #4 (Dual Button Transmitter) below.
Figure #4
Model – 5020 (300mHz) or 5022 (310mHz)
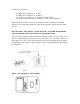
Before setting the receiver code switches, you will need to set the transmitter code switch
on your model 5020 or 5022. We strongly suggest that you change the code from the
factory setting to provide security for your own system, and to eliminate interference with
neighboring systems.