User Manual Professional Thermocouple Thermometer with Four Type K Inputs, Data Logging, and Optional Infrared Wand with NIST-Traceable Calibration Model 20250-20 Enter REC DIF THE STANDARD IN PRECISION MEASUREMENT
Introduction The Digi-Sense Professional Thermocouple Thermometer (Model 20250-20) with Four Type K Inputs, Data Logging, and Optional Infrared Wand offers fast response and high accuracy. This heavy-duty meter works with up to four type K thermocouples and one optional infrared probe*. Advanced features include data logging, USB interface, relative time clock, offset compensation, temperature differential, data Hold, Max/Min/Avg readings, and automatic power-off.
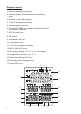
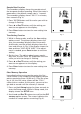
Meter Description 1. Thermocouple type K input (T1, T2, T3, T4) 2. LCD 3. Enter button 4. Up button 5. Rec/ button 6. °C/°F/K button 7. HOLD button 8. DIF/T1–T2–T3–T4 button 9. Power on/off button 10. MAX/MIN button 11. Setup / Backlight button 12. IR input* * Optional infrared wand (model 20250-24) must be ordered separately.
Display Layout 1. Primary temperature display 2. Tertiary display (IR temperature or recording time) 3. Min:Sec or Hour:Min display 4. T1 or T3 temperature display 5. Thermocouple type icon 6. Infrared IR TEMP icon (requires Optional IR wand sku number 20250-24) 7. SETUP mode icon 8. Offset icon 9. Auto power-off icon 10. Low-battery icon 11. T2 or T4 temperature display 12. MAX, MIN, AVG icons 13. Secondary display (T1, T2, T3, or T4 reading) 14. Temperature unit icons (K, °F, °C) 15.
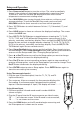
Setup and Operation 1. Press Power on/off button to turn the unit on. The value immediately shown is the number of data logging sample points remaining (from 10,000 to 0). After one second, the display will then switch to the temperature measurement reading mode. 2. Press MAX/MIN button to step through the maximum, minimum, and average readings. To exit the Max/Min/Avg mode, press and hold MAX/MIN button for three seconds to resume normal operation. 3.
Changing Setup Options Use the Setup mode to change offset, sample rate, time, clear data logging memory, and sleep mode settings. The thermometer stores the settings in its memory.
Sample Rate Function The secondary display shows the sample rate of the temperature data recording. When the meter is powered on, the default sample rate is 1 second. The secondary display shows “00 01” in minutes, then seconds (Fig. 2). 1. Press °C/°F/K button until the value you wish to change is flashing. 2. Press or Rec/ button until the setting you want to use appears on the display. 3. Press Enter button to store the new setting into memory. Time Setting Function Fig. 2 1.
Clear Memory Operation (Continued) 3. Press Enter button and “SURE No” will appear on the screen. 4. Press the or Rec/ button until the display shows “SURE YES”, indicating the memory will be cleared. 5. Press Enter button to select the “SURE YES” setting and clear the memory. Data logging capacity now returns to 10,000 sample points. Auto Power-Off (APO)/Sleep Mode The meter’s default mode is to automatically shut off after 20 minutes of non-use.
Viewing the MAX, MIN, and AVG Readings 1. Press MAX/MIN button to step through the maximum (MAX), minimum (MIN), and average (AVG) readings. The elapsed time since entering MAX/ MIN/AVG mode, or the time at which the minimum or maximum occurred, appears on the display. 2. Press and hold the MAX/MIN button for three seconds to exit the Max/Min/Avg mode and return to normal operation. Recording/Data Logging Operation (Meter) 1. Press Power on/off button to turn the unit on.
Recording/Data Logging Operation (Software) continued 6. In manual record mode, press and hold Rec/ button on the meter for three seconds until REC icon is indicated on the screen, indicating that recording function has been activated. Upon completion of desired data logging of measurements, press and hold Rec/ button for three seconds until REC icon disappears from the screen, indicating data logging has been deactivated. 7.
Specifications Range Temperature, external type K thermocouple –328 to 2501°F (–200 to 1372°C) Resolution Temperature display 0.1 (<1000) or 1 (≥1000) Accuracy T1, T2, T3, T4 ±[0.15% reading + 1.8°F (1°C)] above –148°F (–100°C) ±[0.5% reading + 3.6°F (2°C)] below –148°F (–100°C) T1–T2, T3–T4 ±[0.5% reading + 1.8°F (1°C)] IR temperature ±[2.0% reading + 3.6°F (2°C)] above 14°F (–10°C) ±9°F (5°C) below 14°F (–10°C) T1–IR, T2–IR, IR–T3, IR–T4 ±[2.0% reading + 5.
Maintenance, Recalibration, and Repair Cleaning and storage • The meter should be cleaned with a damp cloth and mild detergent when necessary. Do not use solvents or abrasives. • Store the meter in an area within the storage range indicated in the Specifications chart earlier in this manual. Battery Replacement When the battery power falls low, the low-battery icon will appear on the screen. Replace the 9 V battery in the rear battery compartment by removing the cover.