Vocal Harmony & Real-Time Pitch Correction for Guitarists Owner’s Manual
WARNING FOR YOUR PROTECTION READ THE FOLLOWING: KEEP THESE INSTRUCTIONS HEED ALL WARNINGS FOLLOW ALL INSTRUCTIONS The apparatus shall not be exposed to dripping or splashing liquid and no object filled with liquid, such as vases, shall be placed on the apparatus CLEAN ONLY WITH A DRY CLOTH. DO NOT BLOCK ANY OF THE VENTILATION OPENINGS. INSTALL IN ACCORDANCE WITH THE MANUFACTURER’S INSTRUCTIONS.
DECLARATION OF CONFORMITY Manufacturer’s Name: Manufacturer’s Address: declares that the product: Product name: Product option: Harman Music Group 8760 S. Sandy Parkway Sandy, Utah 84070, USA Vocalist® Live 3 all (requires Class II power adapter that conforms to the requirements of EN60065, EN60742, or equivalent.) conforms to the following Product Specifications: Safety: EMC: IEC 60065 (7th ed.
Warranty We at Vocalist® are very proud of our products and back up each one we sell with the following warranty: 1. The warranty registration card must be mailed within ten days after purchase date to validate this warranty. 2. Vocalist warrants this product, when used solely within the U.S., to be free from defects in materials and workmanship under normal use and service. 3.
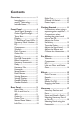
Contents Overview.............................. 1 Introduction...........................1 musIQ® Technology..............1 Included Items.......................3 Front Panel.......................... 4 Vocal Signal Strength............4 Guitar Signal Strength..........4 Tuner Bars..............................4 Display.....................................5 Flat/Sharp Tuner LEDs....5 Harmony Patch Number.....5 EQ............................................5 Compressor...........................5 Warmth.
Harmony Voicing...................18 Harmony Gender..................19 Harmony Mix.........................19 Humanize................................19 Harmony On/Off..................20 Setup Menu.......................... 21 Guitar Sensitivity...................21 Harmony Footswitch Mode........................................21 Chorus Depth.......................22 Chorus Speed........................22 Guitar Reverb Send Level...23 Noise Gate.............................23 Effects Block Diagram.......
Overview Introduction The Vocalist® Live 3 is a powerful but easy to use intelligent vocal harmony processor that automatically generates live multi-part vocal harmony by analyzing guitar chord progressions. Armed with the musIQ® harmony generation technology, the Vocalist Live 3 combines studio-quality audio performance, state of the art vocal processing and an easy to use control interface.
Vocalist® Live 3 Main Features • • • • • • • • • • • • • • • • • 2 Two voices of fully automatic harmony. Just play naturally on your guitar and musIQ® technology will ensure that the harmony voices are always musically correct. Gender controls for each harmony voice allow you to alter the character of the harmony voices. Humanize control to adjust the style of the harmony voices from loose to tight.
Included Items Before you get started, please ensure that the following items have been included: • • • • The Vocalist® Live 3 PS-0913B Power Adapter Owner’s Manual Warranty Card The utmost care was taken while your Vocalist Live 3 was being manufactured. Everything should be included and in perfect working order. If anything is missing, contact the factory at once. Please help us become acquainted with you and your needs by completing your warranty card or registering online at www.vocalistpro.com.
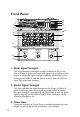
Front Panel 1 3 5 2 4 6 7 8 9 24 23 22 21 19 20 18 17 10 11 12 16 13 15 14 1. Vocal Signal Strength This light represents the signal strength of both the Mic In and Line In. When lit green, the vocal input signal is at a sufficient level. When lit amber, the signal strength is nearing the Vocalist Live 3’s limiting point. When lit red, the limiter is active and the Mic/Line Input Gain should be reduced. 2. Guitar Signal Strength This light indicates the signal strength at the Guitar In.
4. Display In Tuner mode this displays the note played on the guitar. In Setup Menu it is used to display the current value of the various parameters. 5. Flat/Sharp Tuner LEDs These LEDs light when using the Guitar Tuner to show what note is being played (example: F#). 6. Harmony Patch Number This indicates which of the five Harmony Patches is presently selected. Note that each Harmony Patch has two harmony settings: Part A and Part B. 7.
. Reverb This knob adjusts the amount of reverb that is applied to the vocals when the effects are enabled. If the Reverb button is pressed to send the guitar signal to the reverb then this knob also controls the amount of reverb on the guitar. The three buttons select the character of the reverb: Studio selects a standard studio plate reverb, Room selects a mediumsized room and Hall selects a large concert hall. 13.
17. Harmony Mix This adjusts the mix of the Harmony Voices with the Lead Voice at the outputs. With the knob fully counter-clockwise, only the Lead Voice is heard in the outputs with no Harmony Voices. With the knob fully clockwise, only the Harmony Voices will be heard at the outputs with no Lead Voice. 18. Humanize This adjusts the naturalness of the Harmony Voices. The intent is to make the harmonies sound more like real backup singers by introducing variations in the timing and pitch.
23. Gender Display The Gender Display indicates the currently selected gender for that voice. Note that when there are no bars lit on the Gender Display, the Gender setting is disabled for the corresponding Harmony Voice. 24. Gender Buttons Separate Gender settings can be applied to each of the two Harmony Voices. By pressing the Gender button of the corresponding Harmony Voice, you can cycle through the Gender shifts from Masculine (M) to Feminine (F).
Rear Panel 3 1 2 6 4 5 7 8 9 10 1. Input Gain This adjusts the input level of the Lead Vocal signal for both the Mic In and Line In. The relative signal strength can be determined by the Vocal Signal Strength indicator on the front panel. 2. Mic In and Line In The Vocalist Live 3 uses a combo jack for vocal input. This jack will accept either a balanced mic-level signal on the XLR portion of the jack or a line-level signal on the ¼″ portion of the jack.
4. Guitar In This ¼″ unbalanced TS Guitar In connects directly to the guitar for use by musIQ® harmony generation. Note: It is important for the Vocalist Live 3 to be the first device in the guitar signal chain to ensure proper analysis of the guitar signal for harmony generation. 5. Guitar Thru The guitar signal received on the Guitar In is passed through the ¼″ unbalanced TS Guitar Thru to connect to guitar effects and/or an amplifier. 6.
Getting Started The Vocalist Live 3 provides fully automatic vocal harmony for a guitar player. Simply route your guitar signal into Vocalist Live 3 using the Guitar In. The Vocalist Live 3 monitors what you are playing on the guitar and adjusts the harmonies to fit over the accompaniment. Connections when using a separate guitar amplifier When using a separate guitar amplifier, the Guitar Thru output provides a pass through for the guitar signal.
Connections when sending the guitar/vocal mix to the PA Often with an acoustic guitar it is convenient to provide a single output to the PA. The Vocalist Live 3 allows you to mix the guitar with the vocals and send the guitar/vocal mix to the PA via the XLR Outputs. This allows you total control of your sound from on-stage. The Vocalist Live 3 also provides the ability to add chorus and reverb to your guitar signal to fill out the sound. For a solo act it is no longer necessary to carry a mixer to the gig.
To set the Guitar Sensitivity Press the Setup button to enter Setup Mode. Follow the instructions on adjusting Setup parameters later in this manual. Tune the Guitar It is important for your guitar to be properly tuned in order for the musIQ® technology to generate the best sounding harmonies. Alternate tunings (for example, DADGAD or tuning down) are fine, as long as the built-in tuner shows each string as in tune. If you are using an external tuner, make sure that the tuner’s reference is set to 440 Hz.
Pre Effects The Vocalist® Live 3 contains a variety of pre effects to enhance your vocal sound. There are controls on the front panel to directly adjust the settings of the tube preamp model, the compressor and EQ. Warmth This controls the amount of warm subtle distortion from the tube preamp model, adding a degree of vintage tone. Compressor The Compressor gives the ability to tighten up the dynamic range of the Lead Voice.
Effects Pitch Correct This corrects the Lead Voice to a 12-note chromatic scale. Use the Amount knob to set the aggressiveness of the pitch correction. When the Pitch Correct button is lit, Pitch Correct is enabled. When the button is not lit, Pitch Correct is bypassed. Reverb There are three selectable room sizes for the Reverb effect. The active reverb type is indicated by the lit button. Studio Reverb simulates a studio plate reverb. Room Reverb a medium sized room, and Hall Reverb a large concert hall.
Effects On/Off Pressing the Effects footswitch will enable and disable the Pitch Correction, Chorus, Reverb and Delay Effects. It does not affect the Pre Effects which are always active. Engaging the Tuner The Effects Footswitch is also used to access the tuner. Press and hold the Effects footswitch to enable the Tuner. The Effects footswitch LED flashes and the guitar output is muted when the Tuner is active. To disable the Tuner, press the Effects footswitch.
Harmony Harmony Patches and Parts Singers need a way to configure different Harmony Voicings for use in different songs. To accommodate this, the Vocalist Live 3 provides five Harmony Patches. This allows the singer to specify the Harmony Voicing and Gender Settings in advance and recall them when needed during a performance. There are five harmony patches. Each harmony patch also has an A Part and a B Part.
Selecting Harmony Part A or Part B Pressing the Part A/B footswitch quickly will toggle between the A and B Part of the Harmony Patch. Selecting Patch using the Footswitch Pressing and holding the footswitch will slowly step the Vocalist Live 3 through the Harmony Patches. Release the footswitch when the desired Patch is reached. Harmony Voicing Each Voicing button sets the Voicing for one of the Harmony Voices by cycling through the Voicing options.
Harmony Gender The Vocalist ® Live 3 has the option of gender shifting the Harmony Voices to change the character of the virtual backup singers. There are individual Gender controls for each Harmony Voice. By pressing the Gender button of the corresponding Harmony Voice, you can cycle through the Gender shifts from Masculine (M) to Feminine (F) as indicated on the Gender Display.
Harmony On/Off This footswitch turns the Harmony Voices on and off. When the footswitch LED is lit, the Harmony Voices are enabled. When the footswitch LED is off, the Harmony Voices are bypassed.
Setup Menu A Setup Menu has been added to allow additional control of some global settings. To enter the Setup Menu simply press the Setup Button. Once in the Setup Menu the Setup button allows you to step through menu items and the - (Patch) and + (Voicing) buttons adjust the parameter values. A long press of the Setup button will exit the Setup Menu. Alternatively, once you cycle past the last menu item you will leave Setup. Guitar Sensitivity 'UITAR Press Setup until s appears in the Display.
on only as long as the footswitch is held. Once it is released, the Harmony Voicings are bypassed. Select the desired mode using the +/- buttons. Low-cut Filter On/Off 'UITAR 6OCAL LC 'UITAR 6OCAL on 'UITAR 6OCAL OF Press Setup until LC appears in the Display. This is the Low Cut filter setup menu that lets you turn the 75 Hz Low Cut (ARMONY 0ATCH filter on or off.
Chorus Speed 'UITAR 6OCAL CS 'UITAR 6OCAL 4 Press Setup until CS appears in the Display. This is the Chorus Speed setup menu. (ARMONY 0ATCH - & /CTAVE (IGHER (IGH $OUBLE ,OW ,OWER "ASS - & The CS will disappear after a second and a number from 1 to 10 will appear showing the (ARMONY 0ATCH current Chorus Speed. Select the desired Chorus Speed using the +/- buttons. - & /CTAVE (IGHER (IGH $OUBLE ,OW ,OWER "ASS - & Guitar Reverb Send Level Press Setup until r appears in the Display.
Effects Block Diagram Vocal Input Low Cut (setup menu) (setup menu) Compressor Limiter Delay Time Delay Noise Gate Warmth EQ Low EQ High Pitch Correct Harmony Voice 1 Harmony Mix Harmony Voice 2 Short Med Long Output Mixer Reverb Studio Room Reverb Hall Reverb Send Level Guitar Level (setup menu) Chorus Guitar Input Chorus Factory Restore In order to restore the patches and settings to their factory defaults follow these steps. 1. Make sure the Vocalist Live 3 is powered off. 2.
Specifications Mic Preamp Connector: Input Sensitivity @ -4dBFS: Equivalent Input Noise (EIN): Input Impedance: Line Input Connector: Input Sensitivity @ -4dBFS: Input Impedance: ¼″ TRS balanced / unbalanced -13 dBu to +22 dBu 14.6 kΩ balanced, 8.
8760 South Sandy Parkway Sandy, Utah 84070 PH (801) 566-8800 FAX (801) 566-7005 Vocalist® Live 3 Owner’s Manual 18-0685-A ©2009 Harman International Industries, Incorporated, all rights reserved. Vocalist is a registered trademark of Harman International Industries, Inc. musIQ® is a registered trademark of 3dB Research Ltd.