
Specifications


Table Of Contents
- About This Manual
- 1.0 Introduction
- 2.0 Installation
- 3.0 Configuration Settings
- 4.0 Calibration
- 5.0 Scale Operations
- 5.1 Weight Unit Switching
- 5.2 Entering Tare Weights
- 5.2.1 One-Touch Tare, Tare Unknown
- 5.2.2 Digital Tare, Tare Weight Known
- 5.2.3 Tare Addition or Subtraction
- 5.2.4 Tare Exchange
- 5.3 Toggling Between Gross and Net
- 5.4 Entering Unit Weights
- 5.4.1 Unit Weight Operation by Sampling
- 5.4.2 Unit Weight Operation by Key Entry
- 5.5 Part Accumulation and Negative Counting - Without Recalling an Item Code
- 5.5.1 Part Accumulation
- 5.5.2 Negative Counting
- 5.5.3 Clearing Accumulated Data
- 5.6 Toggle Between Scales
- 5.7 Adding Parts To and Subtracting Parts From Inventory
- 5.7.1 Adding Parts to Inventory
- 5.7.2 Subtracting Parts From Inventory
- 5.7.3 Sample, Count and Print a Label
- 5.7.4 Scan ID Bar Code, Count and Print a Label
- 6.0 Scale Programming
- 6.1 Item Code Storage
- 6.1.1 Checking Memory Status
- 6.1.2 Program ID Code, Unit Weight, Tare Weight, Label Format, Part Name, Part Number, Lot Number, Location, Inventory Quantity, Threshold, and Setpoints
- 6.1.3 Delete Item Memory
- 6.2 Using Item Codes in Normal or Operation Mode
- 6.2.1 Recalling Numeric Item Codes using Item Code Number
- 6.2.2 Re-Computing Item Code Unit Weight
- 6.2.3 Quick Add Item to Memory
- 6.2.4 Tare Override
- 6.2.5 Inventory Operations Related to the Item Code Quantity
- 6.2.6 Delete Item Memory
- 6.3 Setting Tare in Operation Mode
- 6.3.1 One Touch Tare
- 6.3.2 Digital Tare (When Tare Weight is Known in Advance)
- 6.3.3 Tare Value Exchange (Tare Addition or Subtraction)
- 6.4 Setting a Lot Number
- 6.5 Setting a Sequence Number
- 7.0 External Printers, Barcode Scanners, Keyboards and Platforms
- 7.1 Connecting External Printers
- 7.1.1 SPEC Settings for External Printers
- 7.1.2 Connecting the Printer to the RS-232C Port
- 7.1.3 Eltron Printers
- 7.1.4 Epson Printers
- 7.2 Connecting a Barcode Scanner
- 7.2.1 Header Codes
- 7.2.2 Z Commands via Barcodes
- 7.2.3 Configuring the RS232C Port for a Scanner
- 7.2.4 Connecting the Scanner to the RS232C Port
- 7.2.5 Configuring the Keyboard Port for a Scanner
- 7.2.6 Programming the QSC-6000 Plus Quickscan RS232C Scanner
- 7.2.7 Programming the QuickScan Keyboard Wedge Scanner
- 7.3 Connecting the IBM Keyboard
- 7.4 Connecting an External Platform
- 8.0 Job Sequence Programming
- 9.0 Password Protecting the Programming Functions
- 10.0 DC-100 Error Message List
- 11.0 DC-100 Limited Warranty
External Printers, Barcode Scanners, Keyboards and Platforms 45
7.1.3 Eltron Printers
The DC-100 includes a pre-programmed format that works with Eltron printers and printers that emulate the
Eltron
Use the following steps to hook up the Eltron printer to the DC-100 scale.
1. Make sure that the following DC-100 SPEC codes are properly set for printing to the Eltron printer (or a
printer emulating the Eltron) as an external printer.
• Set SPEC 62 - RS232 - XON/XOFF to 1:Enable. This turns on the handshaking between the scale and
printer that allows that label format in the DC-100 to be downloaded to the Eltron printer at the time you
print.
• Set SPEC 15 - SIO Select Job to 3:Printer. then check to make sure that SPEC 16 - RS232C Baud Rate,
SPEC 17 - RS232C Data Length, SPEC 18 - RS232C Parity Bit, and SPEC 19 - RS232C Stop Bit are set
to their default values of 9600 baud, 8 bit data length, parity - none, and 1 stop bit.
• Set SPEC 31 - PC/PRN Output Data Method to the conditions on which you want data to be sent to the
printer.
• Set SPEC 32 - Select External Printer type to 0:Eltron LP2622/LP2722.
• Set SPEC 33 - External Eltron/TVP Printer Download Label Format to 0:Enable.
• Set SPEC 34 - Print When Press +/- key to 0:Disable or 1:Enable depending on how you want that feature
to work.
2. After making sure that the power is off on both the Eltron printer and the DC-100 scale, connect the
cable from the scale to the printer.
3. Turn the scale and printer on again.
4. With the DC-100 in weighing mode, perform a weighing or counting operation and press the REPRINT
button on the scale to test print a label.
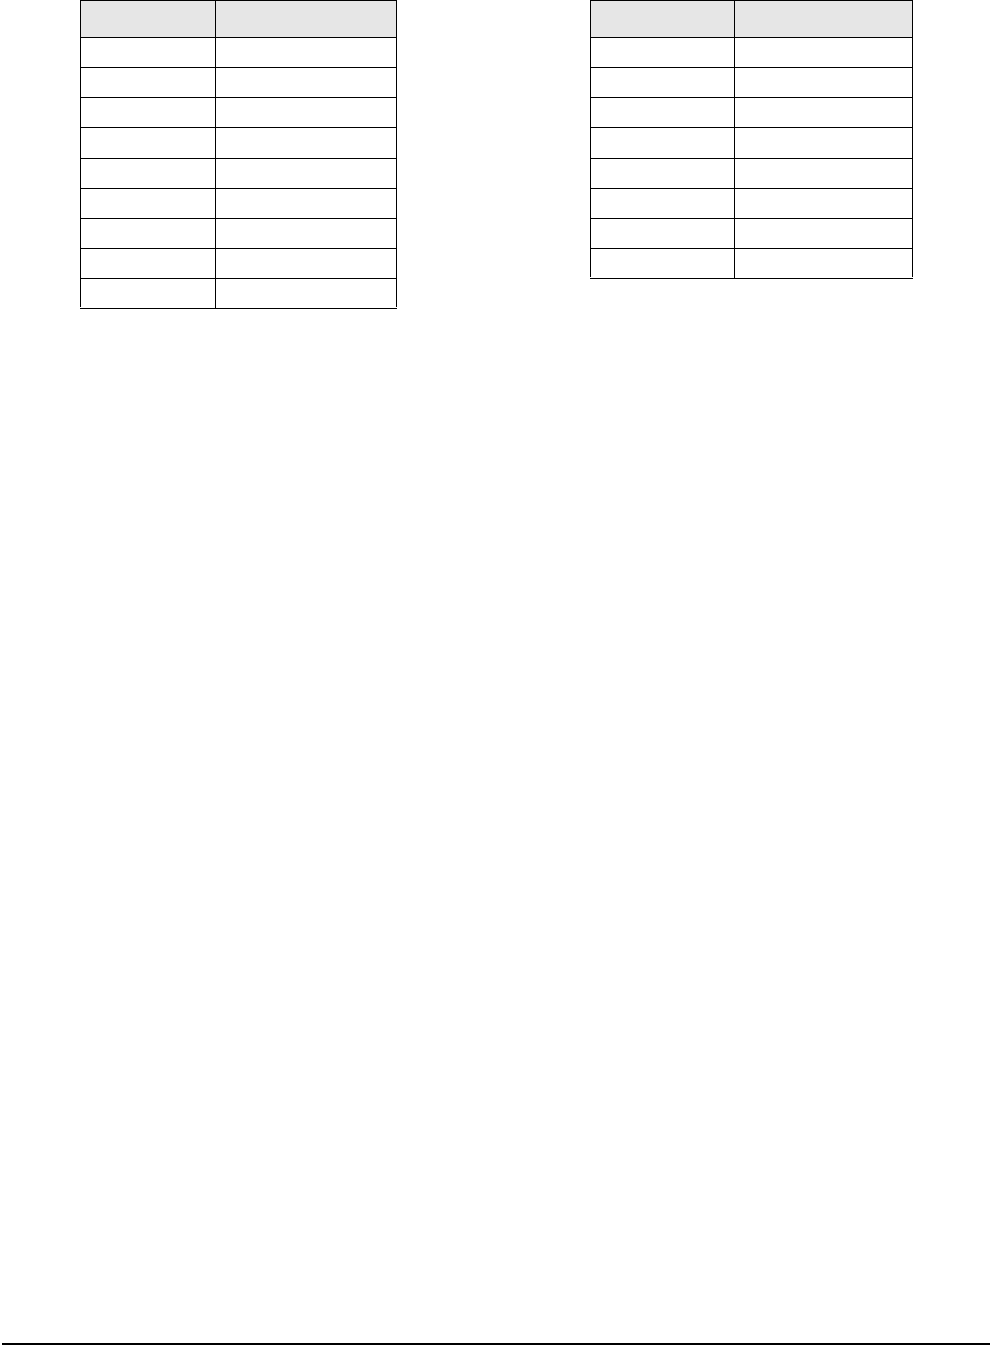
Pin Number Description
1
2 RXD
3 TXD
4
5 GND
6
7 RTS
8 CTS
9
Table 7-1. Nine-Pin DIN Connector - External Printer
Pin Number Description
1 CTS
2 GND
3 DSR
4 RXD
5 TXD
6 DTR
7 RTS
8 Vcc
Table 7-2. Eight-Pin DIN Connector - DC-100