
Specifications
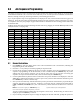


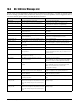


Table Of Contents
- About This Manual
- 1.0 Introduction
- 2.0 Installation
- 3.0 Configuration Settings
- 4.0 Calibration
- 5.0 Scale Operations
- 5.1 Weight Unit Switching
- 5.2 Entering Tare Weights
- 5.2.1 One-Touch Tare, Tare Unknown
- 5.2.2 Digital Tare, Tare Weight Known
- 5.2.3 Tare Addition or Subtraction
- 5.2.4 Tare Exchange
- 5.3 Toggling Between Gross and Net
- 5.4 Entering Unit Weights
- 5.4.1 Unit Weight Operation by Sampling
- 5.4.2 Unit Weight Operation by Key Entry
- 5.5 Part Accumulation and Negative Counting - Without Recalling an Item Code
- 5.5.1 Part Accumulation
- 5.5.2 Negative Counting
- 5.5.3 Clearing Accumulated Data
- 5.6 Toggle Between Scales
- 5.7 Adding Parts To and Subtracting Parts From Inventory
- 5.7.1 Adding Parts to Inventory
- 5.7.2 Subtracting Parts From Inventory
- 5.7.3 Sample, Count and Print a Label
- 5.7.4 Scan ID Bar Code, Count and Print a Label
- 6.0 Scale Programming
- 6.1 Item Code Storage
- 6.1.1 Checking Memory Status
- 6.1.2 Program ID Code, Unit Weight, Tare Weight, Label Format, Part Name, Part Number, Lot Number, Location, Inventory Quantity, Threshold, and Setpoints
- 6.1.3 Delete Item Memory
- 6.2 Using Item Codes in Normal or Operation Mode
- 6.2.1 Recalling Numeric Item Codes using Item Code Number
- 6.2.2 Re-Computing Item Code Unit Weight
- 6.2.3 Quick Add Item to Memory
- 6.2.4 Tare Override
- 6.2.5 Inventory Operations Related to the Item Code Quantity
- 6.2.6 Delete Item Memory
- 6.3 Setting Tare in Operation Mode
- 6.3.1 One Touch Tare
- 6.3.2 Digital Tare (When Tare Weight is Known in Advance)
- 6.3.3 Tare Value Exchange (Tare Addition or Subtraction)
- 6.4 Setting a Lot Number
- 6.5 Setting a Sequence Number
- 7.0 External Printers, Barcode Scanners, Keyboards and Platforms
- 7.1 Connecting External Printers
- 7.1.1 SPEC Settings for External Printers
- 7.1.2 Connecting the Printer to the RS-232C Port
- 7.1.3 Eltron Printers
- 7.1.4 Epson Printers
- 7.2 Connecting a Barcode Scanner
- 7.2.1 Header Codes
- 7.2.2 Z Commands via Barcodes
- 7.2.3 Configuring the RS232C Port for a Scanner
- 7.2.4 Connecting the Scanner to the RS232C Port
- 7.2.5 Configuring the Keyboard Port for a Scanner
- 7.2.6 Programming the QSC-6000 Plus Quickscan RS232C Scanner
- 7.2.7 Programming the QuickScan Keyboard Wedge Scanner
- 7.3 Connecting the IBM Keyboard
- 7.4 Connecting an External Platform
- 8.0 Job Sequence Programming
- 9.0 Password Protecting the Programming Functions
- 10.0 DC-100 Error Message List
- 11.0 DC-100 Limited Warranty
Job Sequence Programming 57
8.0 Job Sequence Programming
The ability to program a series of instructions for the operators that appear on the display is one of the most
useful features of the DC-100. The scale can be made easy to use even for operators not familiar with all of its
features, ensuring accuracy by increasing consistency and avoiding operator error.
Up to 10 job sequence steps can be programmed to be displayed in order, with each instruction having up to 22
characters. Since this screen does not automatically display how many characters remain in the line as you enter,
it is helpful to write out your prompts on paper ahead of time to determine the best wording possible within the
22 character limit.
Prompts can be entered by using the following Teraoka codes or by plugging an external IBM keyboard into the
scale (
See Section 7.3 on page 54).
Table 8-1. Teraoka Codes
Note: For the job sequence prompts to appear on the display, SPEC 13 – JOB SEQUENCE must be set to “1: ENABLE”.
8.1 General Instructions
1. Press MODE key until the display shows ITEM CODE PROGRAMMING. The S annunciator, indicating the
Programming mode, will illuminate
2. Press the + or - key until you reach the program job sequence mode.
3. Choose the job sequence number for the step you want to program. If you are programming a new job
sequence or programming one for the first time, to enter a
1 followed by the * REPRINT key. If you are
adding steps to an existing sequence you can start at a later step. (Ex. If you have an existing job
sequence of 5 steps and want to add a sixth, enter a 6 followed by the * REPRINT key.)
4. Use the alphanumeric keyboard to enter an instruction of up to 22 characters to be displayed. Press the
SHIFT UP key followed by the Q key to insert a space. Once you have entered the first instruction, press
the * REPRINT key to move to the next step.
5. Next you can associate a key with the instruction you have just entered. When this key is pressed the job
sequence will advance to the next step. If the key you choose also has a function associated with it
(
TARE, * REPRINT, UNIT WEIGHT, etc.), the scale will carry out that function and then move to the next
step.
Note: Do not use the + (plus) or * REPRINT keys to
move to the next job sequence step unless you want
to print a label as part of the operation.
You can scroll through the available keys by using the << and >> keys. When the key you want to use is
displayed, press the
CODE key to store it.
6. If you want the job sequence steps to no longer be displayed at the end of the task, prompt the operator to
SPACE A B C D E F G H I
00 01 02 03 04 05 06 07 08 09
J K L M N O P Q R S
10 11 12 13 14 15 16 17 18 19
T U V W X Y Z , . -
20 21 22 23 24 25 26 27 28 29
0 1 2 3 4 5 6 7 8 9
30 31 32 33 34 35 36 37 38 39
@ ! “ # $ % & / ( )
40 41 42 42 44 45 46 47 48 49
‘ < > + : * À Â È Ê
50 58 59 69 72 73 77 78 79 80
É Ô Ç ? → ←
81 82 83 96 97 98