
Owner's manual


SD7 - Getting Started
1-3
1.3.2 Layers and Banks .................................................................
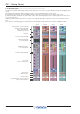
The SD7's worksurface is divided into Layers and Banks. Each Bank contains twelve channels, and the channels which are
currently active on the control surface are defined using the fader bank and bank layer buttons to the right of the Channel Strip
section’s faders:
A ‘bank’ is a set of twelve faders, and a ‘layer’ contains up to six ‘banks’. There are up to 3 ‘layers’ in each section of the desk,
allowing up to 216 channels to be accessible on each worksurface section.
Pressing the bank layer button, located above the fader bank buttons, toggles between layers.
To access a bank of faders within that layer, press the appropriate fader bank button. To switch all three sections of the
console to the same bank level, press and hold one of the fader bank buttons.
The specific channels which are contained within each Bank is defined in the Layout > Fader Banks display. By default, the
Input channels will be assigned to Layer 1 on the left and right sections of the console. The different output channels will be
assigned to Layer 2 and also to the upper centre section. Control Groups will be assigned to the lower centre section. These bank
assignments can be customised by the user and saved in a session at any time. Holding any bank or layer button down for a
couple of seconds will switch all 3 worksurface sections to the same bank level or layer.
1.3.3 Using the Control Surface ....................................................
There are two main ways in which all of the functions of the SD7 are accessed:
1. The touchscreen display, which can be controlled directly using a finger, or by using the keyboard and mouse
2. The physical encoders, switches and faders.
Note that when touching the screen directly, you may find it easier to use a finer point than your finger.
However, in order to prevent damage to the screen, it is important that you only use devices specifically
designed for touching screens (such as a pda stylus), and that you never press down hard on the screen.
A number of functions can be accessed in different ways, allowing users to operate the console using whichever interface they
prefer. This manual will describe accessing on-screen functions by touching the screen directly and not by using the mouse.
All of the physical controls found in the centre section are described in full within the relevant section of the manual and many
require no further introduction.
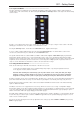
The Master screen has a row of grey buttons accross the top, which are used to access a range of configuration displays.
Pressing these buttons opens either a further drop-down sub-menu or a pop-up display. If a drop-down menu is opened, pressing
on one of its entries will open a pop-up display. The buttons lighten to indicate that their sub-menu or pop-up display is open. A
number of the buttons within each pop-up display generate further pop-ups.
Generallly, buttons within the pop-ups are coloured grey when their function is inactive, switching to a colour when their function
is active. Pressing on a text box opens a numeric or QWERTY keypad which can be operated directly by pressing the screen or
via the console’s external keyboard.
Pop-ups are closed by pressing the box in the top right-hand corner of the pop-up, marked CLOSE or CANCEL (or by pressing
CAN on keypad pop-ups).